
Getting Started#
Basic Concept#
In a CI/CD environment, source code changes are followed by building and testing, after which the generated package is deployed to the next environment.
For example, an application package generated on the build server can first be delivered to a test server and, after verification is complete, deployed sequentially to staging and production servers.
If files are copied directly to each server or separate deployment scripts are run during this process, you may need to check which build artifact was delivered to which server and whether deployment of the previous stage was completed.
With INNORIX Flow, artifacts can be transferred automatically based on the build completion event, connecting deployment across test, staging, and production environments in a single Flow.
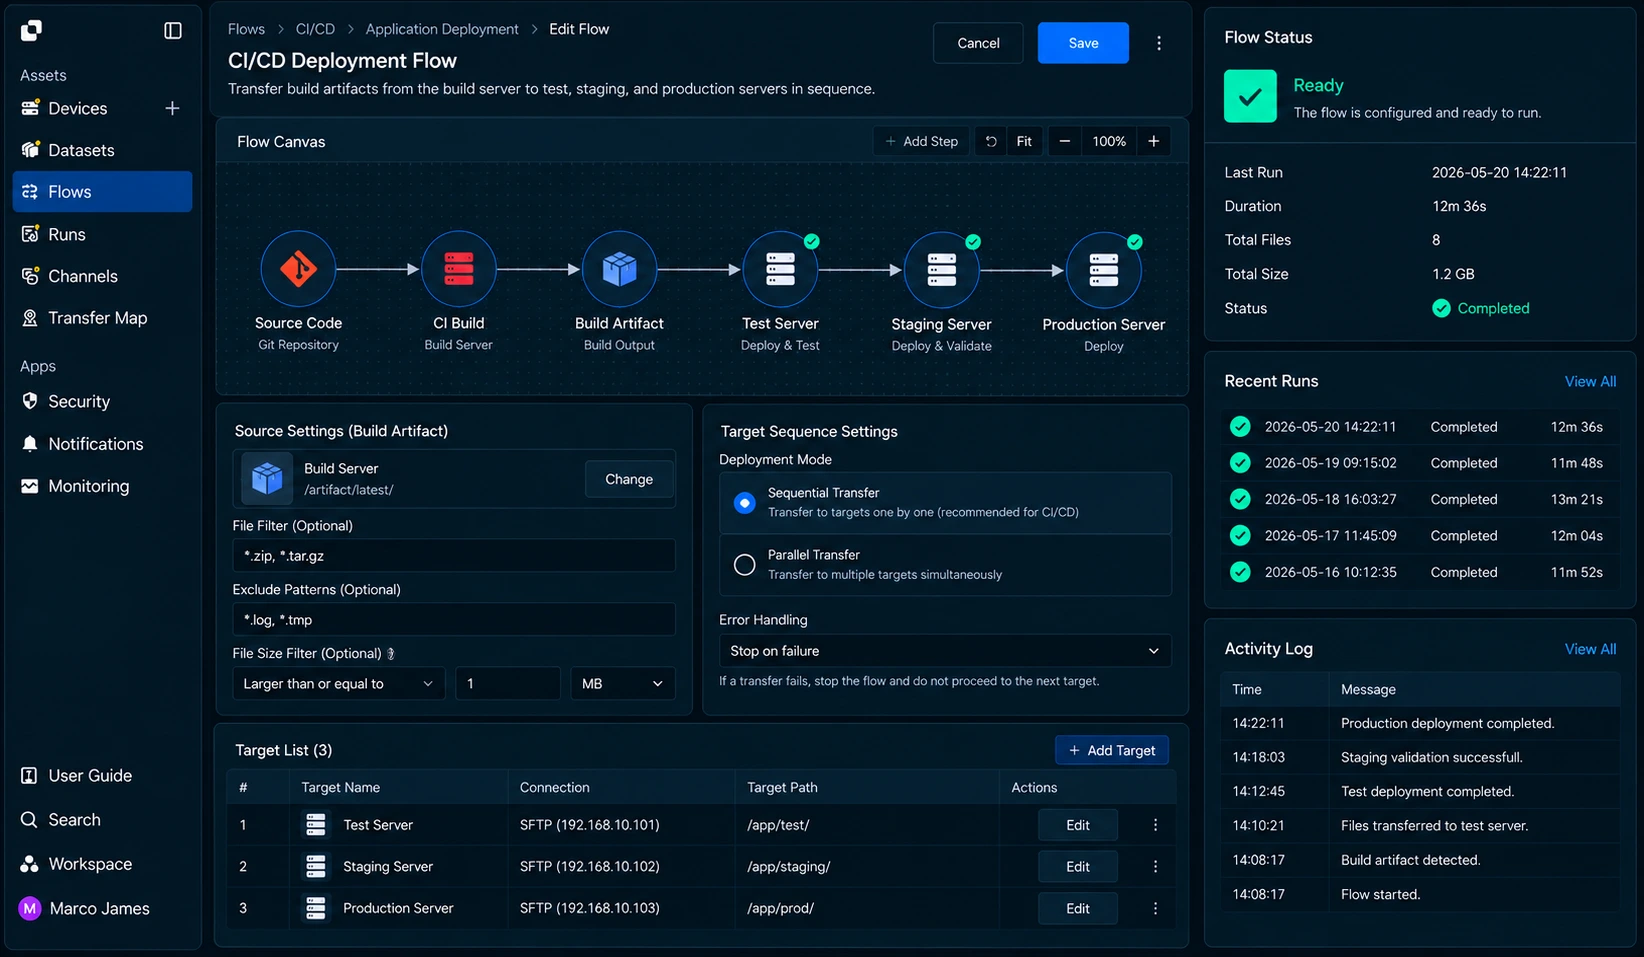
This configuration lets you manage a file deployment flow covering build complete → check artifacts → test deployment → verification → staging deployment → production deployment → verify results.
Environment Flow#
In CI/CD deployment, files may sometimes be delivered to all servers simultaneously, but deployment to the next environment commonly occurs after checking the results from the previous environment.
For example, a new package can be delivered to a test server, automated tests can run, and the package can then be delivered to the staging environment after the results are confirmed.
Each environment can therefore be connected not simply as a file storage location, but as a process that determines the execution condition for the next deployment stage.
| Deployment Environment | Primary Role | Next Stage |
|---|---|---|
| Test | Check and test build artifacts | Staging deployment |
| Staging | Pre-production environment verification | Production deployment |
| Production | Apply to live service environment | Verify results |
| Archive | Store build artifacts | Redeploy when needed |
By configuring the deployment flow in stages, if an environment requires additional review, subsequent operations can be managed based on that stage's results instead of proceeding immediately to the next stage.
Deployment Files#
A completed build may generate not only one package but multiple artifacts, including application files, configuration files, and deployment scripts.
You can therefore select only the files required for actual deployment and deliver the files needed for each environment separately.
build-output/package/application-v2.5.0.tarTARconfig/application.yamlYAMLlogging.yamlYAMLscripts/deploy.shSHmetadata/build-info.jsonJSON
| File Type | Usage |
|---|---|
| Application package | Executable files to deploy to the server |
| Configuration files | Configure execution conditions by environment |
| Deployment script | Connect follow-up operations after files are applied |
| Build information | Check version and build results |
| Temporary files | Exclude from deployment targets |
By setting the transfer scope according to the build artifact structure, only the files required for actual deployment can be delivered to each server environment.
IT Engineer#
Source Configuration#
First, connect the artifacts generated by the CI system or build server as the Source.
When the build completes, the next deployment operation can start based on the package generated in the specified output path.
Configure the file scope to use for deployment on the Source.
| Configuration Item | Setting |
|---|---|
| Source | System where CI or build artifacts are generated |
| Source Path | Path where the package is stored |
| File conditions | Extension and file-name criteria |
| Version criteria | Separate files by build number or version |
| Exclusion conditions | Exclude temporary files and files from previous operations |
For example, the next deployment operation can be configured to run based on the latest .tar or .zip file generated in /var/build/releases.
Execution Connection#
Artifact delivery can start not only when a file is created but also based on the completion result of a CI job.
Instead of transferring incomplete artifacts generated by a failed build, the deployment Flow can be configured to run only after the required build operation completes successfully.

Execution conditions can be configured differently depending on the deployment method.
| Execution Condition | Usage |
|---|---|
| Build Complete | Start deployment after build completion |
| After Transfer | Run after the previous file operation completes |
| File Ready | Run when artifacts are ready at the specified path |
| Date/Time | Deploy at a specified time |
| Manual Run | Deploy manually after checking results |
| URL Request | Run from an external request by the CI system |
This preserves the existing CI/CD Pipeline execution structure while connecting only the file deployment stage as a separate managed Flow.
Staged Deployment#
The test, staging, and production environments do not all need to be configured identically.
For example, a package can be delivered automatically to the test server immediately after the build completes, while staging and production servers can be deployed sequentially based on the verification results from the previous stage.

Each environment can serve as a criterion for starting the next operation.
| Deployment Stage | Execution Criteria | Deployment Purpose |
|---|---|---|
| Test | Build complete | Prepare automated test environment |
| Staging | Test results confirmed | Pre-production verification |
| Production | Staging confirmed | Apply to live service |
This configuration moves a build artifact to the next environment only after the required verification stages instead of applying it to all servers simultaneously.
Environment Branching#
In some cases, one build artifact may need to be deployed simultaneously to multiple test or staging servers.
For example, when validating the same package across multiple test environments with different operating systems or server roles, the deployment path can branch from one Source to multiple Targets.

In this case, deployment results for each server can be checked individually.
For example, if Test-A and Test-B complete successfully but Test-C requires additional verification of the file application status, both the overall deployment results and the status of the specific Target can be checked.
Version Management#
Rather than overwriting the same file with every deployment, build artifacts can be separated by version or build number.
For example, including the CI-generated build number in the file name or storage path makes it easier to identify which artifact was deployed to which environment.
| Management Criteria | Usage |
|---|---|
| Build Number | Separate files by CI execution result |
| Version | Deploy by application version |
| Environment | Separate Test, Staging, Production paths |
| Release Date | Manage results by deployment time |
| Project | Separate artifacts by project |
| This makes it possible to configure operations around the required files when redeploying a specific package version or reviewing previous build results. |
Follow-up Execution#
After files are delivered to the server, deployment results can be checked and the required next operation can be connected.
For example, a deployment script can run after a package is successfully applied to the test server, or validation can begin after file application completes across all test environments.

Follow-up operations can be determined by the current deployment result.
| Current Result | Next Operation |
|---|---|
| Files applied | Run deployment or validation operation |
| All targets complete | Start deployment to next environment |
| Some targets failed | Check affected server status |
| File verification required | Check package or files |
| Deployment complete | Record or notify operational results |
This allows the next deployment stage to continue based on the server's file application results instead of running the next operation separately after file delivery.
Verify Results#
When deployment runs, check the build artifact transfer status and processing results by environment in Runs.
Even when test, staging, and production environments are connected in a single deployment flow, each Target result can be viewed separately to determine which servers received the files successfully.

The following items can be checked in the execution results.
| Item | Details |
|---|---|
| Source | System and path where the build artifact was generated |
| Target | Server that received the package |
| Build | Deployed build number or version |
| Total Files | Number of files to process |
| Total Size | Total deployment file size |
| Progress | Current deployment progress |
| Status | Execution status by environment |
| Started | Deployment start time |
| Completed | Deployment completion time |
Selecting a specific Run shows the file-processing results and execution status for that deployment stage.
This allows the complete deployment flow and stage-by-stage results to be managed in one interface instead of checking deployment results in each server's logs.
Failure Handling#
If a build artifact is not applied successfully to a specific server or environment, use the Run details to identify the affected stage and file-processing status.
For example, if the test server completes successfully but a specific staging server cannot save files, check that Target's connection status, path, and access permissions.
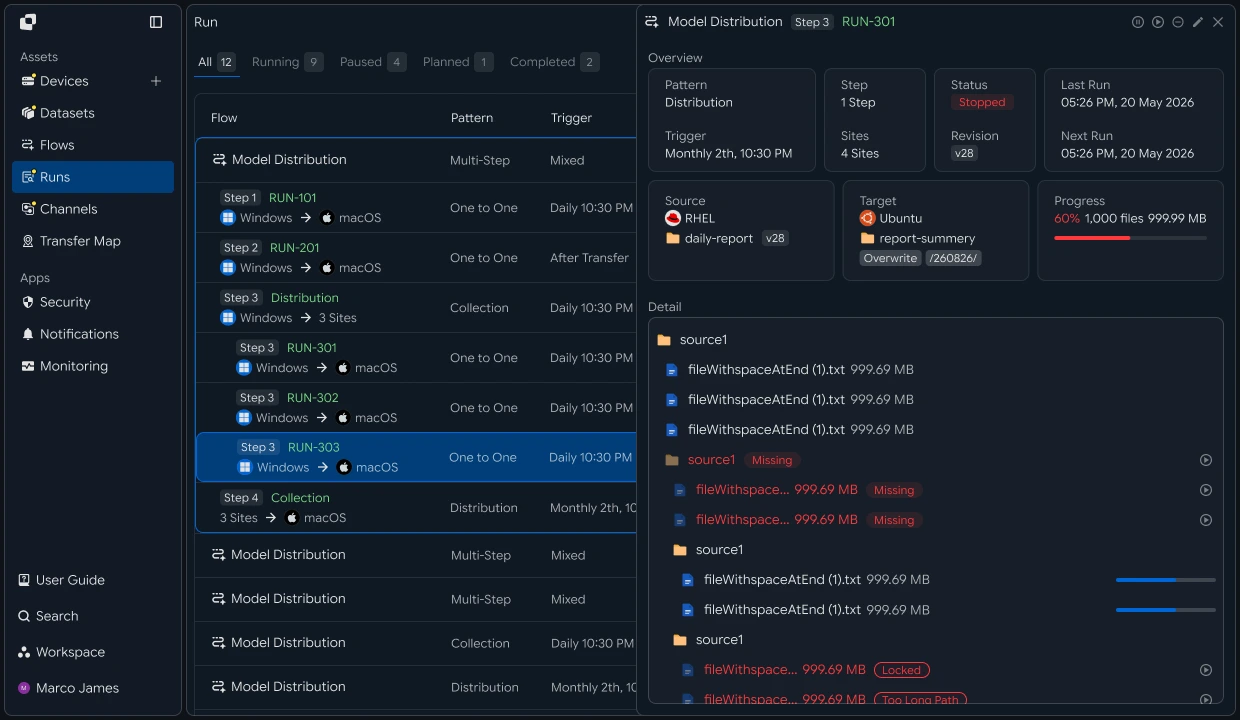
After resolving the issue, rerun the required operations for the deployment stage and Targets that need additional verification instead of restarting the entire CI build process.
After rerunning, use the new Run to verify that the build artifact was successfully applied to the specified server and, if required, continue deployment to the next environment.
This process creates a CI/CD file deployment flow covering CI build complete → prepare artifacts → Test deployment → environment verification → Staging deployment → Production deployment → verify results → handle failed stages.
The build system handles code changes and build operations, while INNORIX Flow manages delivery of generated artifacts to each server environment, allowing you to connect post-build file deployment by environment and stage while managing the overall CI/CD operational flow more clearly.
Developer#
Deploy build artifacts to test, staging, and production in stages
Register the build server and each environment server as Devices, then create staged transfers from the CI step and proceed to the next stage only on success. Prepare the following before starting.
| Prerequisite | Details |
|---|---|
| INNORIX authentication | INNORIX_ACCESS_TOKEN (Authorization: Bearer) |
| Source device | Build server device ID and artifact path (e.g. /build/out/2.14.0) |
| Target devices | Device IDs and deployment paths for test, staging, prod servers |
| Runtime | Python 3 + requests, Java 17+, Node.js 18+, .NET 8+ |
Python and Node.js reuse the minimal
api()helper for direct REST calls and status constants (STATUS_COMPLETEandTERMINAL) from the API Call Recipe. Java and C# use the bundledInnorixClient(including constants) andJsonhelper (Jfor C#). Replace device identifiers and paths with actual values.
Staged Gated Deployment#
Deploy the list of stages in order and proceed only when each stage succeeds (terminal status = complete). If a stage fails, stop at that stage and return the failure.
import time


def deploy_stage(source, source_path, target, target_path):
    transfer = api("POST", "/api/transfers/manual", {
        "sourceDevice": source,
        "targetDevice": target,
        "targetPath": target_path,
        "sourcePaths": [source_path],
        "sendAllFolder": True,
        "checkIntegrity": True,
        "transferOptions": {"target-action": "overwrite"},
    })
    detail = wait_transfer(transfer["monitorId"])
    return detail.get("status") == STATUS_COMPLETE


def deploy_pipeline(source, source_path, stages):
    # stages: [(target, target_path), ...] gated in order
    for target, target_path in stages:
        ok = deploy_stage(source, source_path, target, target_path)
        print(f"{target}: {'done' if ok else 'failed'}")
        if not ok:
            return target   # return the failed step
    return None   # all stages succeeded


def wait_transfer(monitor_id, timeout=7200, interval=5):
    deadline = time.time() + timeout
    while time.time() < deadline:
        detail = api("GET", f"/api/transfers/{monitor_id}") or {}
        if detail.get("status") in TERMINAL:
            return detail
        time.sleep(interval)
    raise TimeoutError(monitor_id)


failed = deploy_pipeline("build-src", "/build/out/2.14.0", [
    ("test-01", "/opt/app"),
    ("staging-01", "/opt/app"),
    ("prod-01", "/opt/app"),
])
print("deploy result:", "all stages succeeded" if failed is None else f"{failed} stopped at stage")
static boolean deployStage(InnorixClient client, String source, String sourcePath,
String target, String targetPath) throws InterruptedException {
Map<String, Object> transfer = client.apiObj("POST", "/api/transfers/manual", Json.newObj(
"sourceDevice", source,
"targetDevice", target,
"targetPath", targetPath,
"sourcePaths", List.of(sourcePath),
"sendAllFolder", true,
"checkIntegrity", true,
"transferOptions", Json.newObj("target-action", "overwrite")), null);
Map<String, Object> detail = waitTransfer(client, Json.str(transfer, "monitorId"), 7200, 5);
Integer status = Json.intOrNull(detail, "status");
return status != null && status == InnorixClient.STATUS_COMPLETE;
}
static String deployPipeline(InnorixClient client, String source, String sourcePath,
List<String[]> stages) throws InterruptedException {
for (String[] stage : stages) { // stage = {target, targetPath}
boolean ok = deployStage(client, source, sourcePath, stage[0], stage[1]);
System.out.println(stage[0] + ": " + (ok ? "done" : "failed"));
if (!ok) return stage[0];
}
return null;
}
static Map<String, Object> waitTransfer(InnorixClient client, String monitorId,
long timeoutSec, long intervalSec) throws InterruptedException {
long deadline = System.currentTimeMillis() + timeoutSec * 1000;
while (System.currentTimeMillis() < deadline) {
Map<String, Object> detail = client.apiObj("GET", "/api/transfers/" + monitorId, null, null);
Integer status = Json.intOrNull(detail, "status");
if (status != null && InnorixClient.TERMINAL.contains(status))
return detail;
Thread.sleep(intervalSec * 1000);
}
throw new RuntimeException("timeout: " + monitorId);
}async function deployStage(source, sourcePath, target, targetPath) {
const transfer = await api("POST", "/api/transfers/manual", {
sourceDevice: source,
targetDevice: target,
targetPath,
sourcePaths: [sourcePath],
sendAllFolder: true,
checkIntegrity: true,
transferOptions: { "target-action": "overwrite" },
});
const detail = await waitTransfer(transfer.monitorId);
return detail.status === STATUS_COMPLETE;
}
async function deployPipeline(source, sourcePath, stages) {
for (const [target, targetPath] of stages) {
const ok = await deployStage(source, sourcePath, target, targetPath);
console.log(`${target}: ${ok ? "done" : "failed"}`);
if (!ok) return target;
}
return null;
}
async function waitTransfer(monitorId, { timeout = 7200, interval = 5 } = {}) {
const deadline = Date.now() + timeout * 1000;
while (Date.now() < deadline) {
const detail = (await api("GET", `/api/transfers/${monitorId}`)) || {};
if (TERMINAL.has(detail.status)) return detail;
await new Promise((r) => setTimeout(r, interval * 1000));
}
throw new Error(`timeout: ${monitorId}`);
}
const failed = await deployPipeline("build-src", "/build/out/2.14.0", [
["test-01", "/opt/app"],
["staging-01", "/opt/app"],
["prod-01", "/opt/app"],
]);
console.log("deploy result:", failed === null ? "all stages succeeded" : `${failed} stopped at stage`);static async Task<bool> DeployStageAsync(InnorixClient client, string source, string sourcePath,
string target, string targetPath)
{
var transfer = await client.ApiObjAsync("POST", "/api/transfers/manual", new JsonObject
{
["sourceDevice"] = source,
["targetDevice"] = target,
["targetPath"] = targetPath,
["sourcePaths"] = J.ArrOfStrings(new[] { sourcePath }),
["sendAllFolder"] = true,
["checkIntegrity"] = true,
["transferOptions"] = new JsonObject { ["target-action"] = "overwrite" },
});
JsonObject detail = await WaitTransferAsync(client, J.Str(transfer, "monitorId"));
int? status = J.IntOrNull(detail, "status");
return status != null && status == InnorixClient.StatusComplete;
}
static async Task<string> DeployPipelineAsync(InnorixClient client, string source, string sourcePath,
IEnumerable<(string target, string targetPath)> stages)
{
foreach (var (target, targetPath) in stages)
{
bool ok = await DeployStageAsync(client, source, sourcePath, target, targetPath);
Console.WriteLine(quot;{target}: {(ok ? "done" : "failed")}");
if (!ok) return target;
}
return null;
}
static async Task<JsonObject> WaitTransferAsync(InnorixClient client, string monitorId,
int timeoutSec = 7200, int intervalSec = 5)
{
DateTime deadline = DateTime.UtcNow.AddSeconds(timeoutSec);
while (DateTime.UtcNow < deadline)
{
JsonObject detail = await client.ApiObjAsync("GET", quot;/api/transfers/{monitorId}", null, null);
int? status = J.IntOrNull(detail, "status");
if (status != null && InnorixClient.Terminal.Contains(status.Value))
return detail;
await Task.Delay(intervalSec * 1000);
}
throw new TimeoutException(monitorId);
}CI step integration Call this code from the deployment step of the CI pipeline. Inject
INNORIX_ACCESS_TOKENas a pipeline secret, and pass the artifact path and version as build variables.
Gate failure handling If a transfer at one stage does not complete, stop without proceeding to subsequent stages. Failed files can be retransmitted using
retry_failedfrom the Pause and Resume Recipe, and whether to proceed to later stages is determined by the CI pipeline policy.
Integrity verification conditions The example uses
checkIntegrity: truebecause the transfer targets servers. UsecheckIntegrityonly with Source/Target device combinations that support integrity verification, and do not apply it when extending to unsupported targets such as object storage.
Implementation Result#
With this recipe, build artifacts can be deployed in stages using the following flow.
- Build complete (CI)
- call artifact transfer API
- test deployment succeeds
- staging deployment succeeds
- prod deployment
- If any stage fails, stop at that stage
You can configure the pipeline to deploy build artifacts to test, staging, and production in stages and proceed to the next environment only after file transfer for each stage completes (application validation and approval gates are handled separately in the CI stage).