Getting Started
Connect two devices and try transferring a file.
From manual transfer to automatic execution, checking the results takes only a few steps.
Quick Start Flow
Connect Devices → Transfer Files → Automate → Check Results
Getting Started
Start Your First Transfer
In INNORIX Platform files can be directly transferred between connected devices, and the same task can be automated.
To get started device 2 units prepare.
What You Need
- INNORIX Platform account
- Files to send or receive devices 2 units
- On each device INNORIX Agent install
Connect Devices
Connect the Devices for Transfer
From the top menu Devices open Connect Device select it.
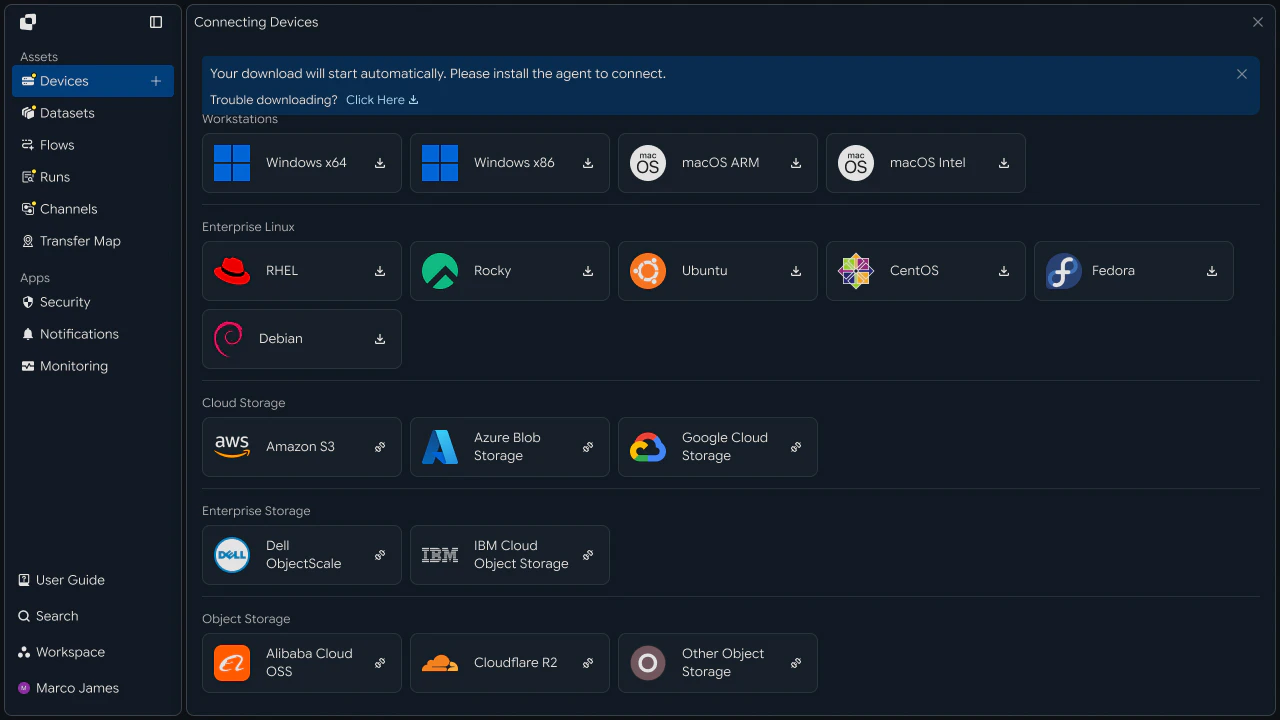
1. Add Device
Devices → Connect Device
Select the operating system and Agent install.
Windows Linux macOS Cloud Storage Enterprise Storage Object Storage
2. Connect Device
When Agent runs the device is automatically registered to the account.
You are ready when the screen appears as follows.
| Device | Status |
|---|---|
| OFFICE-PC | ● Online |
| FILE-SERVER | ● Online |
Next → Send Files Between Two Devices
2 devices manual transfer
Send Files Between Two Devices
Open Browser to view the files on both connected devices on one screen.
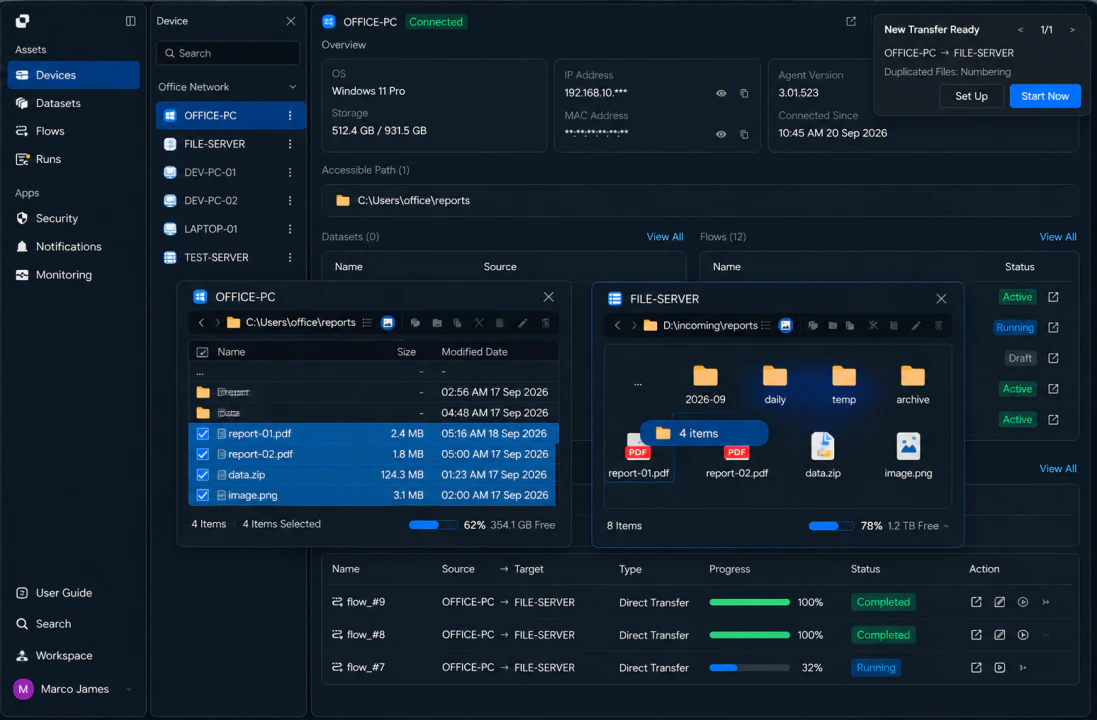
1. Select Devices
Select the sending device, and select the receiving device.
OFFICE-PC → FILE-SERVER
2. Select Files
Select the file or folder to send.
3. Start Transfer
Send the files from the sending device to the receiving device Drag and Drop to start the transfer immediately.
Next → Run This Transfer Automatically
2 devices automatic transfer
Run the Same Transfer Automatically
If you need to send repeatedly save the transfer Flow as saved.
On the Flows screen select Add Flow*.
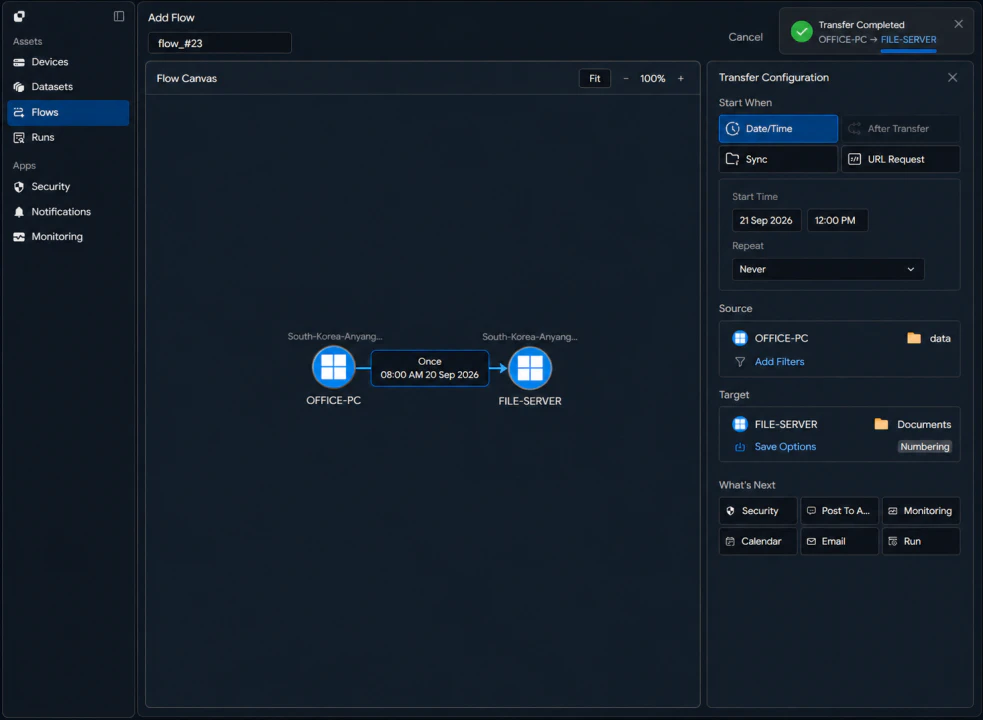
1. Check Transfer Conditions
Date/Time
Never Hourly Daily Weekly Event
For example run every night:
Daily → 23:00
2. Save
Enter the Flow name and Save & Active select it.
The transfer will now run automatically at the specified time.
Next → Check Transfer Results
Check Transfer Results
Check Whether the Transfer Is Complete
From the top menu Runs open it.
You can check your recently executed manual and automatic transfers in one place.
Menu Guide
See the functions of the main menus at a glance, from connecting devices and configuring transfers to checking execution results and managing operations.
Screen Layout
INNORIX Platform Overview
After logging in you can view current transfer tasks and execution status on one screen.
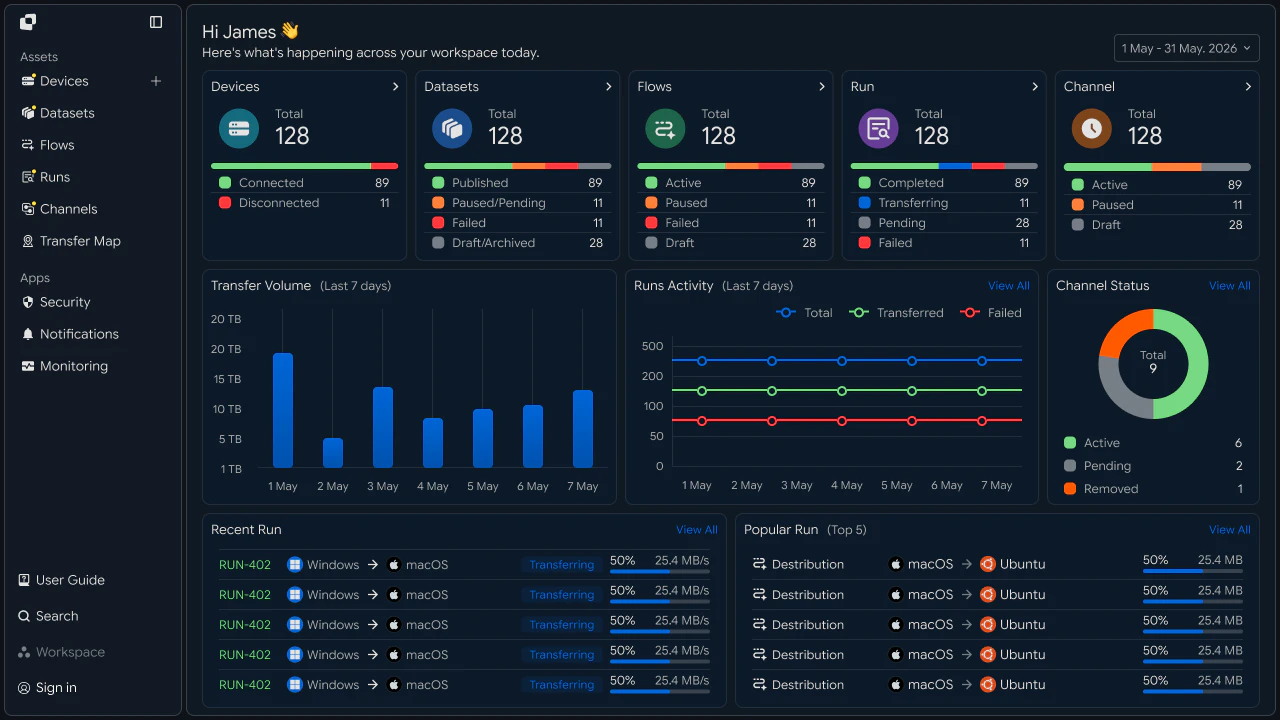
① Main Menu
Devices Datasets Flows Runs Security Notifications Monitoring
Navigate to the main functions.
② Search
Find Devices, Dataset, Flow, Run by name or ID.
③ Workspace
Currently working in Workspace is displayed.
Select to switch to another Workspace.
Devices
Manage Connected Devices
In Devices INNORIX Platform connected devices can be viewed in a list, and transfer tasks and execution status can be managed by device.
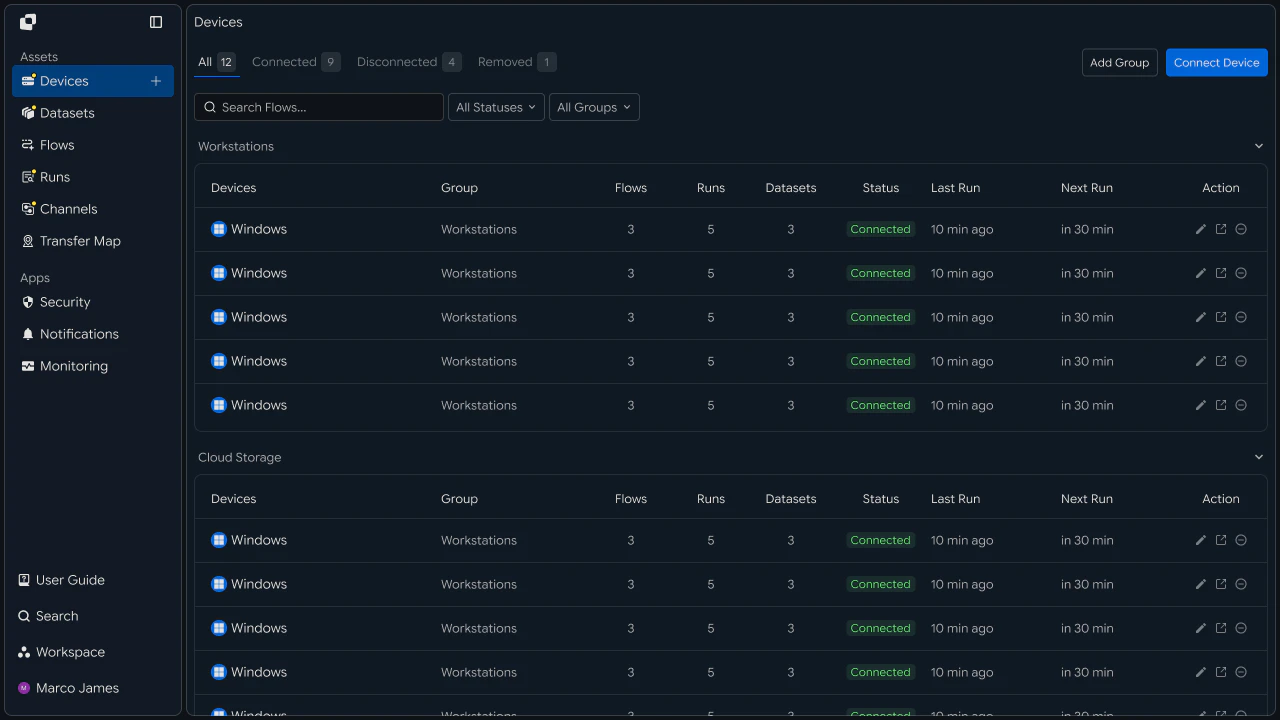
1. Screen Layout
Devices
View the names of connected devices. Devices are displayed as Workstations, Cloud Storage and other categories depending on the device type or environment.
Group
View the group a device belongs to. Multiple devices can be managed by group.
Flows
View the number of Flow connections for the device.
Runs
View the number of transfer executions related to the device.
Datasets
View the number of Dataset connections for the device.
Status
View the current device connection status including Connected.
Last Run
View the time of the most recent task executed on the device.
Next Run
You can view the next scheduled execution time.
Action
Run settings or detailed functions for each device.
2. Main Functions
Connect Device
Connect a new device to INNORIX Platform.
Add Group
Add a group to manage devices.
Search
Search for a device by name or among registered devices.
Filter
Filter the device list by status and group.
Select a required device from the device list to view its Flow, Run, Dataset and execution schedule and manage the transfer environment.
Datasets
Manage files and folders to transfer as Dataset
In Datasets multiple device files and folders can be grouped into a single Dataset and managed, and used for transfer tasks.
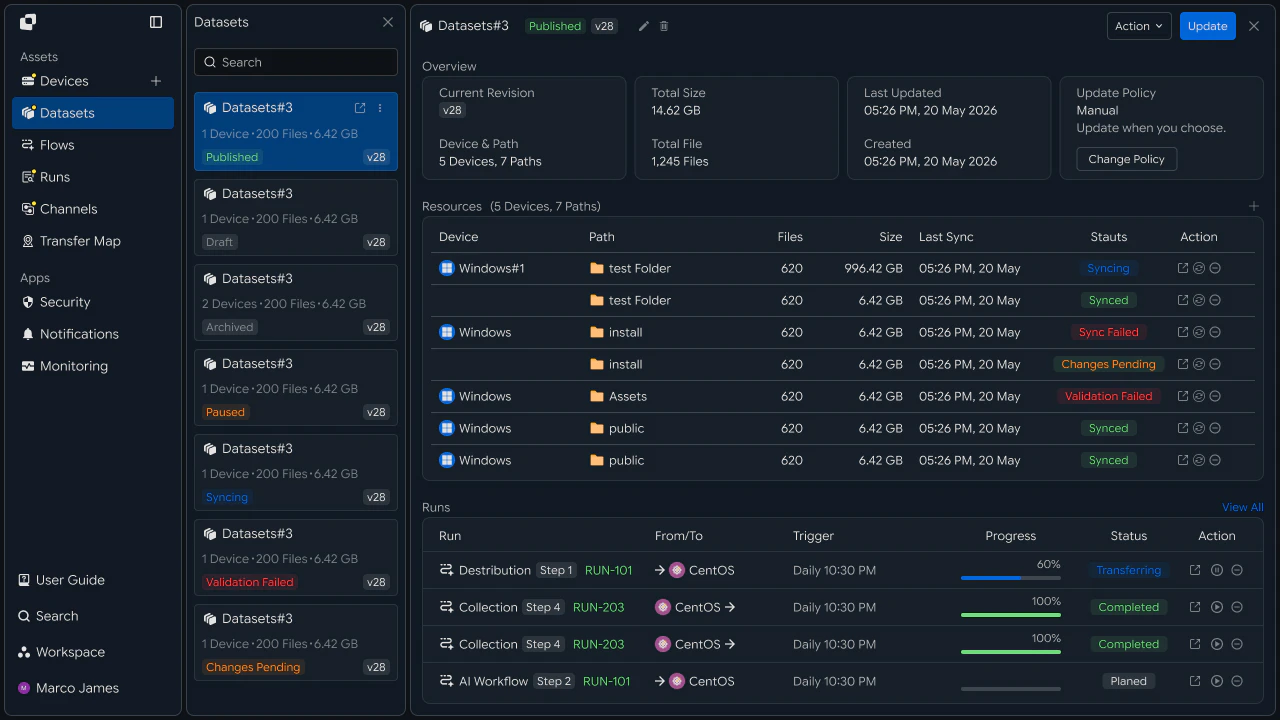
1. Screen Layout
Dataset List
View the Dataset name and status, connected devices·files information.
Overview
View information of the selected Dataset Revision, Total Size, Total Files, Update Policy and more.
Resources
Dataset includes Device, Path, Files, Size, Last Sync, Status.
Runs
View the execution status and results of transfer tasks connected to the Dataset.
2. Main Functions
Create Dataset
Select a device and path to create a Dataset.
Update
Update files and paths of the Dataset to the latest state.
Change Policy
Set the Dataset update method.
Action
Modify or delete the Dataset and perform the required tasks.
Flows
Create and Manage Automatic Transfers
In Flows configure where to transfer from and to, when to transfer, and how to transfer.
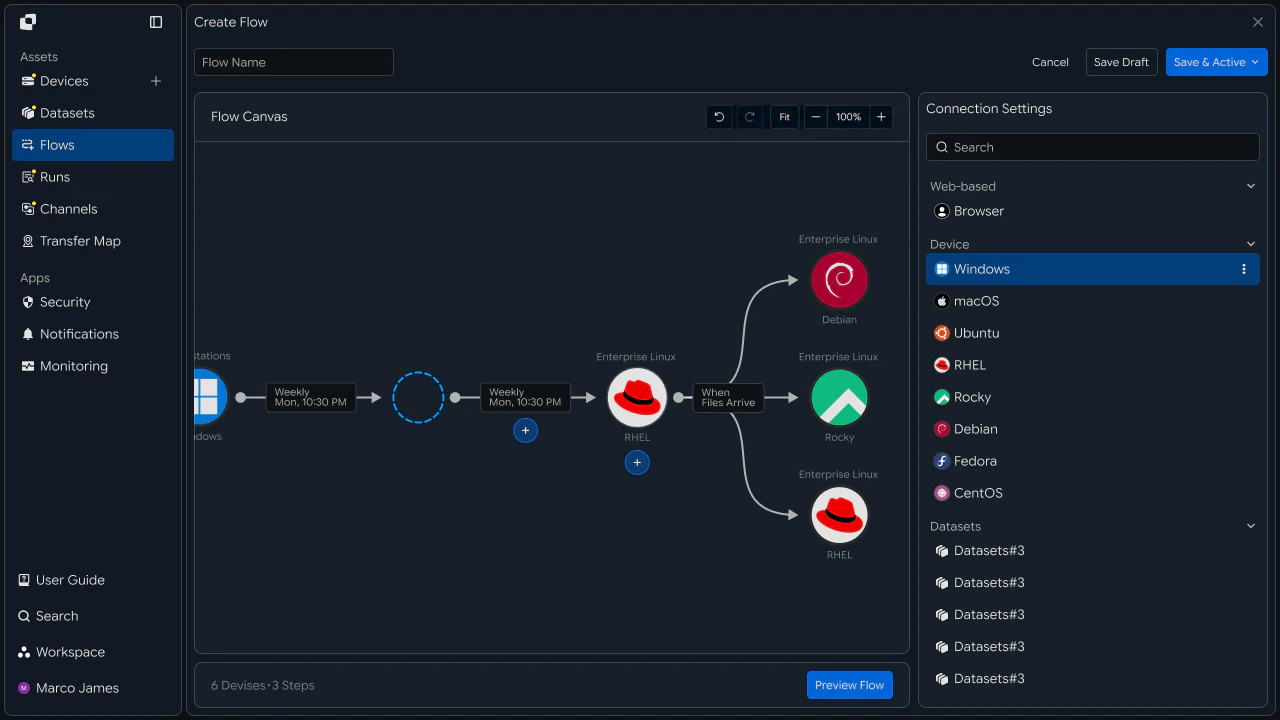
1. Screen Layout
Flow Canvas
Connect the Source and Target and configure the transfer flow.
Start When
Set the execution condition from Date/Time · After Transfer · Sync · URL Request among the execution conditions.
Source / Target
Specify the device and file path to transfer, and the device and folder to store them.
Transfer Scope
Select files from the previous step or files in the specified path as the transfer target.
What's Next
Connect Security · Monitoring · Calendar · Email · Run and other post transfer tasks.
2. Main Functions
Create Flow
Configure a new transfer Flow.
Save & Active
Save the configured Flow and enable automatic execution.
Save Draft
Save the Flow being configured as a draft.
Preview Flow
Preview the configured transfer flow.
Runs
Check Transfer Execution Status and Results
In Runs executed Flow progress status and results can be checked.
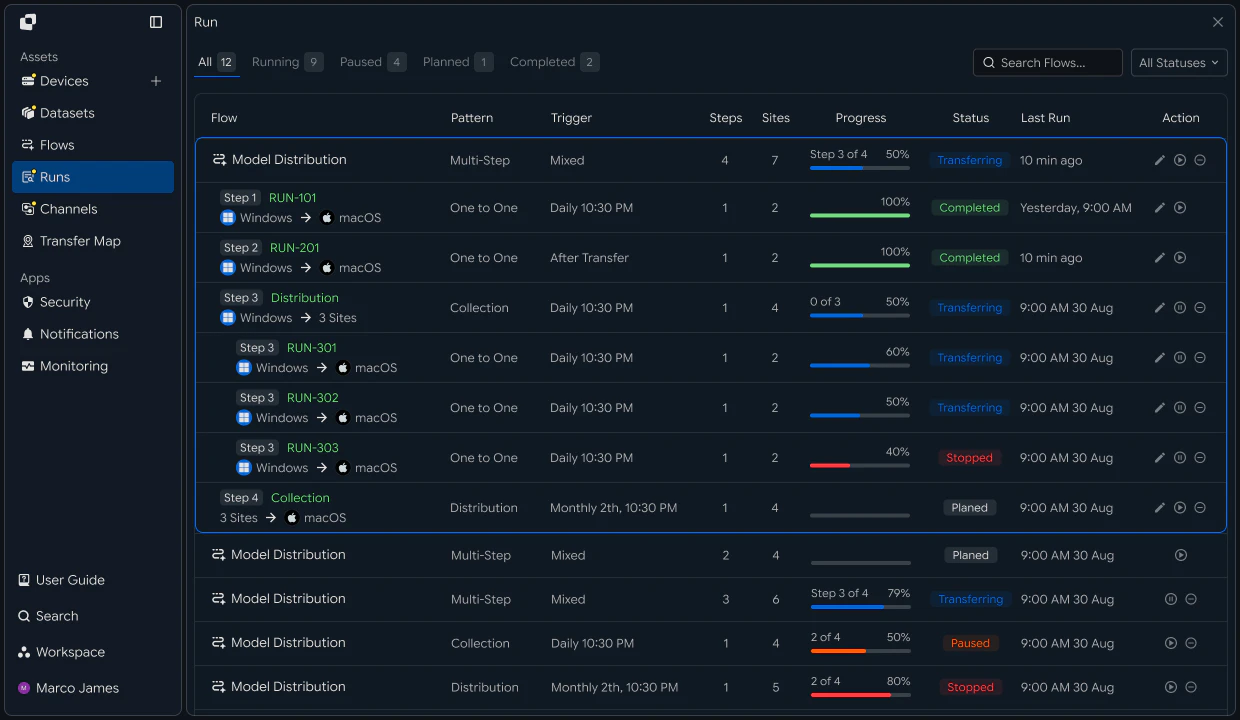
1. Screen Layout
Flow
View the name and transfer type of the executed Flow.
Pattern / Trigger
View the transfer method and execution condition.
Steps / Sites
View the number of steps in the Flow and the number of connected devices.
Progress
View the current transfer progress.
Status
View the current execution status Transferring · Completed · Stopped · Paused · Planned and other current execution states.
Last Run
View the most recent execution time.
2. Main Functions
Search / Filter
Find execution results by Flow name and status.
Run Detail
Select an execution item to view the progress status and results for each step.
Pause / Stop
Pause or stop a running task.
Run Again
Run the transfer task again when needed.
Security
Manage Security Policies Applied to Devices and Transfers
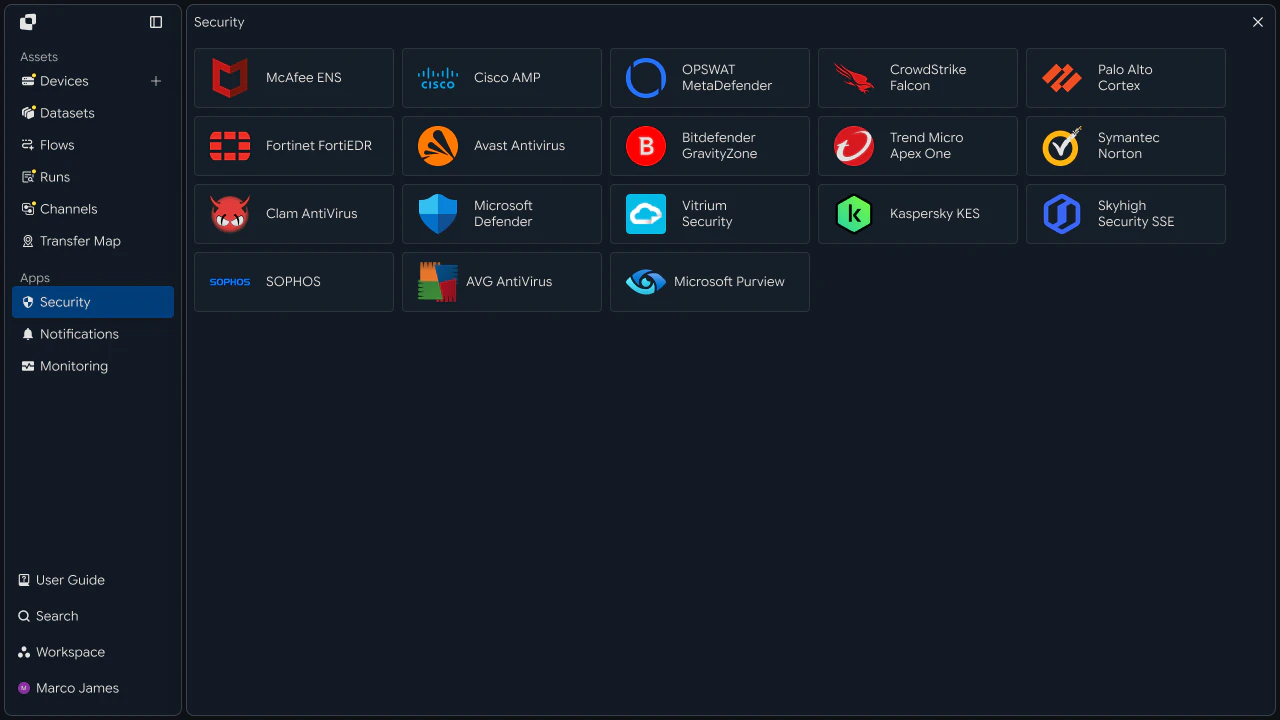
In Security Workspace transfer and device security policies are configured.
Main Functions
Security Solution
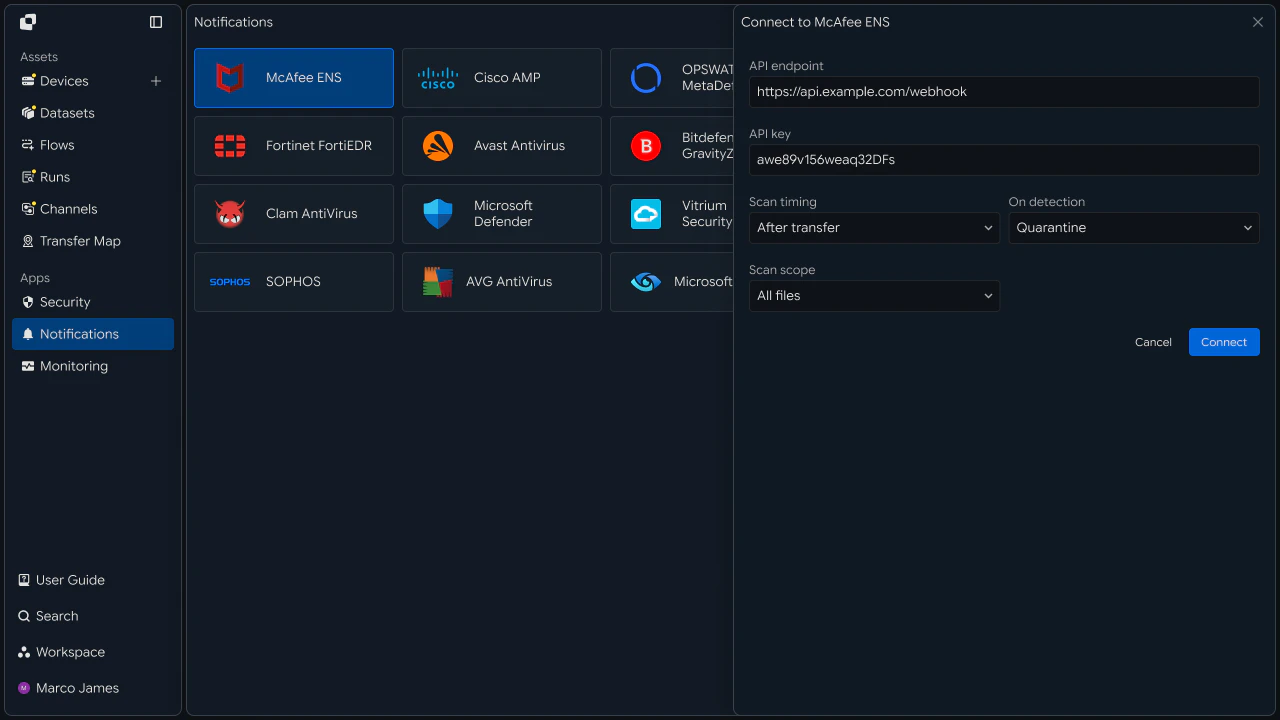
Select security solutions McAfee ENS, Cisco AMP, Microsoft Defender, Fortinet FortiEDR and others.
Scan Timing
Set when to run file scans After transfer and other scan timings.
On Detection
Set how detected files are handled. Example: Quarantine
Scan Scope
Select the scope of files to scan.
Notifications
Notifies You of States That Require Attention
View transfer failures, device connection status and other events requiring attention in one place.
Main Functions
Event
Select key states Started · Completed · Failed · Paused · Canceled and other states.
Integration
Connect external services Slack, Microsoft Teams, Notion, Amazon SES and others.
Channel / Recipient
Specify the channel or recipient to receive notifications.
Notification Settings
Select only the events you need to receive notifications.
Monitoring
Check the Overall Transfer Status at a Glance
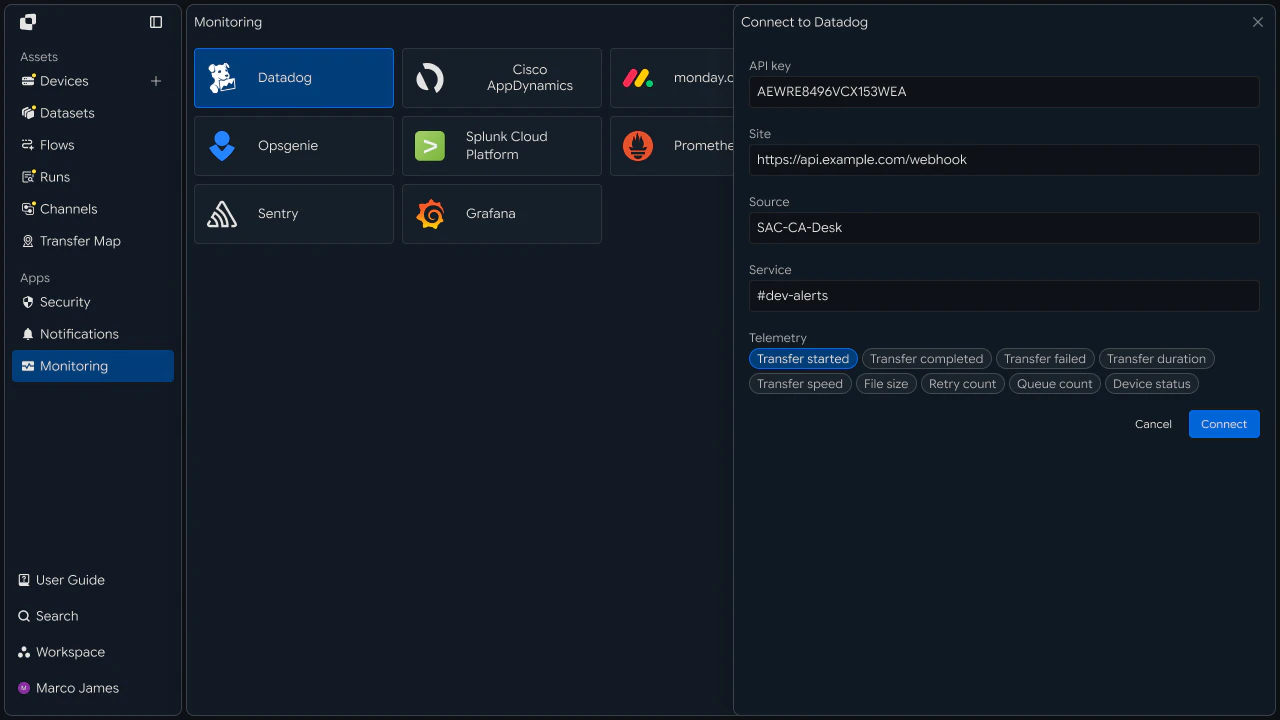
Monitoring checks not individual Run but the current Workspace overall operational status on this screen.
Main Functions
Monitoring Service
Select monitoring services to use Datadog, Grafana, Prometheus and others.
Connection
Configure service integration information API Key, Site, Source, Service and others.
Telemetry
Select the transfer metrics to send.
Workspace
Manage users and devices by Workspace
In Workspace a workspace for the team can be created, and members and key management functions can be viewed.
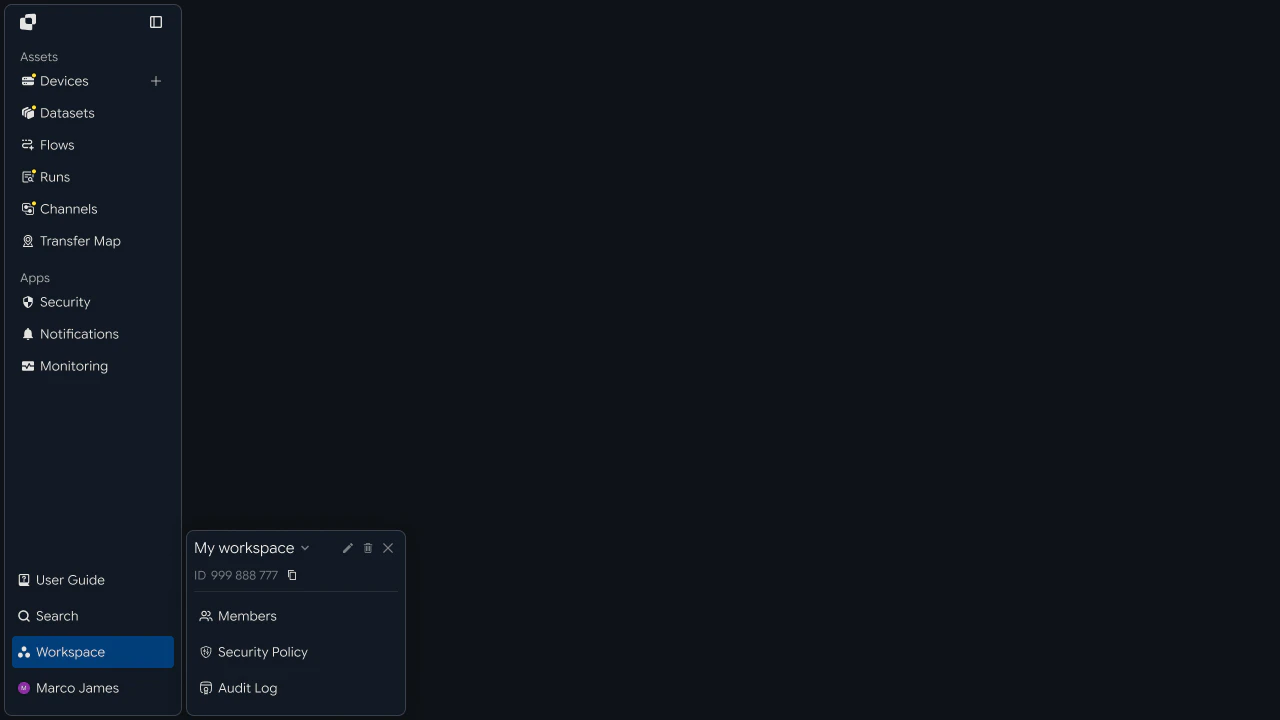
Select Workspace at the bottom left of the screen to open the management menu.
Main Functions
Create Workspace
Create a new Workspace and invite team members.
Join Workspace
Enter the invited Workspace with ID to join.
Members
View users who have joined the Workspace and manage their permissions.
Security Policy
Manage the security policies applied to the Workspace.
Audit Log
View records of major activities that occurred in the Workspace.
Search
Find the Devices and Transfers You Need
Select Search at the top or enter a search term.
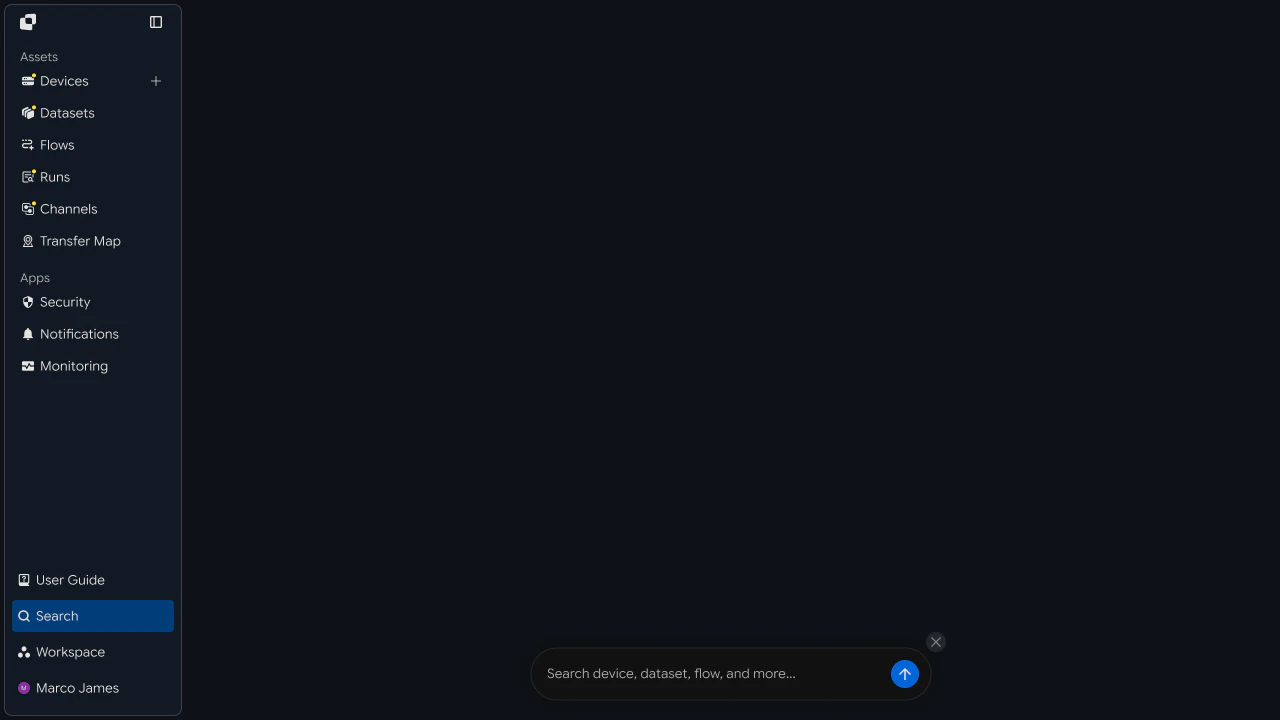
Search results are categorized by type.
Searchable Items
Devices — Device name, Device ID
Datasets — Dataset name
Flows — Flow name
Runs — Run ID
Transfer in Various Ways
Beyond transfers between devices distribution, collection, multi stage transfers, synchronization and external integrations can be configured.
Distribute to Multiple Devices
Send One File to Multiple Devices at the Same Time
A file can be distributed from one Source to multiple Target as Dataset.
Flows → Add Flow → Distribute
1. Source Selection
Select the device and path where the files are located.
2. Target Addition
Flow Canvas + button select to connect multiple Target.
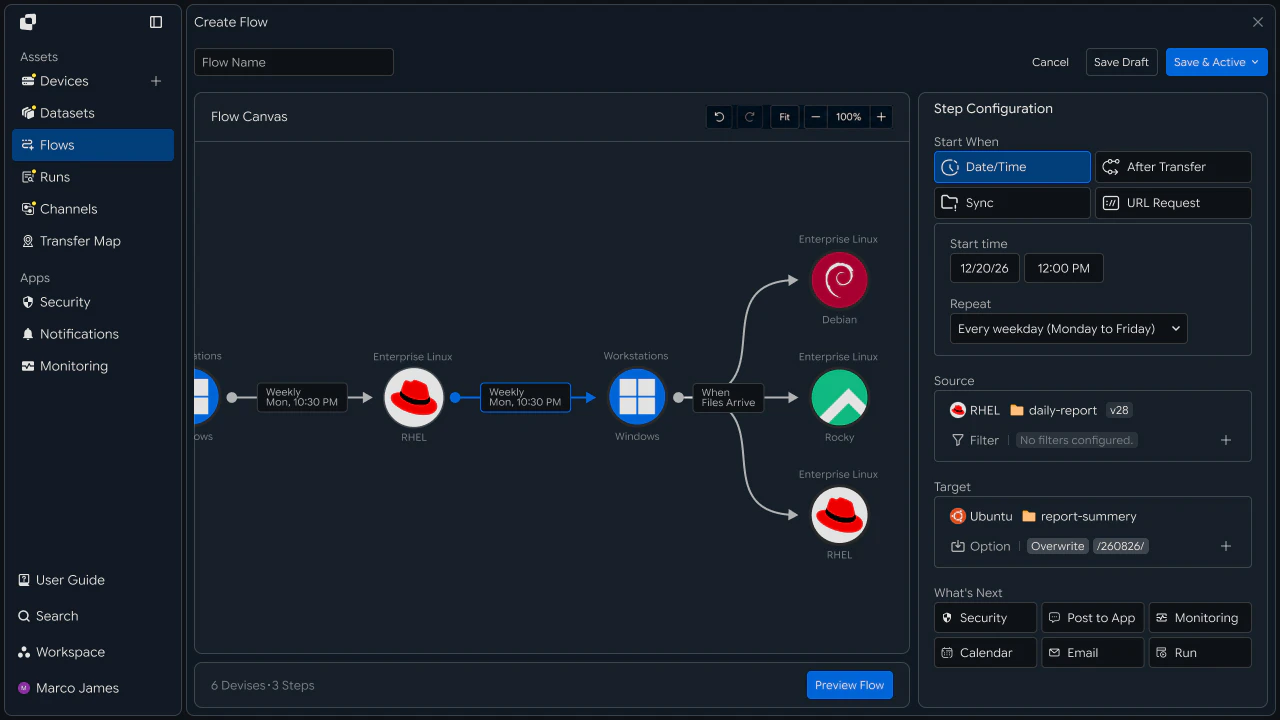
Each Target can also have a different destination path specified.
3. Set Transfer Conditions
In Step Configuration select execution conditions including Date/Time, Sync, URL Request and other execution conditions, and set the required file filters and save options.
After completing the settings Save & Active the distribution Flow runs.
Collect from Multiple Devices
Collect Files from Multiple Devices in One Place
Files generated from multiple Source are automatically collected into a single Target.
Flows → Add Flow → Collect
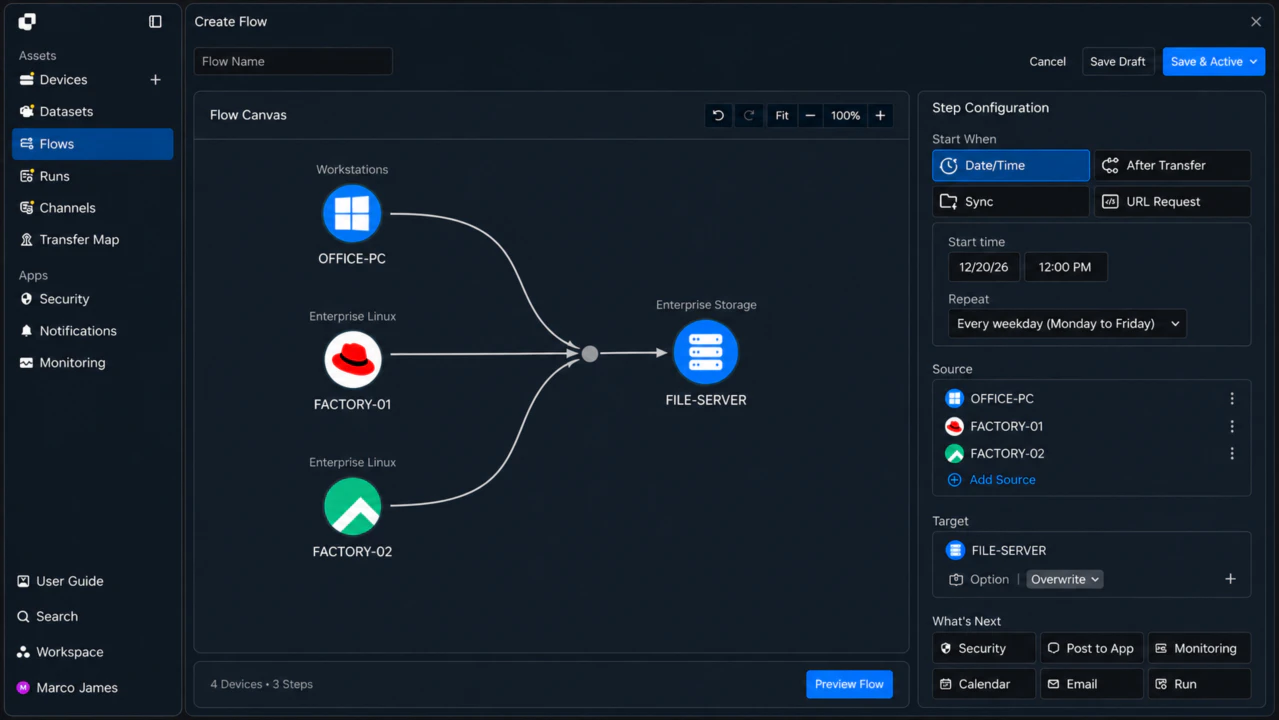
1. Source
Select the device and path where the files are located.
2. Target
Flow Canvas + button select to connect multiple Target.
3. Set Transfer Conditions
In Step Configuration select execution conditions including Date/Time, Sync, URL Request and other execution conditions, and set the required file filters and save options.
After completing the settings Save & Active the collection Flow runs.
A → B → C Multi Step Transfer
Connect multiple transfers into one Flow
When the previous step is complete the next transfer can start automatically.
Flows → Add Flow → Add-step
1. Add Step
+ Add Step select and specify the next Source and Target.
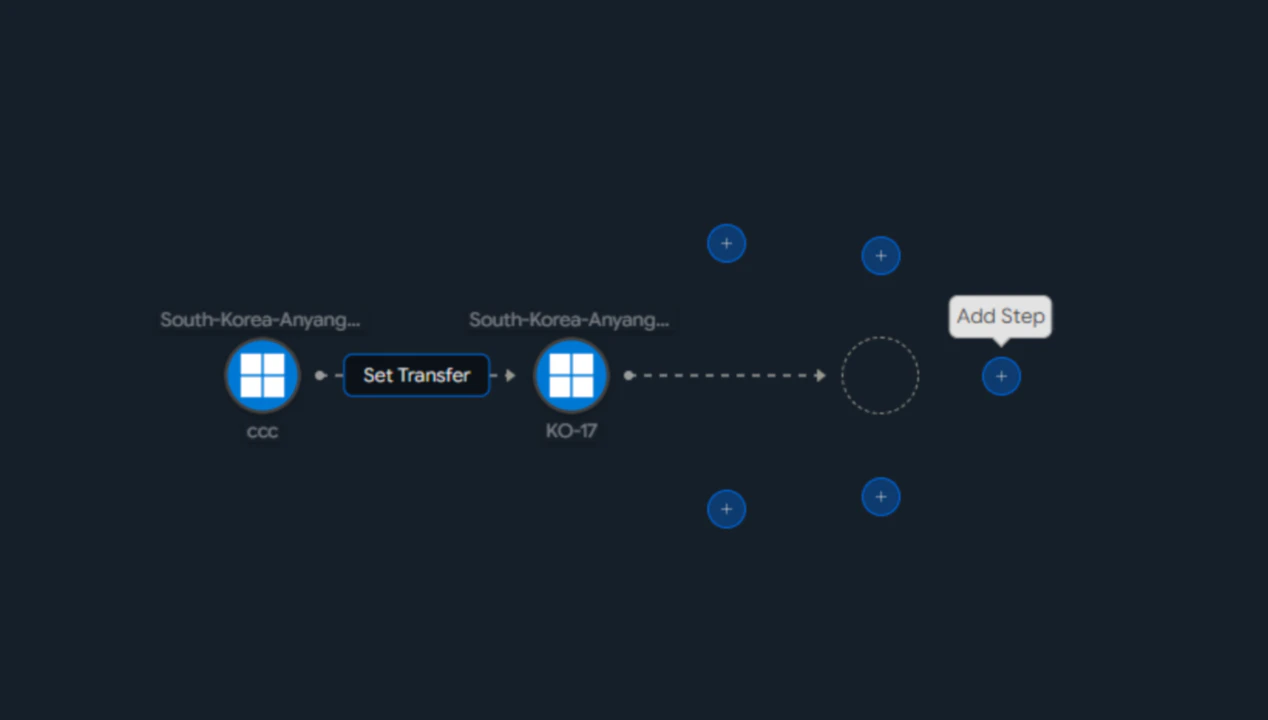
2. Set Transfer Conditions
In Step Configuration select execution conditions including Date/Time, Sync, URL Request and other execution conditions, and set the required file filters and save options.
After completing the settings Save & Active the multi step transfer runs.
For each step you can configure the path, file conditions and execution options separately.
By default the next step runs when the previous step succeeds.
One Way·Two Way Synchronization
Automatically Keep Folders on Two Devices in Sync
Flows → Add Flow → Sync
First select the folders to synchronize on the two devices.
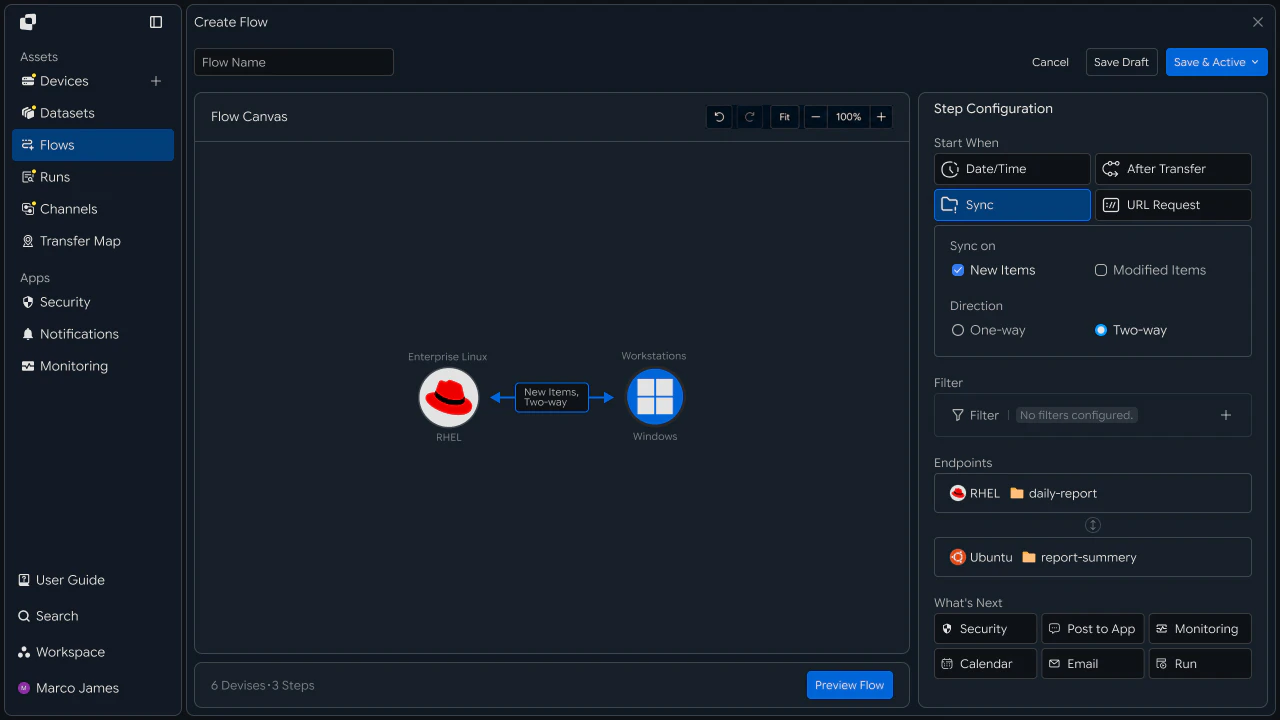
1. Synchronization Conditions
Sync on
New Items — Synchronize new filesModified Items — Synchronize modified files
Direction
One-way — Apply changes from one device to the other.Two-way — Apply changes between both devices in both directions.
2. Additional Settings
If needed Filter limit the files to synchronize, and Endpoints specify the two devices and folders to synchronize.
After completing the settings Save & Active automatically synchronizes according to the specified conditions.
File Filters · Conditions · Duplicate Handling
Transfer Only the Files You Need in the Way You Want
In Flow Transfer Confituration specify the files to transfer and processing methods.
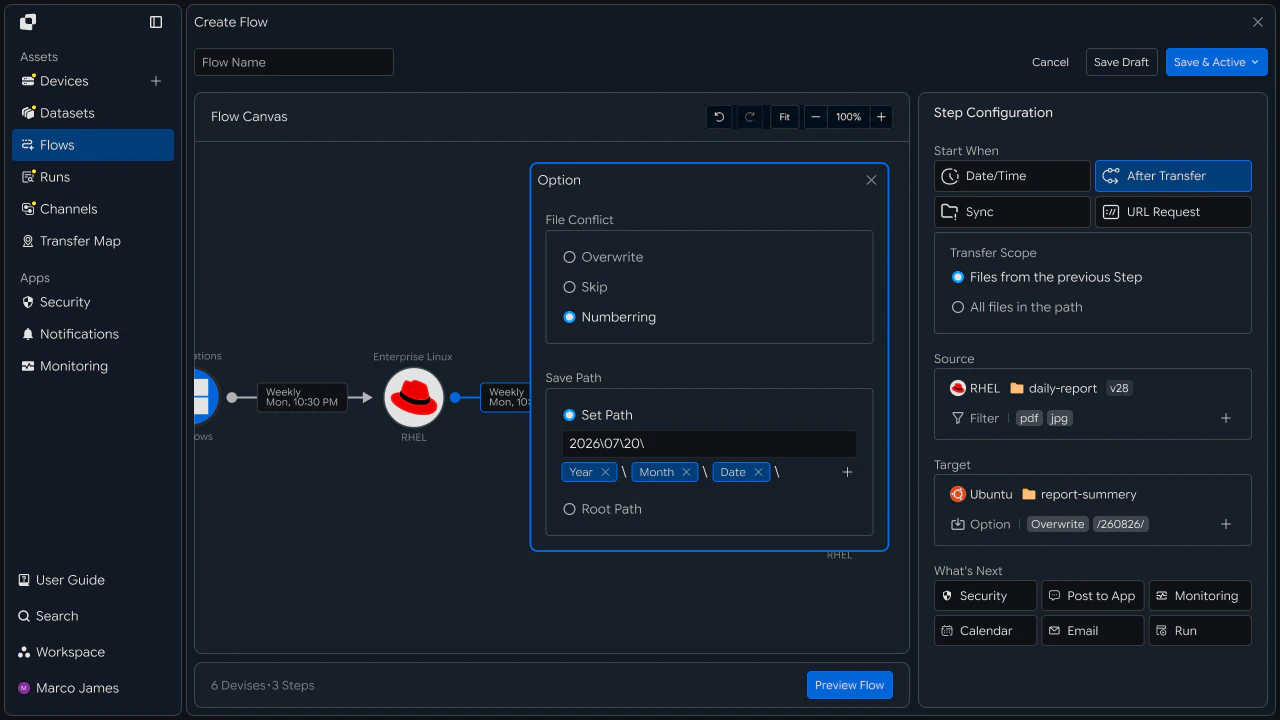
1.File Filter
Source → Filter specify transfer conditions.
- Types: Set file extensions to
Allow / Deny - Name: Set file names to
Include / Excluded - Regular Exp.: Specify file name conditions using regular expressions
- Size: Specify the minimum·maximum file size
Example: PDF, EXE, MSI files can be excluded or only files with specific names can be selected.
2.Transfer Scope
Transfer Scope select the range of files to transfer.
Files from the previous Step — Files from the previous stepAll files in the path — All files in the specified path
3.Duplicate File Handling
Target → Option select the handling method when the same file exists.
Overwrite — Overwrite the existing fileSkip — Keep the existing fileNumbering — Add a number to the file name and save it
If needed Save Path specify the save path and Year / Month / Date and other criteria can be used to classify files.
Start Transfer from an External Request
Run a Flow from Another System
You can start a file transfer from a request by an external application or business system.
Set Execution Conditions
Flow configuration screen What's Next → Run select it.
Configure the execution method.
- Run Type:
HTTP Request - Run On:
Source DeviceorTarget Device - Method:
POST - URL: Execute the request URL
- Auth:
API Keyand authentication method
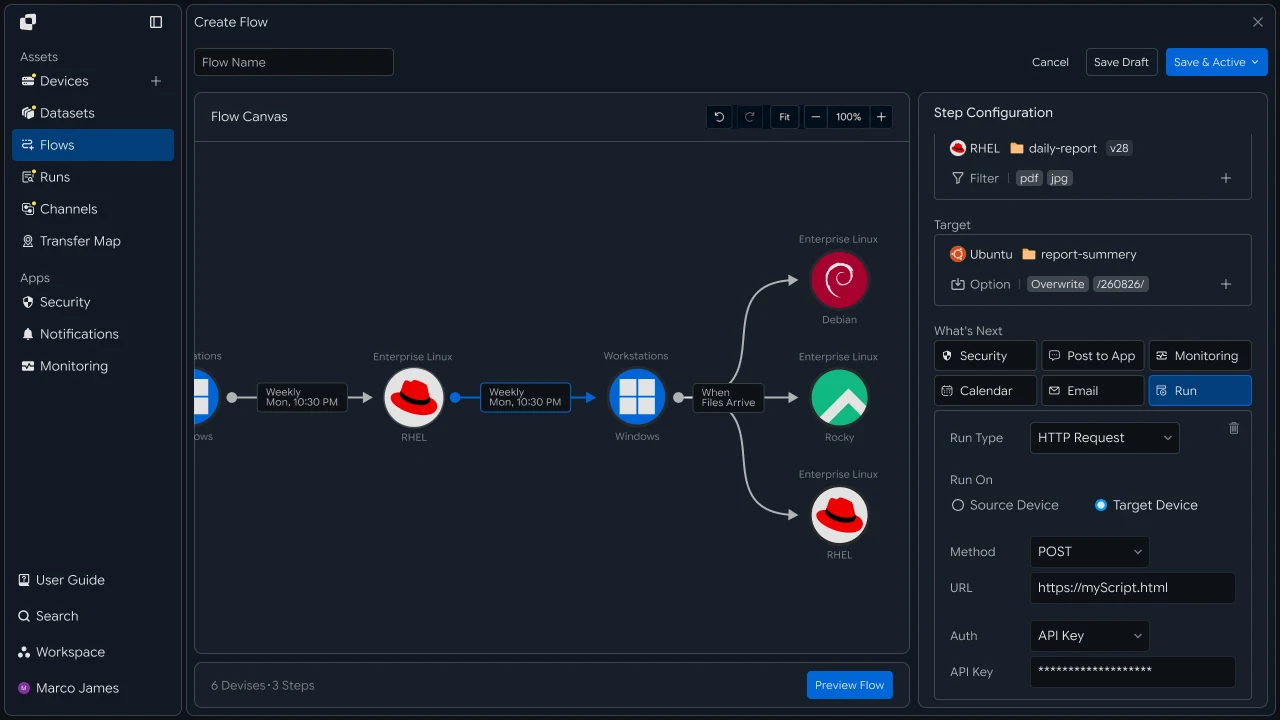
When an external request is received Flow runs and a new Run is created. Execution results can be checked in Runs.
Team Sharing · Permission Management
Set Access Permissions for Each User
In Workspace add users and set Device access permissions and task permissions.
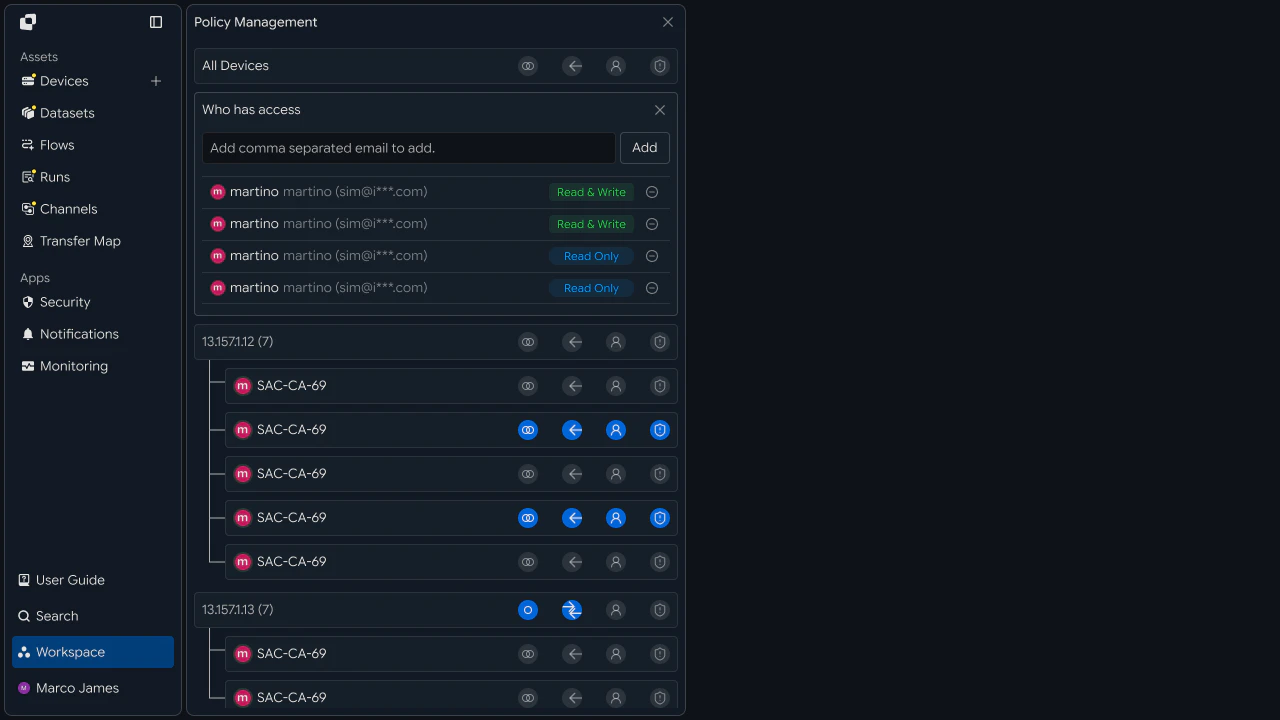
1. Add User
Enter an email in Who has access and select Add to add the user.
2. Set Permissions
You can assign the following permissions to each user.
- Read & Write — View and modify
- Read Only — View only
You can also select the permission icon for each device to set whether the user can access a specific device.
This allows granting each user access only to the devices and tasks they need.