Getting Started
Basic Concept
Transfer Azure Blob files directly to an on-premises server work folder
Files created or stored in Azure may need to be used by on-premises systems.
For example, processing results generated in the cloud can be brought to an internal business server, or backup files stored in Azure Blob can be delivered to an on-premises archive server.
Traditionally, files may be moved through an operator or an intermediate environment as follows.
Azure Blob Storage
        │
        │ Download
        ▼
   Local PC / Server
        │
        │ Copy
        ▼
 On-Premises Server
By configuring direct transfer, Azure Blob and an on-premises server can be connected in a single file transfer flow.
┌─────────────────────┐
│  Azure Blob Storage │
│                     │
│   Source Container  │
└──────────┬──────────┘
           │
           │ File Transfer
           ▼
┌─────────────────────┐
│ On-Premises Server  │
│                     │
│  Windows / Linux    │
└─────────────────────┘
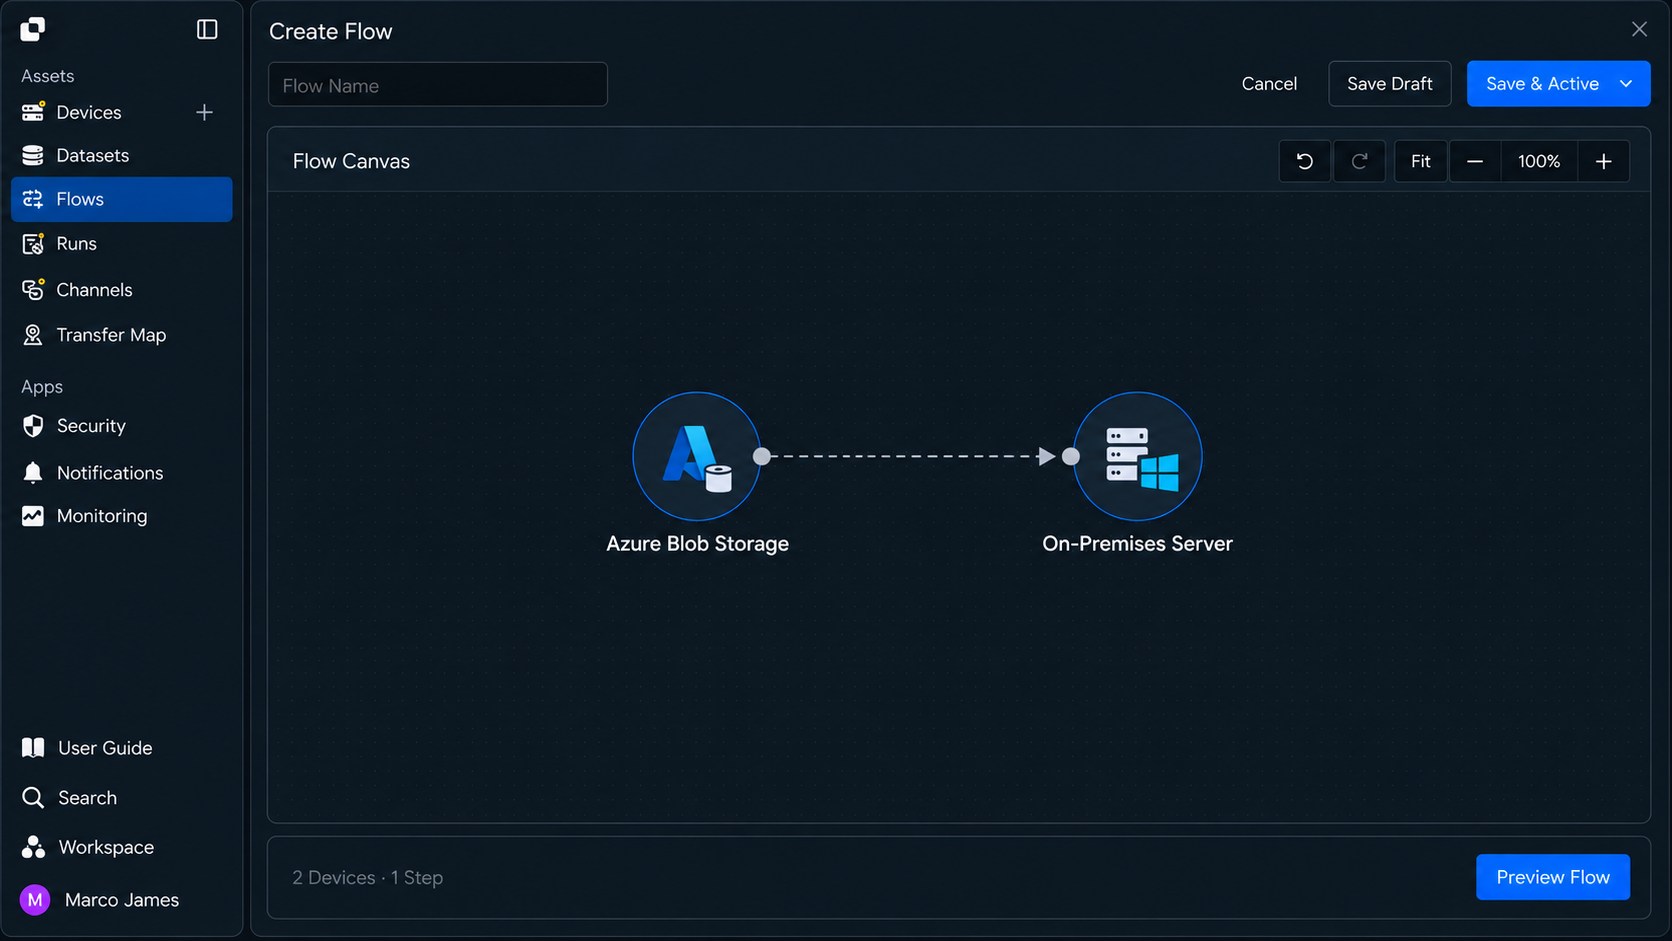
This connects check Azure Blob files → select transfer target → save to on-premises server → verify results as a single operation.
Target Folder
Connect Azure file paths to the server's actual work folder
A single Azure Blob Container may store files used by multiple business processes and services.
Instead of downloading the entire Container to the server, you can select and deliver only the file paths required in the actual on-premises environment.
For example, assume Azure Blob has the following file structure.
processing-container
│
├── completed/
│   ├── report/
│   │   ├── report-01.csv
│   │   └── report-02.csv
│   │
│   └── media/
│
├── backup/
│
└── temporary/
Only the completed report files can be delivered to the business folder on the on-premises server.
Azure Blob Storage                    On-Premises Server

processing-container                  D:\data\incoming\
│                                     │
├── completed/                        ├── report-01.csv
│   └── report/       ───────────▶    └── report-02.csv
│       Selected
│
├── backup/        Not Included
└── temporary/     Not Included
When using a Linux server, a designated path such as /data/incoming/ can also be configured as the Target.
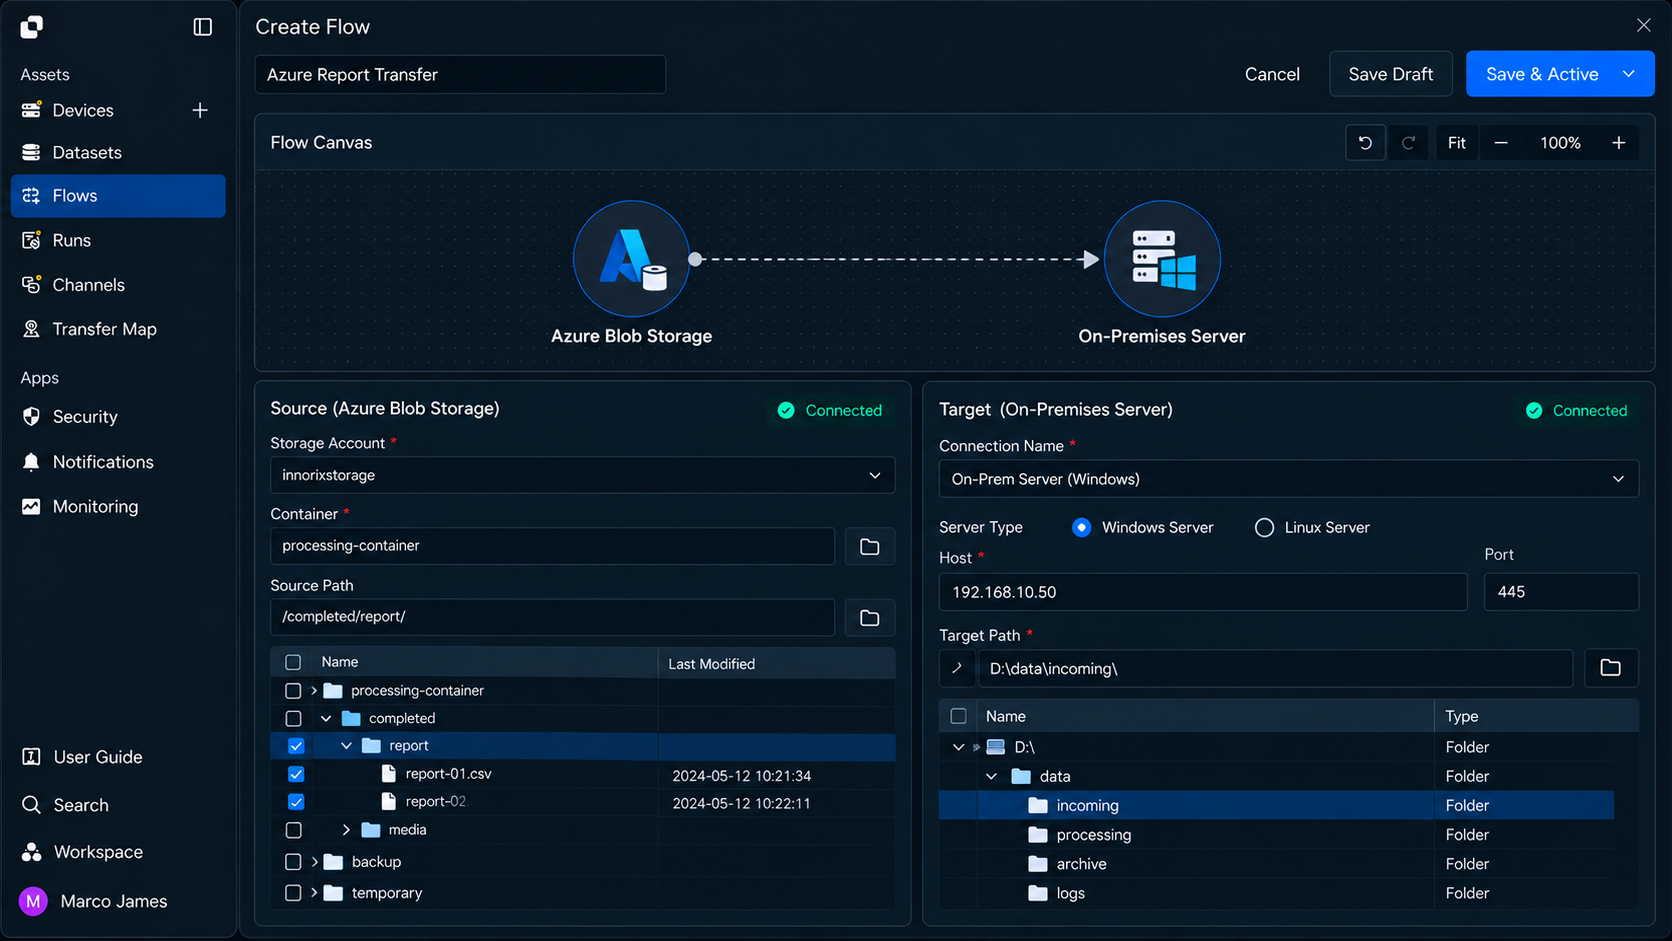
The transfer path can be configured to match the server's actual business structure.
| Category | Source | Target |
|---|---|---|
| Storage environment | Azure Blob Storage | Windows or Linux server |
| File location | Container / Blob path | Designated server folder |
| File scope | Specified path or files | Storage location by business task |
| File selection | Name · extension · path conditions | Save to specified path |
| Purpose | Cloud results · backups · data | Internal processing · business use · archiving |
This allows you to directly connect files stored in Azure with the server folder where actual on-premises work is performed.
Transfer Timing
Run when needed or automatically deliver based on file creation and schedules
Transferring Azure Blob files to an on-premises server does not need to be limited to a one-time download.
Files can be delivered automatically after they are created in Azure, or required files can be brought to the server at a scheduled time before on-premises work begins.
For example, it can be used as follows.
| Transfer Purpose | Configuration |
|---|---|
| Collect processing results | Deliver completed files to the server |
| Periodic data update | Run repeatedly at a specified time |
| Collect new files | Detect new files and deliver automatically |
| Apply changed files | Retransfer only changed files |
| Connect follow-up processing | Run the next operation after files are saved |
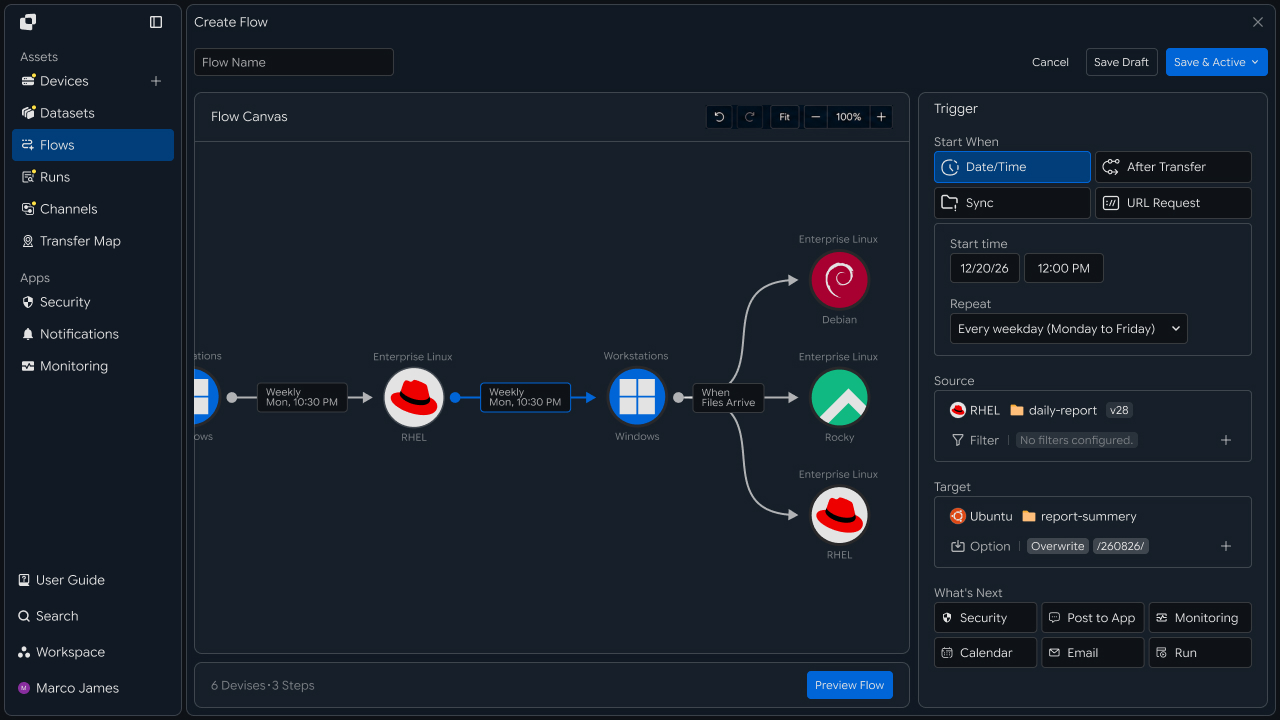
For example, if result files processed overnight in Azure are delivered to an on-premises server every morning, the flow can be configured as follows.
Azure Processing Complete
        │
        ▼
Check Result Files
        │
        ▼
Check Transfer Conditions
        │
        ▼
Deliver to On-Premises Server
        │
        ▼
Apply to Work Folder
After the files are saved on the server, a batch job or analysis program that uses those files can also be configured to run automatically.
IT Engineer
Environment Connection
Register Azure Blob Storage and the on-premises server as transfer environments
First, connect the Azure Blob Storage from which files will be retrieved and the on-premises server where the files will be stored.
Because the Source and Target are different environments, file access and storage scopes can be managed separately.
Azure Blob must be able to read the Container and files to transfer, while the on-premises server must be able to save files to the designated folder.
Transfer Environment

Azure Blob Storage
└── Source Container
    └── Read Files

        │
        ▼

Transfer Flow

        │
        ▼

Windows / Linux Server
└── Target Folder
    └── Write Files
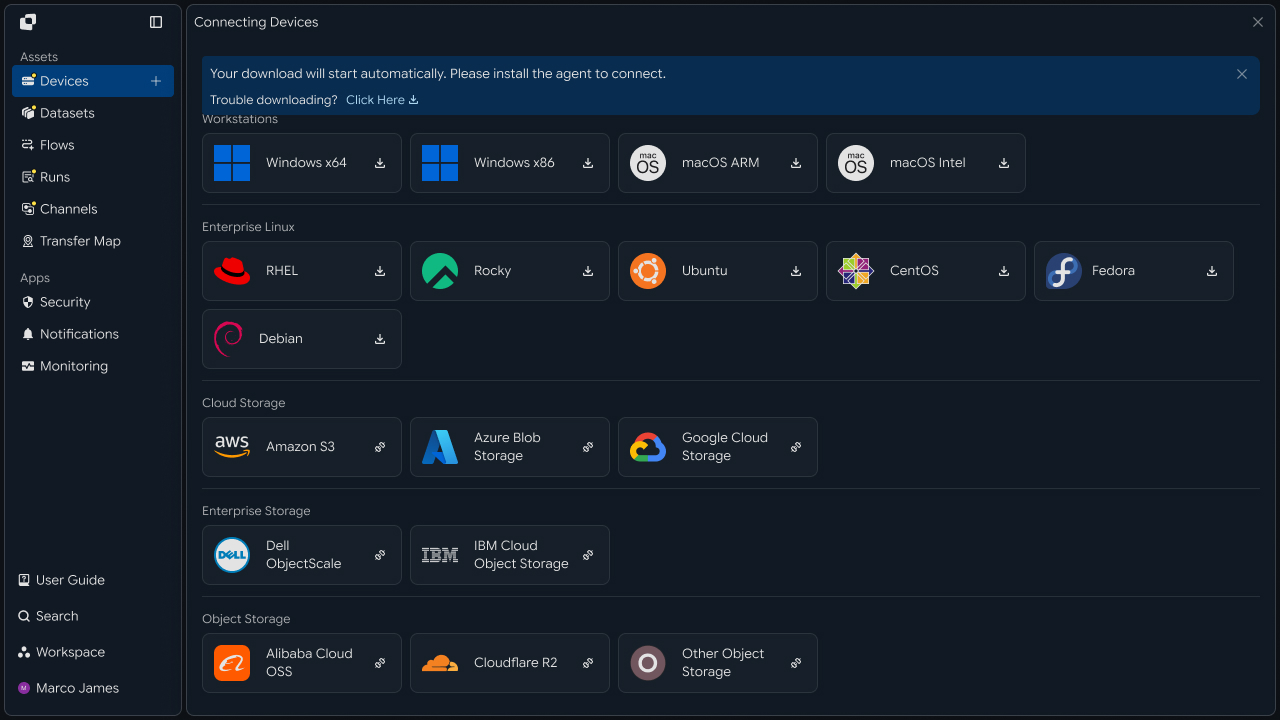
Check the following items before configuring the transfer.
| Connected Environment | Check |
|---|---|
| Azure Blob | Source Container access status |
| Source path | Read access to files and paths to transfer |
| On-premises server | Target device connection status |
| Target folder | Actual file storage location |
| Server permissions | Ability to create and save files |
| Network | Connection status between cloud and server |
Connecting each environment independently separates the Azure Storage access scope from the on-premises server's file storage scope while connecting them through a single transfer operation.
Path Configuration
Map Container file locations to the server's business folder
After preparing the connected environments, configure where files will be retrieved from Azure Blob and where they will be stored on the on-premises server.
For example, the following Azure Blob path can be specified as the Source.
processing-container/completed/report/
On a Windows server, the Target folder can be specified as follows.
D:\data\incoming\report\
On a Linux server, it can be configured as follows.
/data/incoming/report/
The complete transfer structure is configured as follows.
Source

Azure Blob Storage
processing-container
└── completed/
    └── report/
        ├── report-01.csv
        ├── report-02.csv
        └── report-03.csv

                │
                │ Transfer
                ▼

Target

Windows / Linux Server
└── Target Folder
    ├── report-01.csv
    ├── report-02.csv
    └── report-03.csv
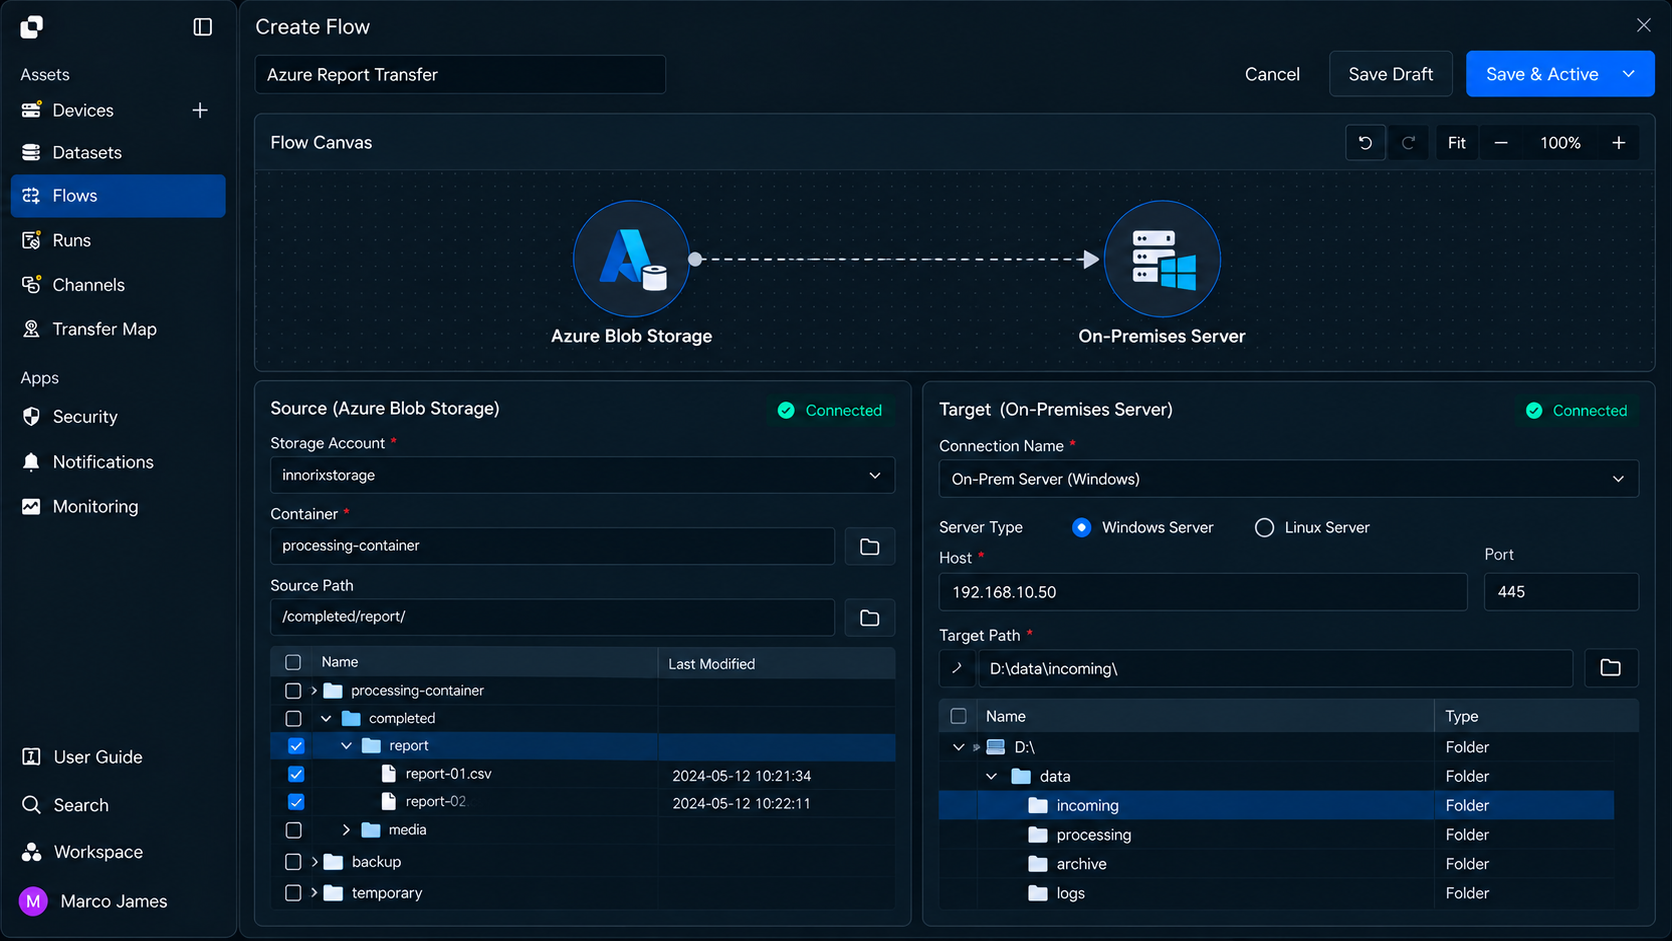
Depending on the business requirement, files from one Azure Container can be distributed to multiple servers, or files from multiple Azure paths can be collected on one central server.
For example, delivering files to different internal servers based on file type enables the following configuration.
                    ┌──▶ Windows Server
                    │     D:\report\
Azure Blob ── Flow ─┼──▶ Linux Server
                    │     /data/media/
                    │
                    └──▶ Archive Server
                          /backup/
In this way, a single Azure Blob file storage environment can serve as the starting point for delivering files to multiple on-premises environments based on the internal business structure.
File Conditions
Select only the files required by the server and deliver them to the specified location
Azure Blob may contain files being processed, completed files, backup files, and other data together.
Instead of delivering every Blob to the server, you can select only the files required for actual work based on file name, extension, or path.
For example, it can be configured as follows.
| File Condition | Transfer Method |
|---|---|
completed/*.csv | Deliver to Windows business server |
media/*.mp4 | Deliver to Linux media server |
backup/*.zip | Deliver to internal archive server |
temporary/* | Exclude from transfer targets |
| Changed files | Reapply only changed files |
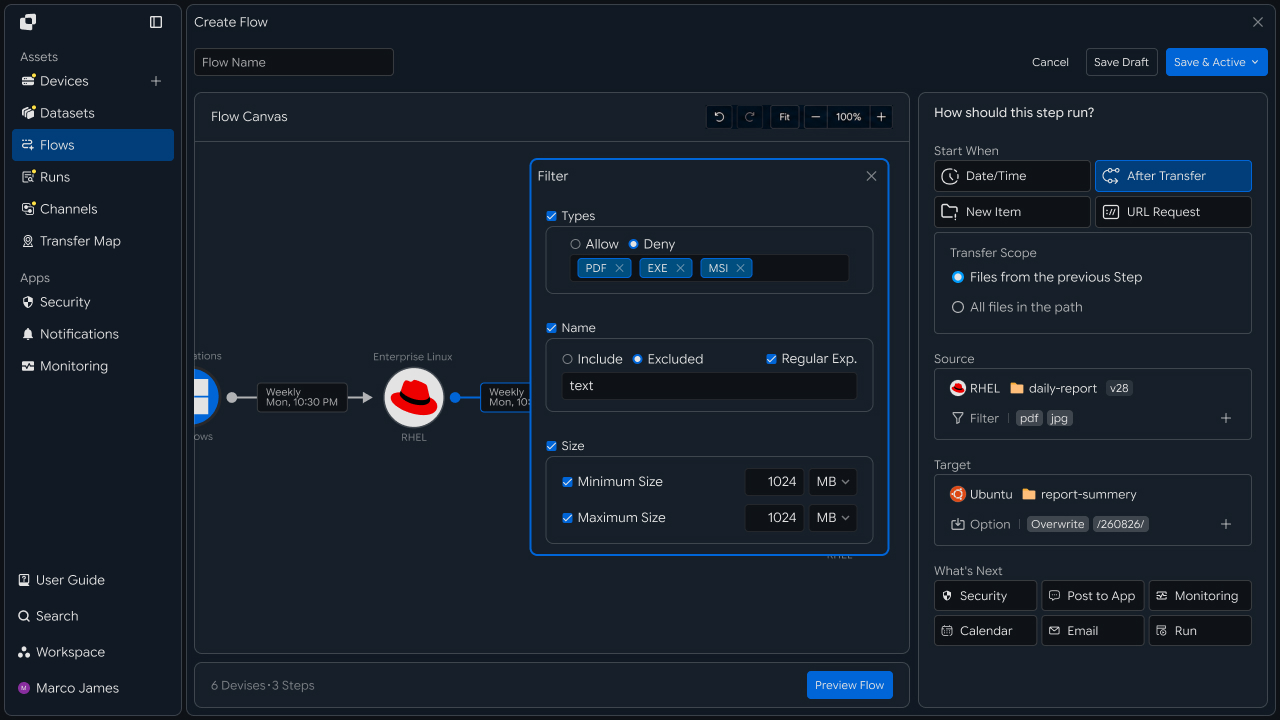
This allows you to selectively deliver only the files actually required in the on-premises environment instead of downloading all files from Azure Blob.
Follow-up Processing
Automatically connect the next operation after files are saved in the server folder
After Azure Blob files are saved on the on-premises server, the next operation that uses those files can be connected.
For example, when report files are saved on a Windows server, an internal program can process the data, or when media files arrive in a Linux server work folder, a conversion job can start.
Azure Blob
     │
     ▼
File Transfer
     │
     ▼
On-Premises Folder
     │
     ├──────────────▶ Application
     │
     ├──────────────▶ Next Flow
     │
     └──────────────▶ Completion Notice
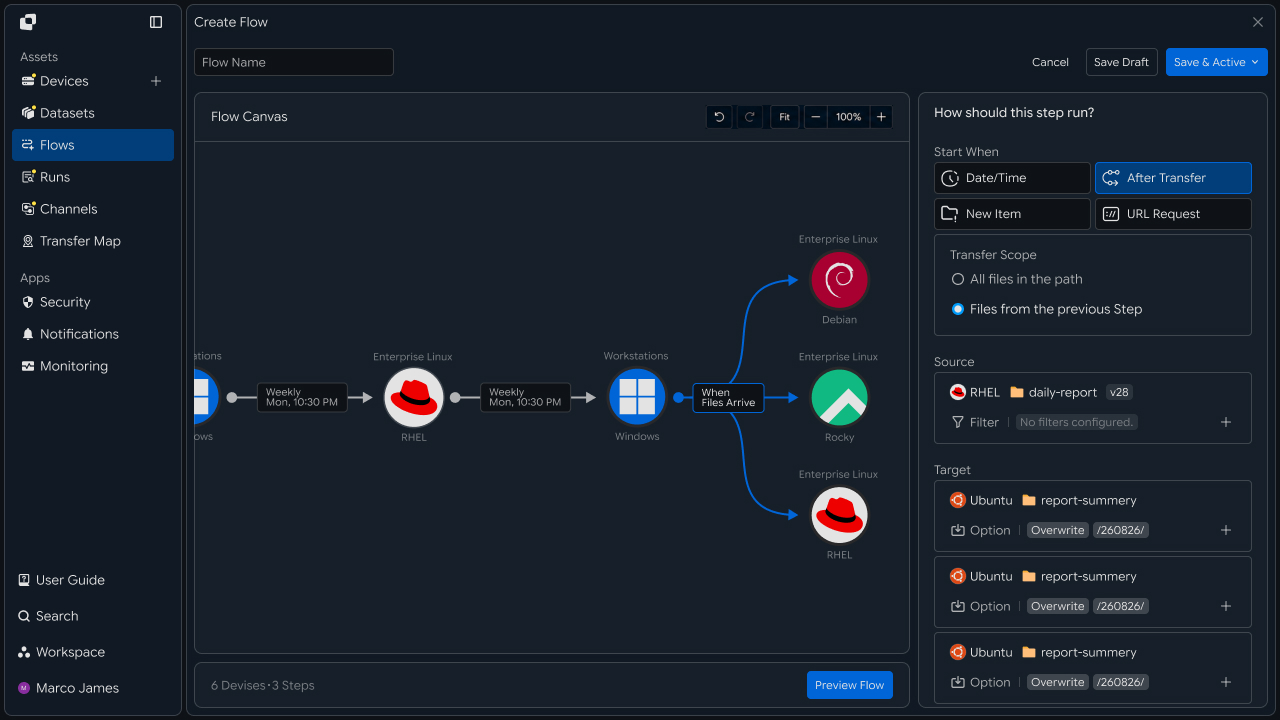
Follow-up operations can run based on confirmation that the files were successfully applied to the Target.
| Connected Target | Usage |
|---|---|
| Internal application | Process delivered files directly on the server |
| Next Flow | Deliver files to another server or Storage |
| Business notification | Notify file arrival and processing results |
| Operating environment | Check transfer status and processing results |
This connects cloud file delivery → apply to server folder → internal processing → verify results as a single business workflow.
Verify Execution
Verify the cloud source files and server storage results together
When the transfer runs, you can check the overall processing status and execution results in Runs.
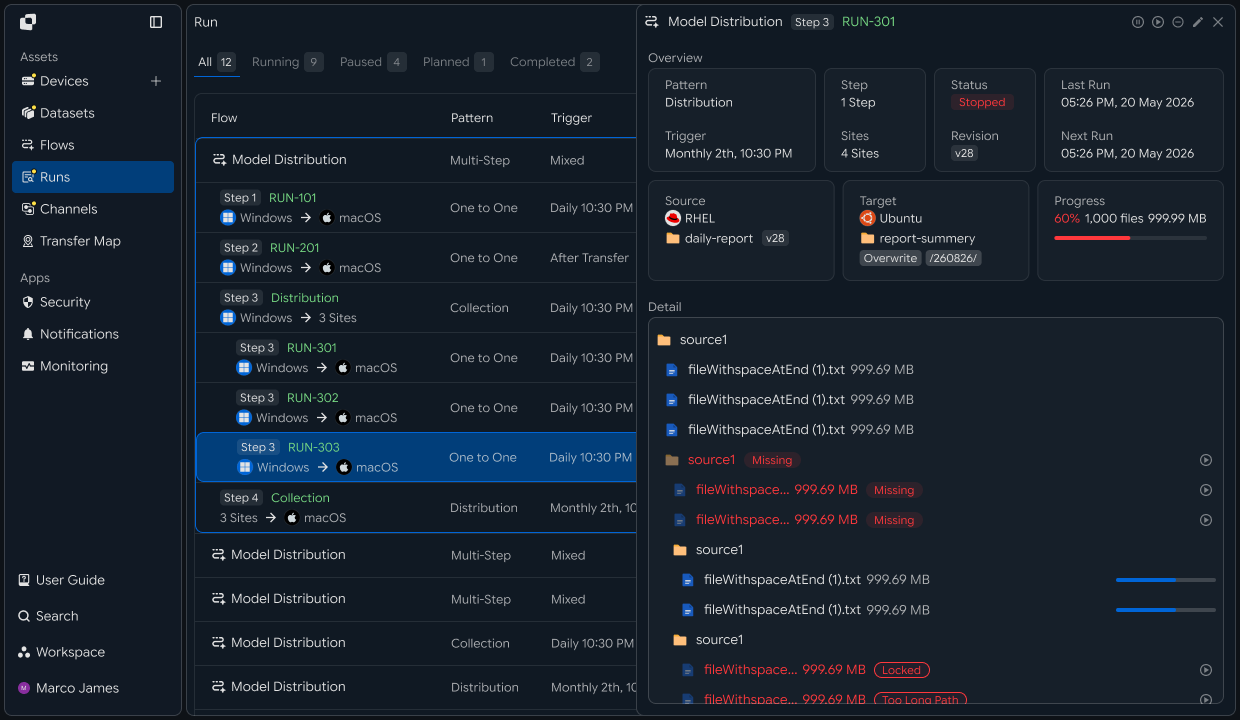
Selecting a specific Run shows the Azure Blob Source, on-premises server Target, number of transferred files, total size, and progress status.
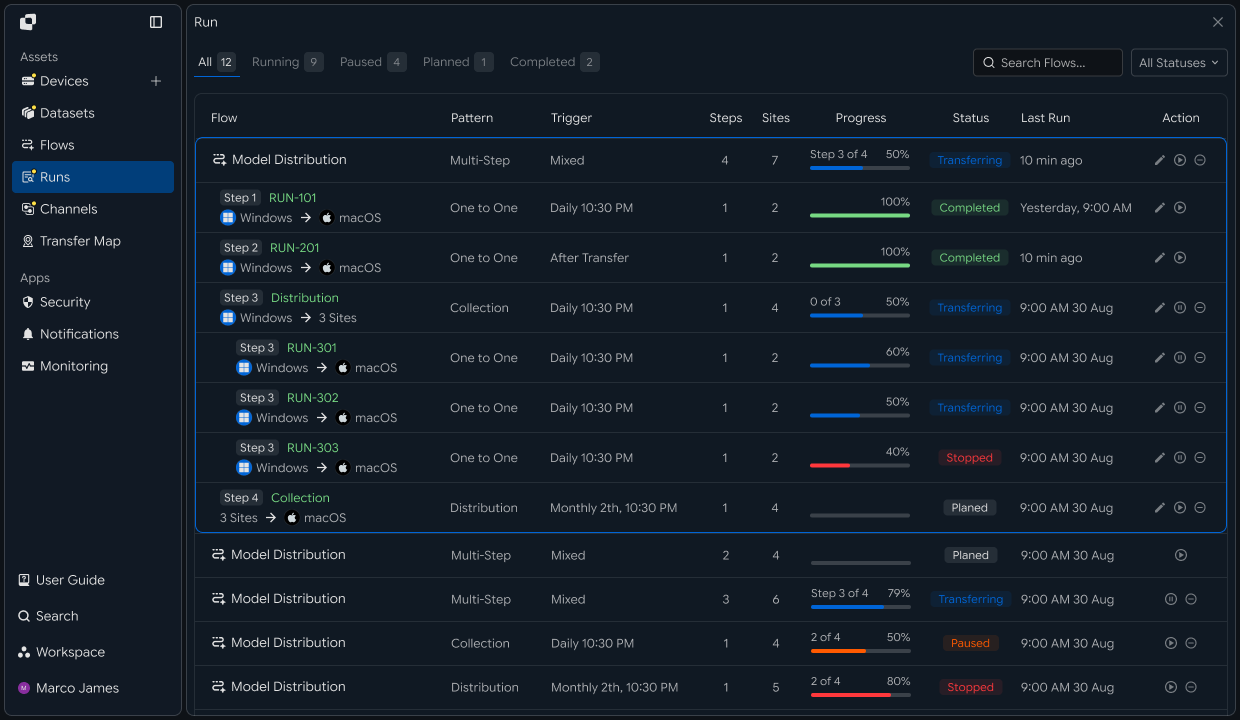
The following information can be checked for each Run.
| Item | Details |
|---|---|
| Source | Azure Blob Container and source path |
| Target | Windows or Linux server and target folder |
| Total Files | Total number of transferred files |
| Total Size | Total transfer size |
| Progress | Current transfer progress |
| Status | Completed · in progress · failed status |
| Started | Transfer start time |
| Completed | Transfer completion time |
When the transfer completes, you can verify the overall Run status and confirm that the files were successfully saved in the designated folder on the actual Target server.
This allows you to manage which Azure files were delivered to which on-premises server and the final storage results using a single execution record.
Troubleshooting
Identify the cause by separating the Azure Source from the on-premises Target
If an issue requiring additional investigation occurs during transfer, first determine whether it occurred in Azure Blob or on the on-premises server.
If files cannot be read from Azure Blob, check the Storage connection status, Container, and file path. If files cannot be saved to the server, check the Target device connection, target folder, and storage permissions.
                 Transfer Failed
                        │
           ┌────────────┴────────────┐
           │                         │
           ▼                         ▼
      Check Azure                 Check Server
           │                         │
    Container connection               Device connection status
    Source file path             Target folder
    File read permission               File write permission
           │                         │
           └────────────┬────────────┘
                        ▼
                    Adjust Environment
                        │
                        ▼
                      Retry
                        │
                        ▼
                 Verify Server Storage Result
After identifying the issue, adjust the required connection, path, or access scope and run the operation again.
After rerunning, use the new Run to verify that Azure Blob files were successfully applied to the designated work folder on the on-premises Windows or Linux server.
With this recipe, you can configure connect Azure Blob → select Source files and paths → configure Windows or Linux server Target → set file conditions and execution timing → transfer directly from cloud to on-premises → connect follow-up operations after server delivery → check Run results → verify storage results as a single flow.
This allows files stored in the cloud to be delivered directly to the on-premises business environment without an intermediate PC, creating a hybrid file transfer environment that continues through file use and follow-up processing in the server's actual work folder.
Developer
Transfer Azure Blob files to an on-premises server and verify the results
Register the source (Azure Blob) and target (server) as Devices, specify the prefix and server path, create the transfer, and check its terminal status. Prepare the following before starting.
| Prerequisite | Details |
|---|---|
| INNORIX authentication | INNORIX_ACCESS_TOKEN (Authorization: Bearer) |
| Source Azure device | Device ID and source prefix of the Azure Blob container (e.g. export/2026/09) |
| Target server device | Device ID and storage folder path of the on-premises server (e.g. /data/incoming) |
| Runtime | Python 3 + requests · Java 17+ · Node.js 18+ · .NET 8+ |
Python and Node.js reuse the minimal
api()helper for direct REST calls and status constants (STATUS_COMPLETEandTERMINAL) from the API Call Recipe. Java and C# use the bundledInnorixClient(including constants) andJsonhelper (Jfor C#). Replace the device identifiers (azure-srcandonprem-01) and paths with actual values.
Create Azure Blob → Server Transfer
Use the Azure Blob prefix as the folder root (sourcePaths + sendAllFolder) and specify the server's absolute path as targetPath. After creating the transfer, use monitorId to check its terminal status.
import time


def transfer_to_server(source, target, prefixes, target_path, action="overwrite"):
    transfer = api("POST", "/api/transfers/manual", {
        "sourceDevice": source,
        "targetDevice": target,
        "targetPath": target_path,
        "sourcePaths": prefixes,
        "sendAllFolder": True,
        "transferOptions": {"target-action": action},
    })
    return transfer["monitorId"]


def wait_transfer(monitor_id, timeout=14400, interval=5):
    deadline = time.time() + timeout
    while time.time() < deadline:
        detail = api("GET", f"/api/transfers/{monitor_id}") or {}
        if detail.get("status") in TERMINAL:
            return detail
        time.sleep(interval)
    raise TimeoutError(monitor_id)


monitor_id = transfer_to_server("azure-src", "onprem-01", ["export/2026/09"], "/data/incoming")
detail = wait_transfer(monitor_id)
print("completed:", detail.get("status") == STATUS_COMPLETE)
Use an absolute server path Specify
targetPathas an absolute path on the target server (Windows:C:/share/incoming, Linux:/data/incoming). Prepare the target folder in advance because the transfer may fail if it does not exist.
Scheduled import If the same prefix must be imported periodically, switch to scheduled automation (see the S3→Linux Automatic Download Recipe) to run at specified times.
If failed files remain, use retry_failed from the Pause and Resume Recipe to retransmit only the failures.
Implementation Result
With this recipe, Azure Blob files can be delivered to an on-premises server using the following flow.
Azure Blob (azure-src) — specify prefix
   ↓

Create transfer → wait for terminal status
   ↓

On-Premises Server (onprem-01) — save files to specified folder
   ↓

Retry failed files only
Run Azure Blob → server transfers using only device IDs and paths without handling cloud credentials in code, and selectively resend only the remaining failed files.