Getting Started
Basic Concept
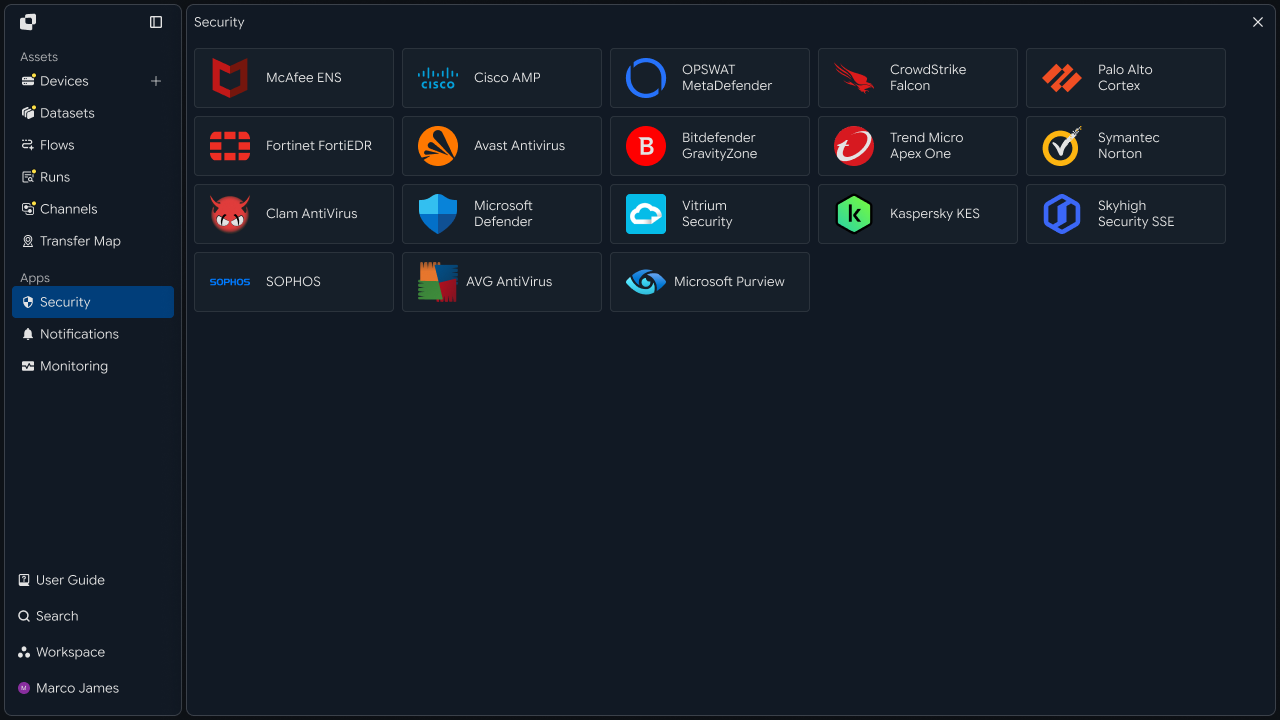
When transferring files received from external systems or users to internal servers or business environments, you can scan received files first and determine the processing path based on the scan result instead of sending them directly to the next system.
For example, compressed files, documents, executables, or data files uploaded externally can be scanned with Microsoft Defender, and only files without issues can be transferred to internal business servers or storage.
By branching the file-processing flow according to scan results, clean files can continue to the next operation while files requiring additional review can be quarantined separately or presented for operator review.
Incoming Files
      │
      ▼
Receive Flow
      │
      ▼
Microsoft Defender Scan
      │
      ├───────────────┬────────────────┐
      ▼               ▼                ▼
    Clean        Detection/Error    Check Required
      │               │                │
      ▼               ▼                ▼
Next Transfer    Quarantine      Review / Retry
This creates a file-scanning flow covering file receipt → scan execution → scan result review → follow-up transfer of clean files → quarantine of files requiring review → processing result verification.
Scan Targets
Instead of processing all files using the same criteria, scan targets can be separated by receiving path, file type, and business purpose.
For example, all externally received files can be scanned, or scanning can be limited to files entering a specific upload folder, executables, and compressed files.
Incoming Files
│
├── /incoming/documents/
│      ├── report.pdf
│      └── contract.docx
│
├── /incoming/archive/
│      └── package.zip
│
└── /incoming/software/
       └── installer.exe
                │
                ▼
         Defender Scan
| Scan Criteria | Usage |
|---|---|
| Receiving path | Scan files received in a specified folder |
| File type | Scan documents, compressed files, or executables |
| File name | Scan files matching specific naming rules |
| Transfer operation | Scan files received through a specific Flow |
| All received files | Scan all received files before follow-up processing |
This applies the scanning flow primarily to externally received files and files requiring additional review instead of treating internally generated files the same way.
Processing Structure
File scanning can run as an independent operation, but including the scan step in the actual file transfer flow connects post-receipt processing in one Flow.
┌──────────────┐
│ External     │
│ Source       │
└──────┬───────┘
       │
       ▼
┌──────────────┐
│ Receive      │
│ Folder       │
└──────┬───────┘
       │
       ▼
┌──────────────┐
│ Defender     │
│ Scan         │
└──────┬───────┘
       │
   ┌───┴────┐
   ▼        ▼
 Clean    Detection
   │        │
   ▼        ▼
 Target   Quarantine
With this structure, files are received first, their scan status is checked, and only files with clean scan results are transferred to the next Target.
IT Engineer
Receiving Path
To configure file scanning, first identify where files received from external or other systems are stored and connect that location as the Source of the scan Flow.
For example, scanning can start from the /data/incoming path after files are received there.
File Sources
│
├── External Upload
│      └── /data/incoming/upload/
│
├── Remote Server
│      └── /data/incoming/transfer/
│
└── Partner System
       └── /data/incoming/system/
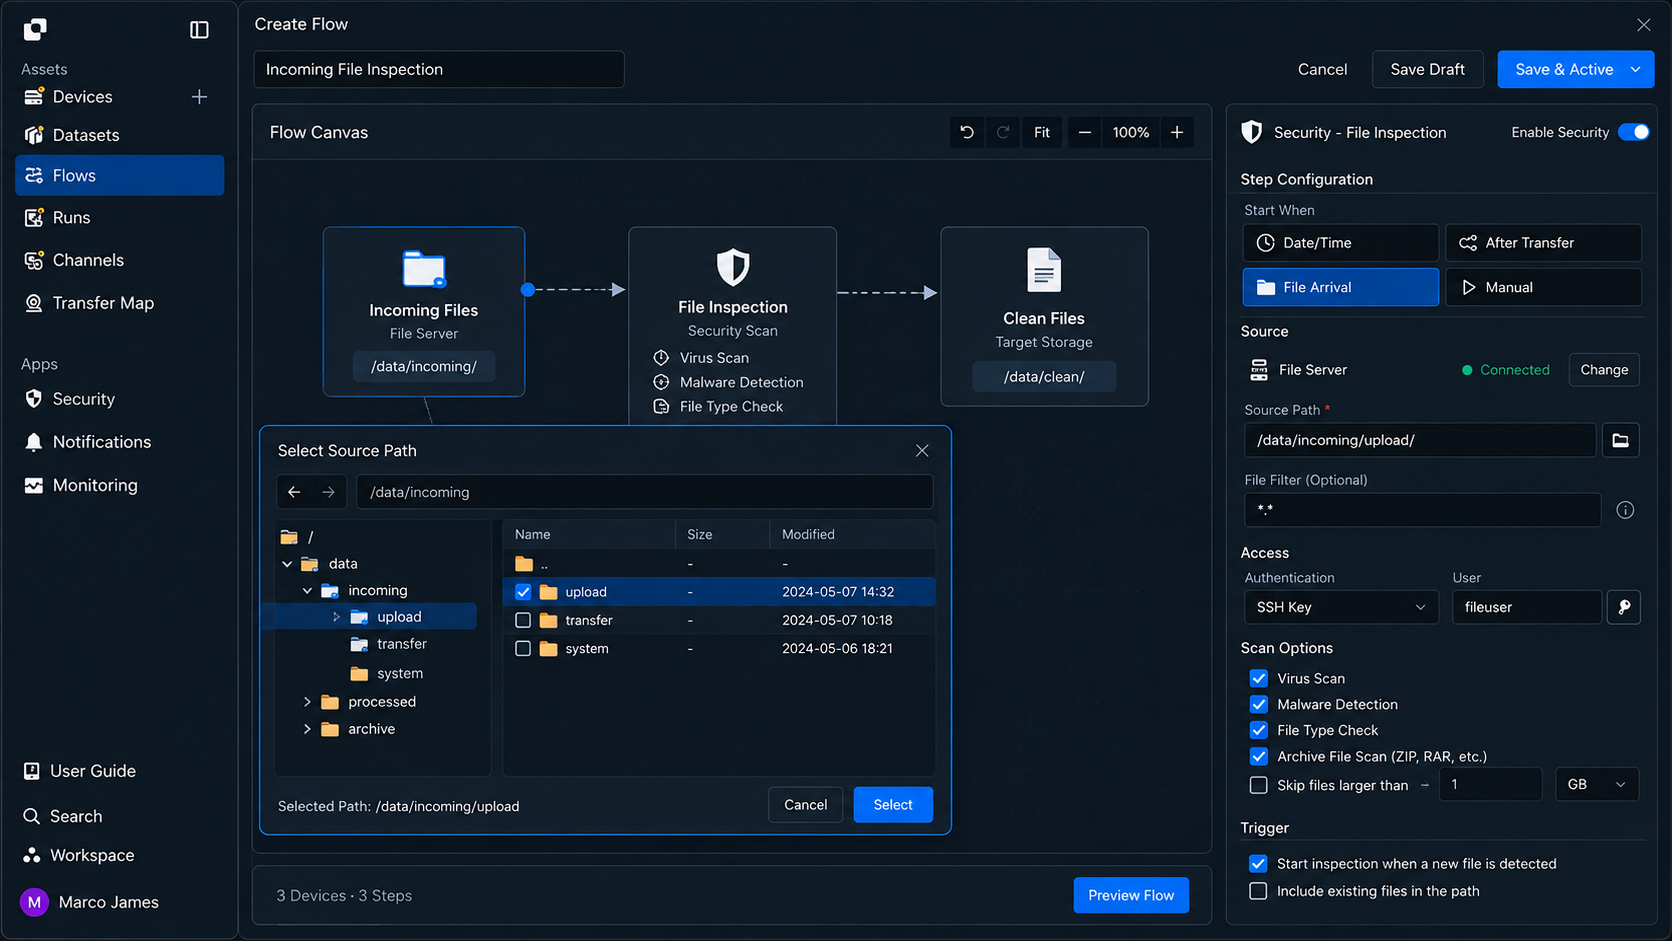
The following items can be checked in the receiving environment.
| Configuration Item | Setting |
|---|---|
| Source | System where received files are stored |
| Source Path | Path containing files to scan |
| File conditions | Names and types of files to scan |
| Access permissions | Permissions required to access files and run scans |
| Scan timing | Immediately after file receipt or under specified conditions |
For example, when a new file is created in /data/incoming/upload, it can be identified as a scan target and the next scan operation can begin.
Scan Connection
Connect received files to the Microsoft Defender scan operation so scanning runs automatically after files are ready.
Scanning can run immediately after a file is received or continue after the preceding file transfer operation completes.
File Received
      │
      ▼
Transfer Completed
      │
      ▼
Scan Task
      │
      ▼
Result Evaluation
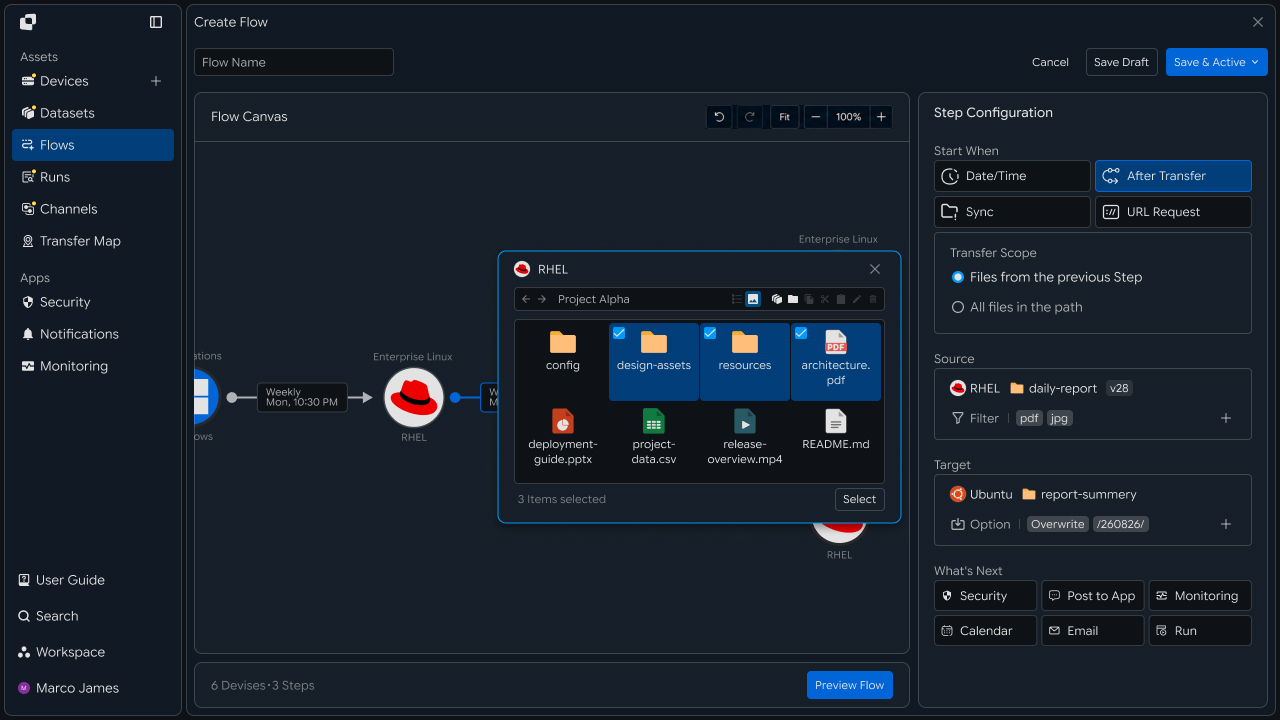
Execution conditions for scanning can be defined according to the file-processing environment.
| Execution Condition | Usage |
|---|---|
| New File | Run scan when a new file is received |
| After Transfer | Scan after the previous transfer operation completes |
| Date/Time | Batch-scan received files at a specified time |
| URL Request | Run scan in response to an external request |
| Manual Run | Manually select and scan required files |
This connects file receipt with scanning instead of requiring a separate manual scan after files are received.
Result Branching
After scanning completes, different file-processing paths can be configured according to the result.
Clean files can be transferred to internal business servers or storage, while detected files or files requiring additional review can be moved to a separate quarantine location.
Defender Scan
      │
      ▼
Scan Result
      │
 ┌────┼───────────────┐
 ▼    ▼               ▼
Clean Detection     Error
 │        │            │
 ▼        ▼            ▼
Transfer Quarantine Review
 │        │
 ▼        ▼
Target   Isolated Storage
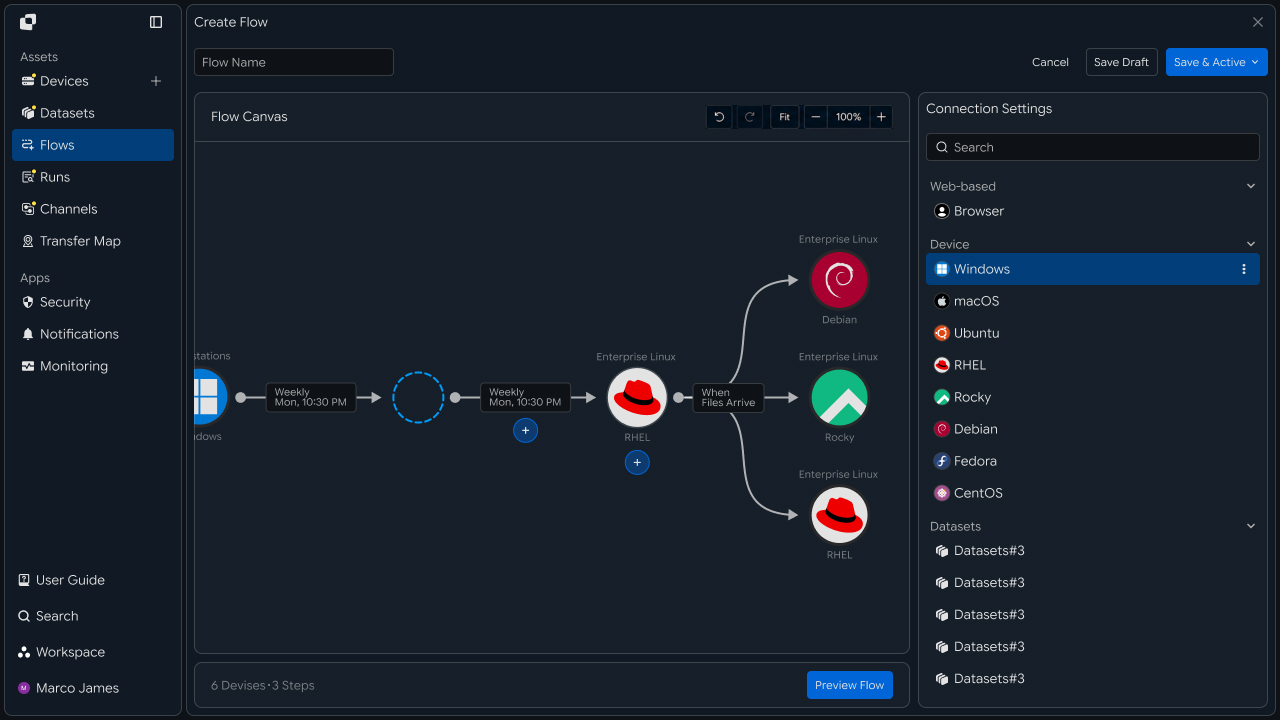
Processing can be configured by scan result as follows.
| Scan Result | Processing Method |
|---|---|
| Clean | Follow-up transfer to a specified internal system |
| Detection | Move to a quarantine path or separate storage location |
| Scan Error | Check the scan environment and rerun |
| Check Required | Operator reviews the file and scan result |
| Completed | Run the next business operation or follow-up Flow |
For example, clean files can be transferred to /data/approved, while detected files can be separated and managed in /data/quarantine.
Quarantine Management
Detected files or files that cannot be immediately transferred to the next system can be managed separately from normal received files.
Incoming Files
      │
      ▼
Defender Scan
      │
      ▼
Detection
      │
      ▼
┌───────────────────┐
│ Quarantine Target │
│ /data/quarantine  │
└─────────┬─────────┘
          │
          ▼
    Review / Action
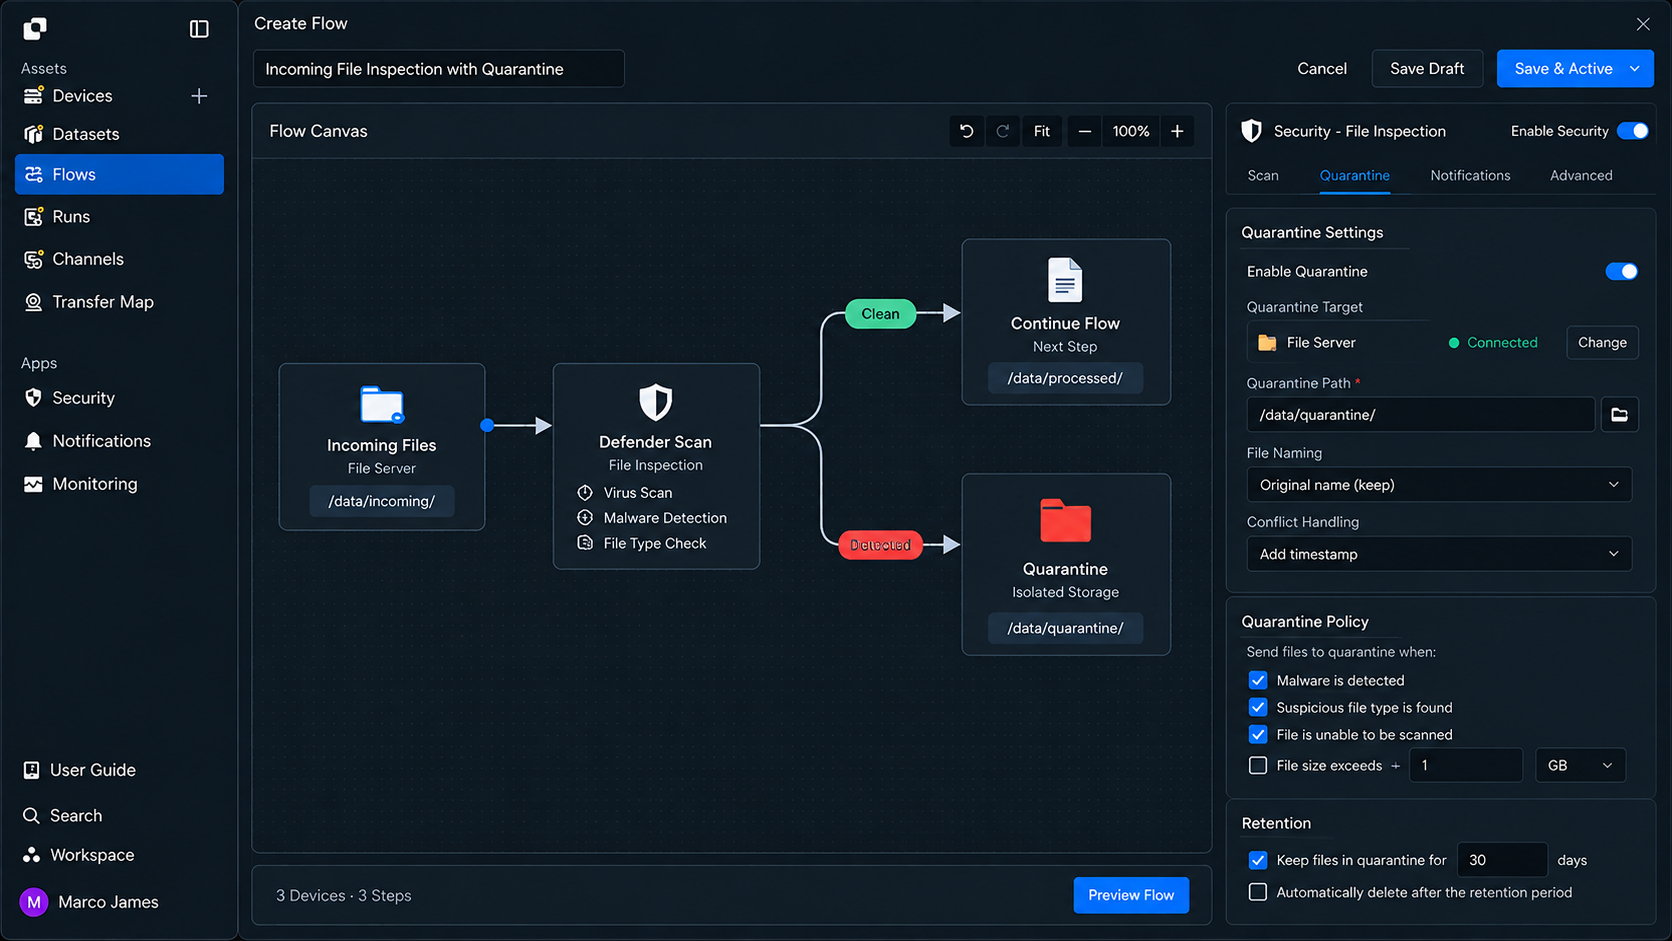
Files in the quarantine area can be classified using the following criteria.
| Item | Usage |
|---|---|
| File name | Identify quarantined files |
| Receiving location | Check where the file was originally received |
| Scan result | Check detection or review-required status |
| Scan time | Check when the file scan ran |
| Processing status | Check review or reprocessing status |
This prevents files requiring additional review from being applied to the same internal business path as clean files and allows only those files to be managed separately.
Follow-up Transfer
Files with clean scan results can be connected for automatic transfer to the next Flow or internal system.
For example, after scanning externally received files, only clean files can be stored on a file server or transferred to a data-processing server or project-specific workspace.
Clean File
     │
     ▼
Next Transfer
     │
 ┌───┼─────────────┐
 ▼   ▼             ▼
Server Storage Processing
 │      │             │
 └──────┴──────┬──────┘
               ▼
          Next Workflow
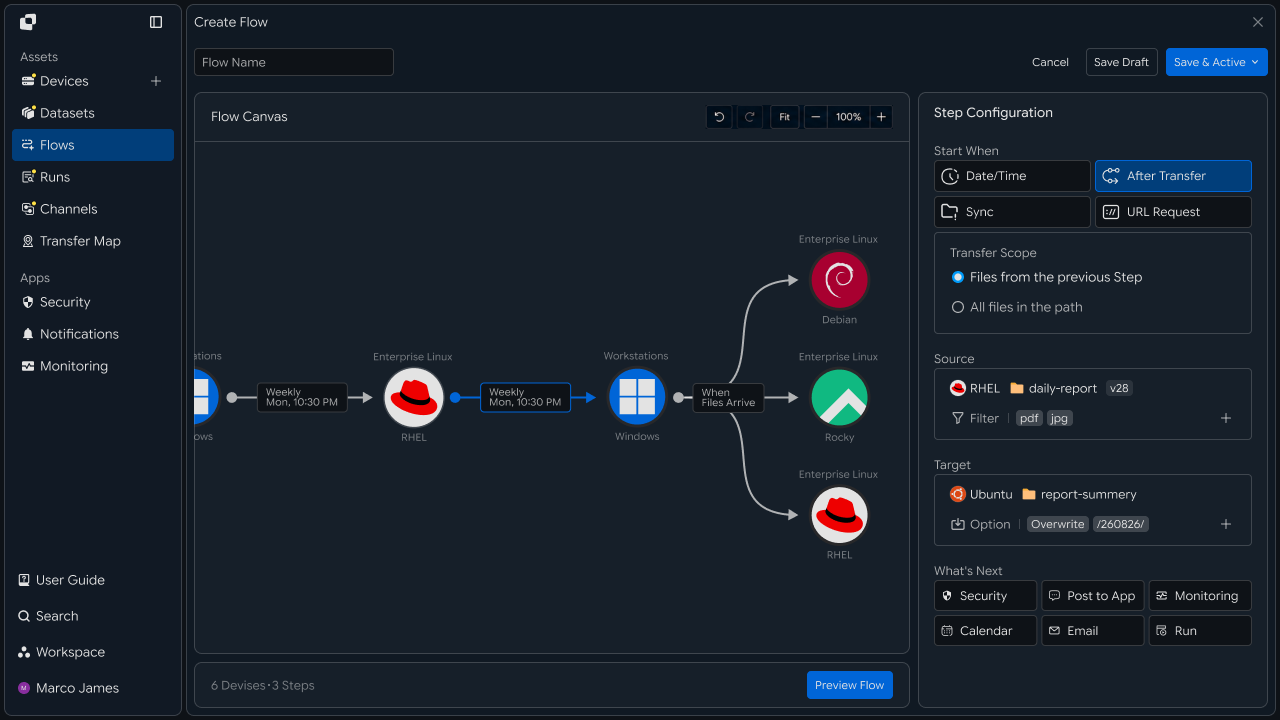
| Target | Usage |
|---|---|
| Internal file server | Store scanned files |
| Business system | Apply as internal business files |
| Processing server | Run conversion or analysis operations |
| Cloud storage | Store scanned files |
| Next Flow | Additional transfer or automated processing |
This automatically connects the next operation based on scan results instead of operating file scanning and business file transfer as separate tasks.
Execution Results
When scanning and follow-up transfer operations run, overall processing status and per-file results can be checked in Runs.
Within one Run, you can review the flow from file receipt through scanning, result branching, and application to the next Target.
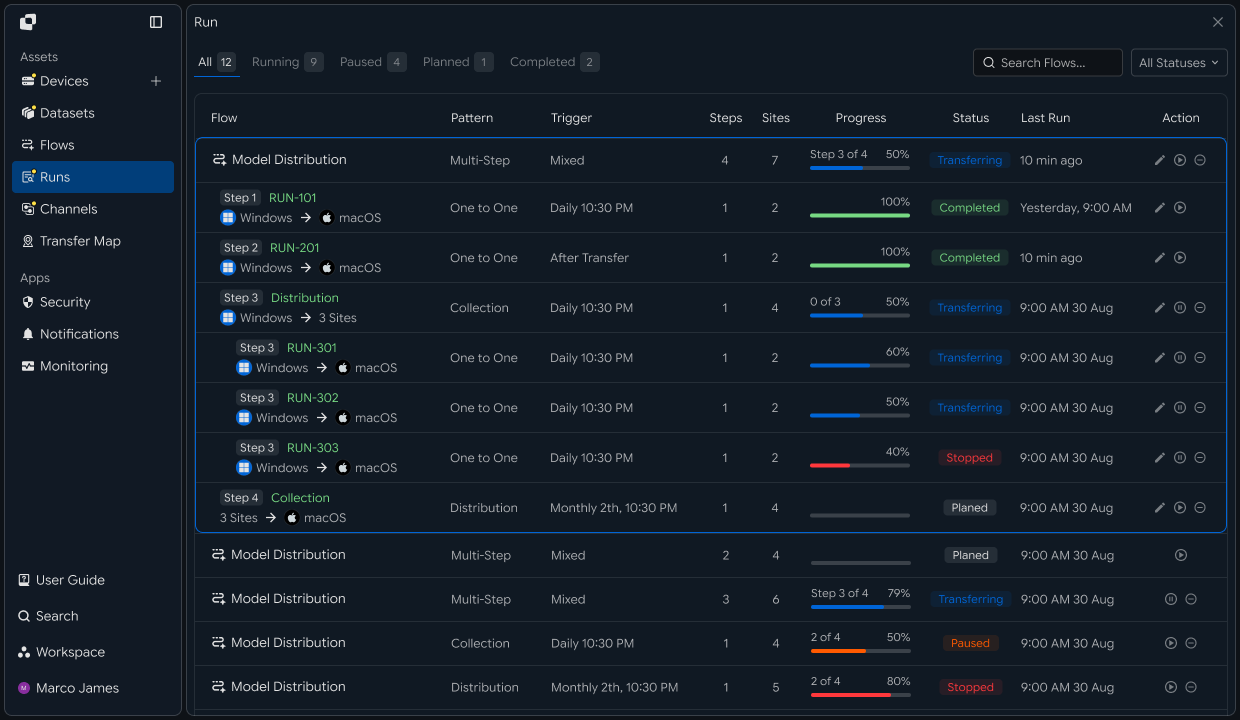
The following information can be checked for each Run.
| Item | Details |
|---|---|
| Source | Location where files to scan were received |
| Scan Status | Microsoft Defender scan status |
| File Result | Per-file scan result |
| Target | Internal system where clean files were transferred |
| Quarantine | Storage location for quarantined files |
| Total Files | Total number of scanned files |
| Status | Operation completed or review-required status |
| Started | Operation start time |
| Completed | Operation completion time |
Selecting a specific Run lets you review scan results and per-file processing status to distinguish clean files from files requiring additional review.
Exception Handling
If an error occurs during file scanning or a specific file requires additional review, use the Run details to check the scan stage and file-processing status.
For example, if a Microsoft Defender scan does not complete or an issue occurs while transferring a file to the quarantine Target, you can check the file and connection status.
Scan Run
    │
    ▼
View Details
    │
    ├── Source Path
    │
    ├── Scan Task
    │
    ├── Scan Result
    │
    └── Target Status
            │
            ▼
          Adjust
            │
            ▼
           Retry
            │
            ▼
       Result Verified
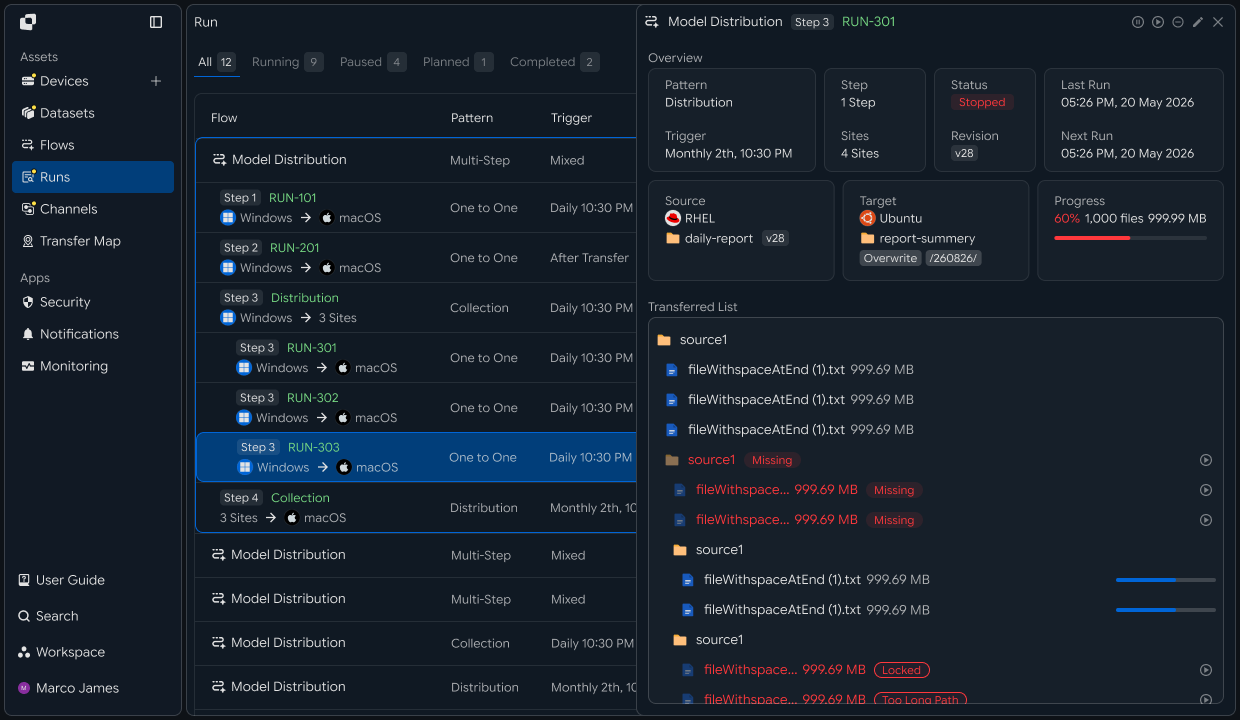
If an issue occurs, the following items can be checked together.
| Item | Details | Follow-up Action |
|---|---|---|
| Source | Scan target file and path | Check file status |
| Scan environment | Defender scan execution status | Check scan environment |
| File result | Per-file scan status | Recheck result |
| Quarantine | Quarantine Target connection status | Check storage location |
| Target | Follow-up transfer status for clean files | Check target environment |
| Execution record | Run and processing result by stage | Rerun required operation |
After resolving the issue, rerun the operation for files whose scans did not complete or that require additional review instead of reprocessing all received files from the beginning.
This process creates a file-scanning and follow-up processing flow covering file receipt → identify scan targets → Microsoft Defender scan → branch by result → follow-up transfer of clean files → quarantine files requiring review → check execution results → handle exception files.
Instead of sending externally received files directly to internal systems, this separates processing paths based on scan results and connects the business use of clean files and separate management of files requiring additional review in one Flow.
Developer
Scan transferred files with Defender, identify infected files, and perform follow-up processing
After registering the Defender security integration once, check scan results in the file list after transfer completion and forward only files that passed the scan. Prepare the following before starting.
| Prerequisite | Details |
|---|---|
| INNORIX authentication | INNORIX_ACCESS_TOKEN (Authorization: Bearer) |
| Defender settings | Configuration values required for Defender integration (check with GET /api/integrations/rules/microsoft_defender) |
| Transfer information | monitorId of the transfer to scan, follow-up transfer Target Device · path |
| Runtime | Python 3 + requests · Java 17+ · Node.js 18+ · .NET 8+ |
Python and Node.js reuse the minimal
api()helper for direct REST calls from the API Call Recipe. Java and C# use the bundledInnorixClientandJsonhelper (Jfor C#). Infection is determined by file status5(skipped) and code100112, so no separate status constant is required.
Register Defender Security Integration
Register the integration with type: "microsoft_defender" and category: "security". For scanTiming (scan timing), onDetection, and scanScope, use the option values from the rules (GET /api/integrations/rules/microsoft_defender).
def create_defender_integration(name, scan_timing="after_transfer_target",
                                on_detection="alert_only", scan_scope="all"):
    result = api("POST", "/api/integrations", {
        "name": name,
        "type": "microsoft_defender",
        "category": "security",
        "config": {
            "name": name,
            "scanTiming": scan_timing,   # before_transfer_source · after_transfer_target · both
            "onDetection": on_detection,  # block_transfer · alert_only · admin_confirm
            "scanScope": scan_scope,      # all · executable_files_only · custom_exceptions
        },
    }) or {}
    return result.get("integrationId")


integration_id = create_defender_integration("incoming-file-scan")
onDetectionbehavior scope The currentonDetection(block_transfer·alert_only·admin_confirm) value is stored in the integration settings but is not applied to transfer behavior. Regardless of the configured value, files detected as infected by Defender are markedskipped(block_transferdoes not stop the transfer itself). Follow-up policies such as blocking, quarantine, and administrator approval must be implemented separately in the application. FollowGET /api/integrations/rules/microsoft_defenderfor the exact configuration fields.
Scan timing and file location
before_transfer_sourcescans at the Source before transfer, so infected files are not transferred to the Target.after_transfer_targetscans after transfer to the Target, so infected files are recorded asskippedafter reaching the Target and may remain there. In this case, the application must move the file to a quarantine location or delete it.
Check Scan Results After Transfer
After the transfer completes, distinguish infected files (status 5 skipped + code 100112) from transfer-completed files (status 2 completed) in the file list. For transfers where scanning was performed, completed files are treated as scan-passed files and forwarded to the next stage, while infected files are quarantined.
VIRUS_CODE = "100112"   # EXCEPTION_VIRUS_SCAN
FILE_SKIPPED = 5
FILE_COMPLETED = 2
PAGE_SIZE = 500

def scan_results(monitor_id):
    infected, completed = [], []
    page = 1
    while True:   # page through until fewer than size are returned
        result = api("GET", f"/api/transfers/{monitor_id}/files", params={
            "state": "any", "page": page, "size": PAGE_SIZE,
        }) or {}
        children = result.get("children") or []
        for c in children:
            path = c.get("sourceFilePath")
            if c.get("status") == FILE_SKIPPED and str(c.get("code")) == VIRUS_CODE:
                infected.append(path)          # flagged by Defender
            elif c.get("status") == FILE_COMPLETED and path:
                completed.append(path)         # transfer-complete (scanned only when scanning ran)
        if len(children) < PAGE_SIZE:
            break
        page += 1
    return infected, completed


infected, completed = scan_results(monitor_id)
print("infected:", len(infected), "completed:", len(completed))
# if scanning ran: completed files -> forward; infected files -> quarantine (app-side)
Infection criteria Files marked as infected by Defender are recorded not as status
4(error) or9(partial), but as5(skipped) + code100112. Both conditions must be checked together to distinguish infection from a normal skip (duplicate, etc.).
Scan timing · scope
scanTimingcan be set to before Source transfer (before_transfer_source), after Target transfer (after_transfer_target), or both (both). Transfer status11(virus-scanning) and file status8(virus-scanning) are temporary and delivered only through websocket, so they may not appear in polling queries. Check scan results in the file list after the transfer ends.
Meaning of file status 2 File status
2(completed) means transfer completed. For transfers where scanning was performed, completed files not marked as infected are scan-passed files. However, scanning is skipped for massive transfers, so status2in that case does not guarantee that the file passed a scan. If Defender scanning is required, use a transfer method where scanning is not skipped.
Specify scan-passed files in sourceItem of POST /api/transfers/manual to forward them to the next stage, and move infected files to a separate quarantine location or report them as a list (INNORIX does not quarantine automatically). See the API Call Recipe for how to specify the file list precisely in sourceItem.
Implementation Result
With this recipe, received files can be scanned with Defender and processed according to the results using the following flow.
Transfer (Defender scan timing specified)
   ↓  Infected files skipped, transfer ends with 2/9

Query file list (GET .../files)
   ↓  Status 5 + code 100112 = infected · status 2 = transfer completed

Follow-up transfer of scan-passed files · quarantine infected files (application handling)
Check Defender scan results, quarantine infected files (status 5 + code 100112), and forward only files that passed the scan.