Get Started
Basic Concept
Upload and download files reliably from a web service
When a web service handles files such as documents, images, videos, and data, users need a way to select files in the browser and transfer them to the required location.
Web file transfer adds upload and download capabilities to a web service, allowing users to select files in the browser and transfer large files between business systems and storage locations.
For example, users can upload large video files through a web service and download result files for immediate use in their work.
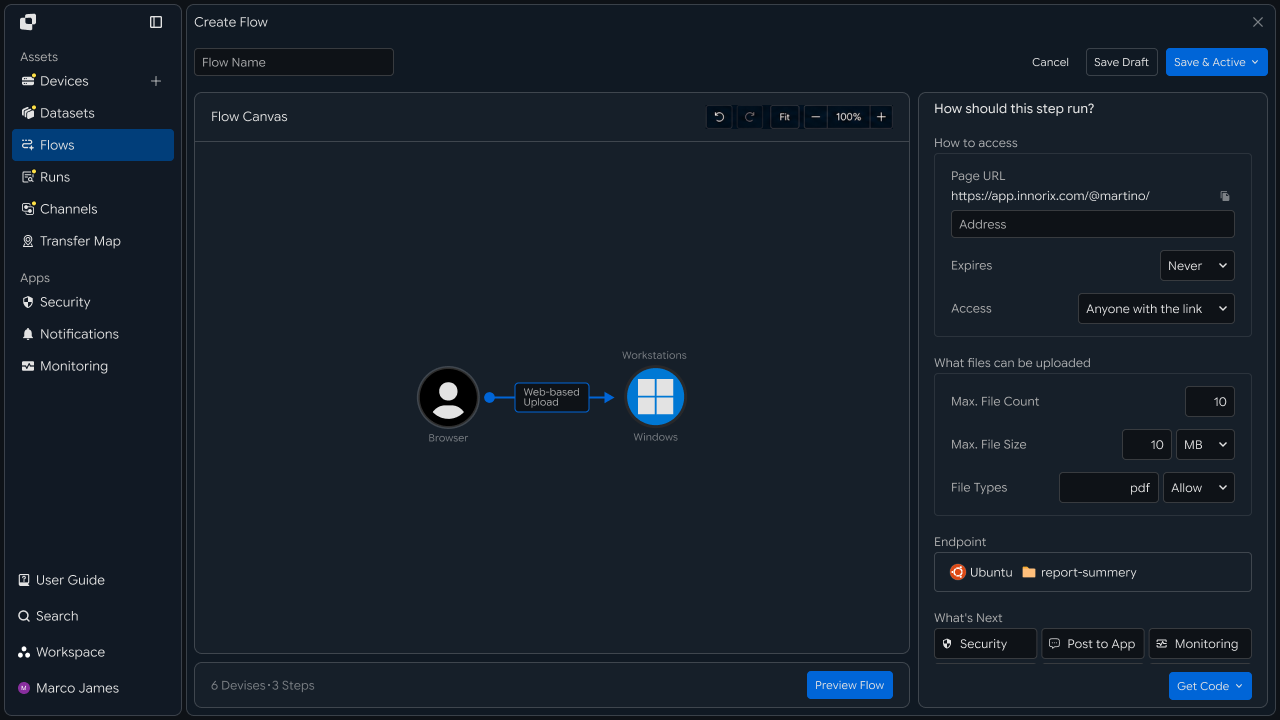
By connecting a web service to file transfer capabilities, users can select files from a familiar web interface while transfers are processed according to the configured transfer environment.
Transfer Flow
Understand the process from file selection to transfer completion
Web file transfer follows a flow in which users select files, start the transfer, monitor progress, and use the completed files in the next step of their work.
① Select files
↓
② Prepare transfer
↓
③ Upload or download files
↓
④ Check transfer progress
↓
⑤ Complete transfer
↓
⑥ Use files
For uploads, files selected on the user's device are transferred to the specified business system or storage location.
For downloads, files prepared in the business system are transferred to the user's device for use in the required task.
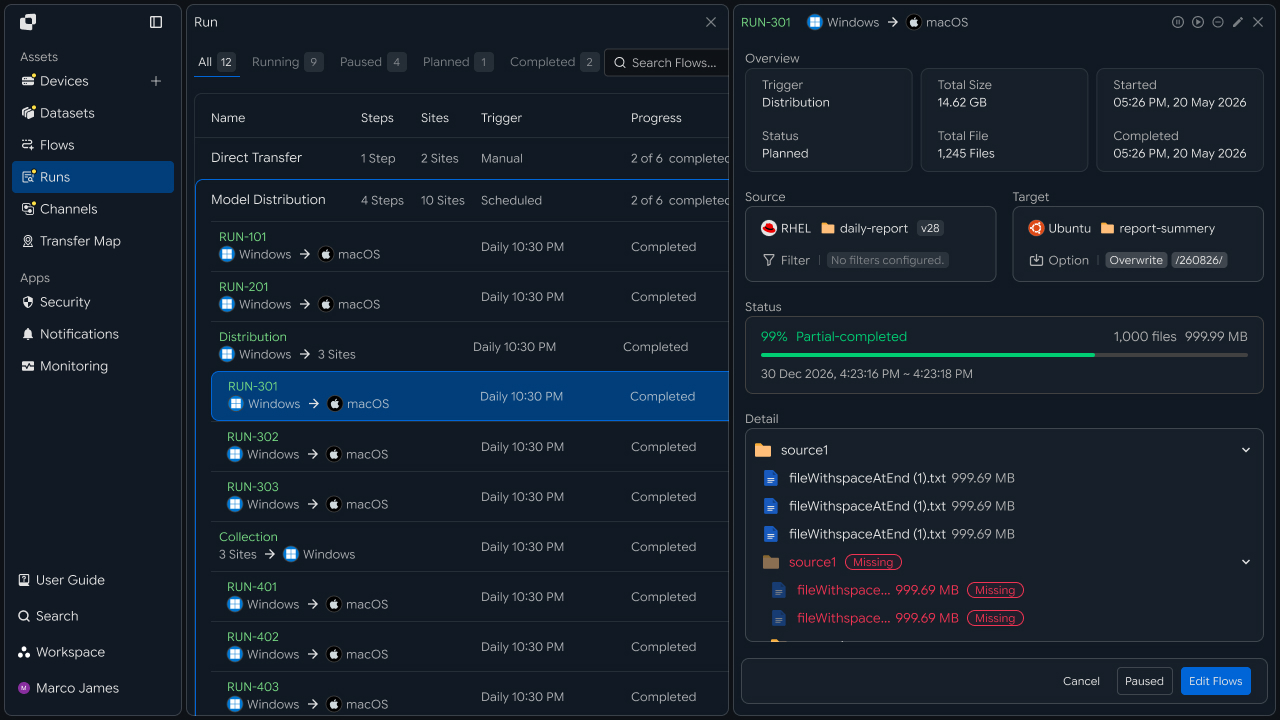
This flow lets users select files in the web service, check transfer status, and immediately use completed files.
Workflow Changes
Handle large file transfers faster and more reliably
When large files are handled through a web service, transfer times can increase depending on file size and network conditions.
By applying web file transfer capabilities, large files can be processed using transfer methods suited to the business environment, while users can monitor progress and results directly from the web interface.
Before and after implementation
| Category | Standard web file handling | With web file transfer |
|---|---|---|
| File selection | Select files in the web interface | Select files in the web interface |
| Large files | Configure the transfer environment based on file size | Apply capabilities designed for large file transfer |
| Progress tracking | Build functionality to monitor transfer progress | View progress and status in the interface |
| File use | Continue work after the transfer completes | Connect completed files to the next task |
Adding file transfer capabilities to a web service lets users move from file selection to completion confirmation within a single interface flow.
Business Teams
Business teams focus on uploading and downloading the files they need directly from the web and using completed files immediately in their work.
File Upload
Upload required files directly from the web
Users can select and upload files required for their work from the file transfer interface in the web service.
After selecting files, users can review the file names and sizes and start the transfer. The interface can also support selecting and uploading multiple files at once.
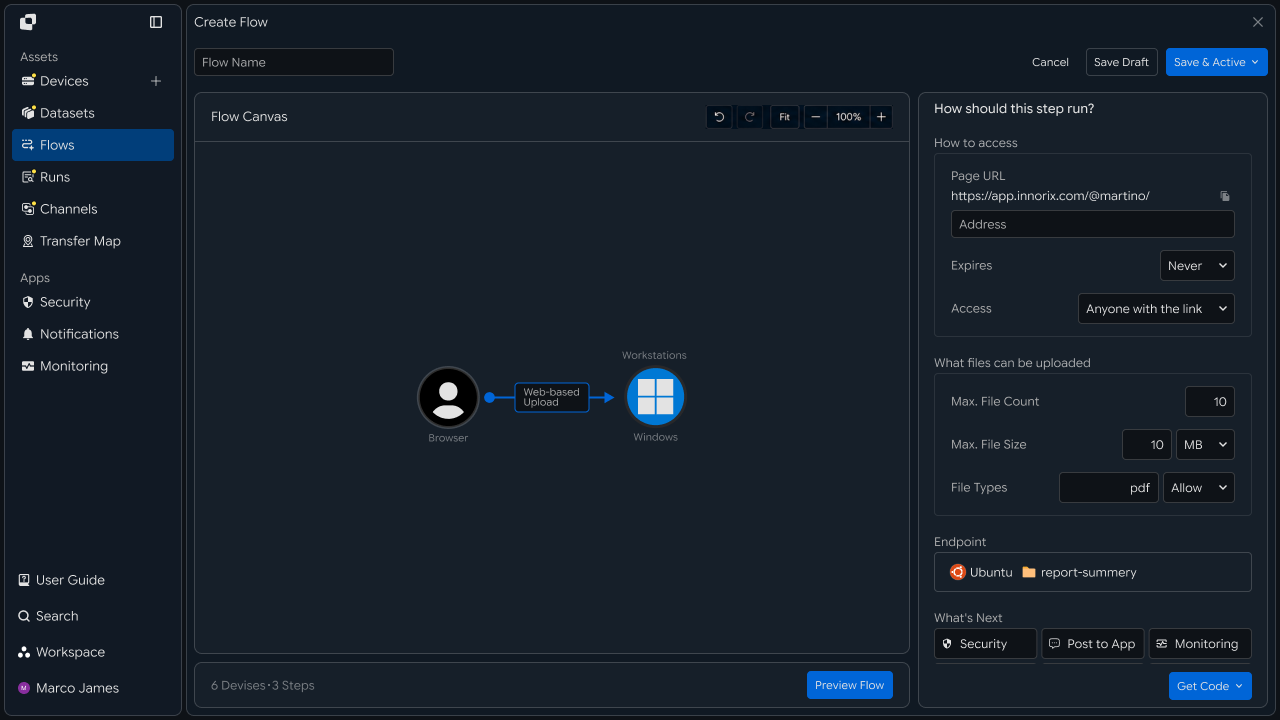
For example, when users upload large videos, design files, business data, or documents through the web service, those files can be accessed and used in the designated business system or workspace.
File Download
Download required files directly from the web
Files provided through the web service can be downloaded to the environment where they are needed.
Users select the required items from the file list and start the download. The interface can also be configured to download multiple selected files together.
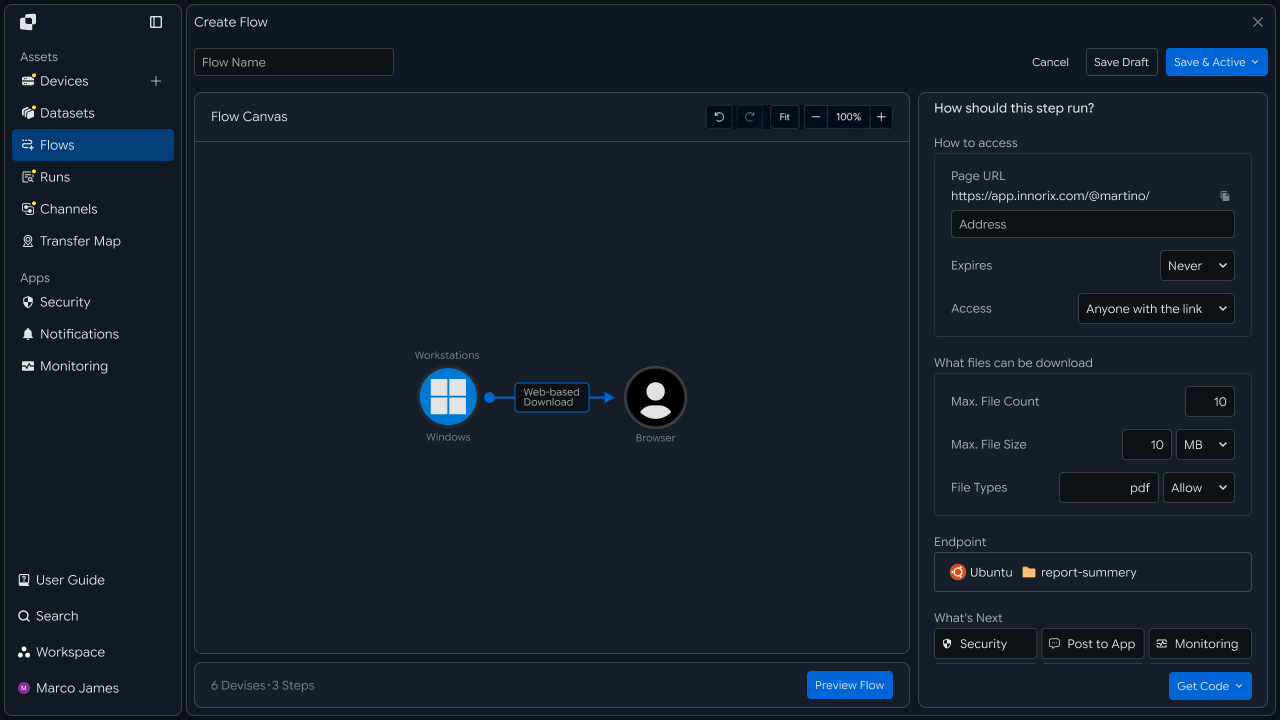
After the download completes, users can review the received files in their current work environment and use them in the next task.
| Use case | How files are used |
|---|---|
| Content work | Review video and image files |
| Development | Use installation files and deployment materials |
| Data work | Use analysis data and result files |
| General work | Review documents and business materials |
Transfer Status
Check files in progress and completed results
When files are uploaded or downloaded, users can monitor progress from the transfer interface.
Per-file progress and overall transfer status make it easy to distinguish files still being processed from files that have completed.
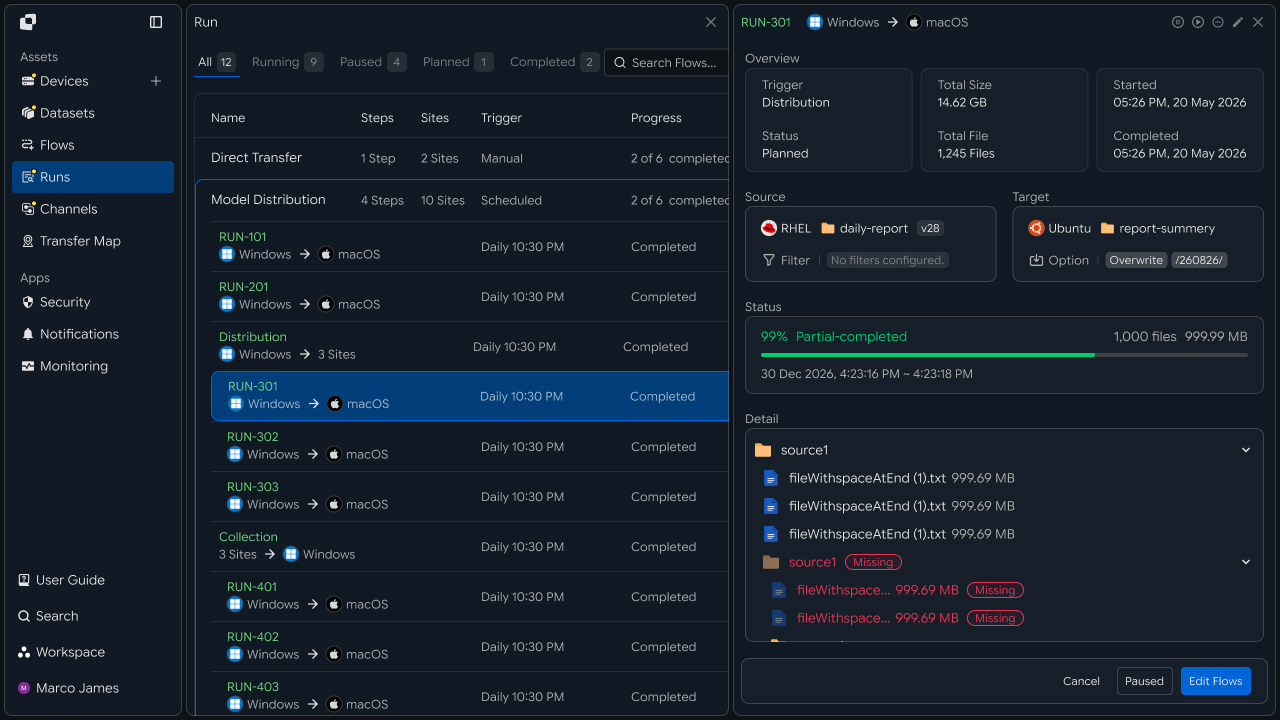
Key items to check include:
File name
File size
Transfer progress
Transfer status
Completion result
After checking transfer status, users can continue their work using the completed files.
File Use
Use transferred files immediately in the next task
Completed files can be used in the next stage of the relevant workflow.
For example, when a user uploads a large source file, a processing system can use the file for conversion or analysis. Once the result file is ready, the user can download it through the web service and continue with the next task.
File Upload
    ↓

Business System Processing
    ↓

Result File Ready
    ↓

File Download
    ↓

Continue Work
In this way, business teams can transfer files directly through the web service and connect completed files to both the current task and the next one.
IT Engineers
IT engineers focus on connecting the web service to the file transfer environment, configuring transfer capabilities and policies, and operating transfer results.
Device Setup
Connect the web service to file transfer devices
To configure web file transfer, connect the web service to the server or business system that will process the files.
The web application provides the file transfer interface, while connected servers and devices receive uploaded files or provide files for download.
The configuration can be expanded based on the business environment as follows.
Web Service
     │
     ▼
File Transfer
     │
  ┌───┴────┐
  ▼        ▼
Server   Storage
  │        │
  ▼        ▼
Processing  Workspace
Connecting the web service to the transfer environment lets you integrate file uploads and downloads with the file flow of your business systems.
Transfer Setup
Configure uploads, downloads, file paths, and target locations
Configure the upload and download capabilities used by the web service, then set the file paths and target locations for transfers.
For uploads, specify where user-submitted files will be stored. For downloads, connect the location that contains files to be provided to users.
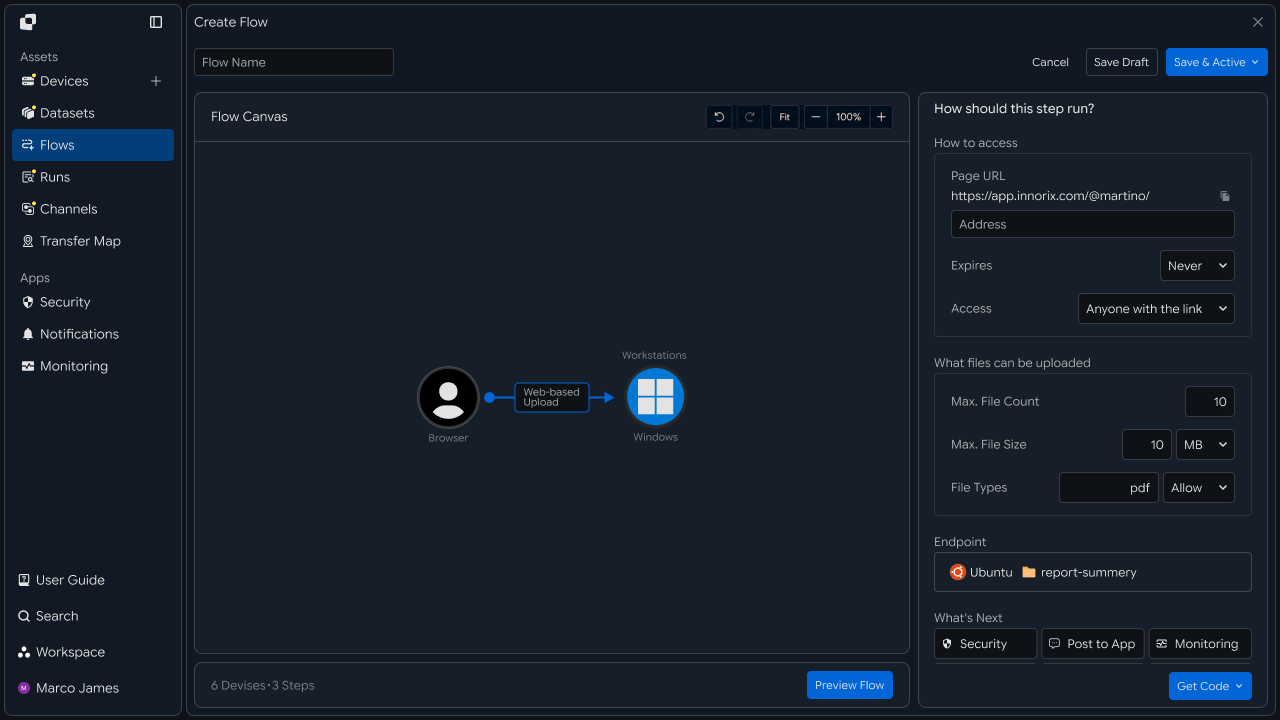
Key settings can be configured as follows.
| Setting | Use |
|---|---|
| Upload | Transfer files from the web to the server |
| Download | Transfer files from the server to the user's device |
| Source Path | Location where files to be transferred are prepared |
| Target Path | Location where transferred files are placed |
| File Filter | Set conditions for files to transfer |
Configuring file transfer paths connects the required file flow between the web service and business systems.
Transfer Policy
Set transfer criteria and access scope for files and targets
After configuring transfer capabilities, define file handling criteria and access scope.
You can configure the file transfer flow by applying criteria required by the business environment, including file size, extension, transfer target, and storage path.
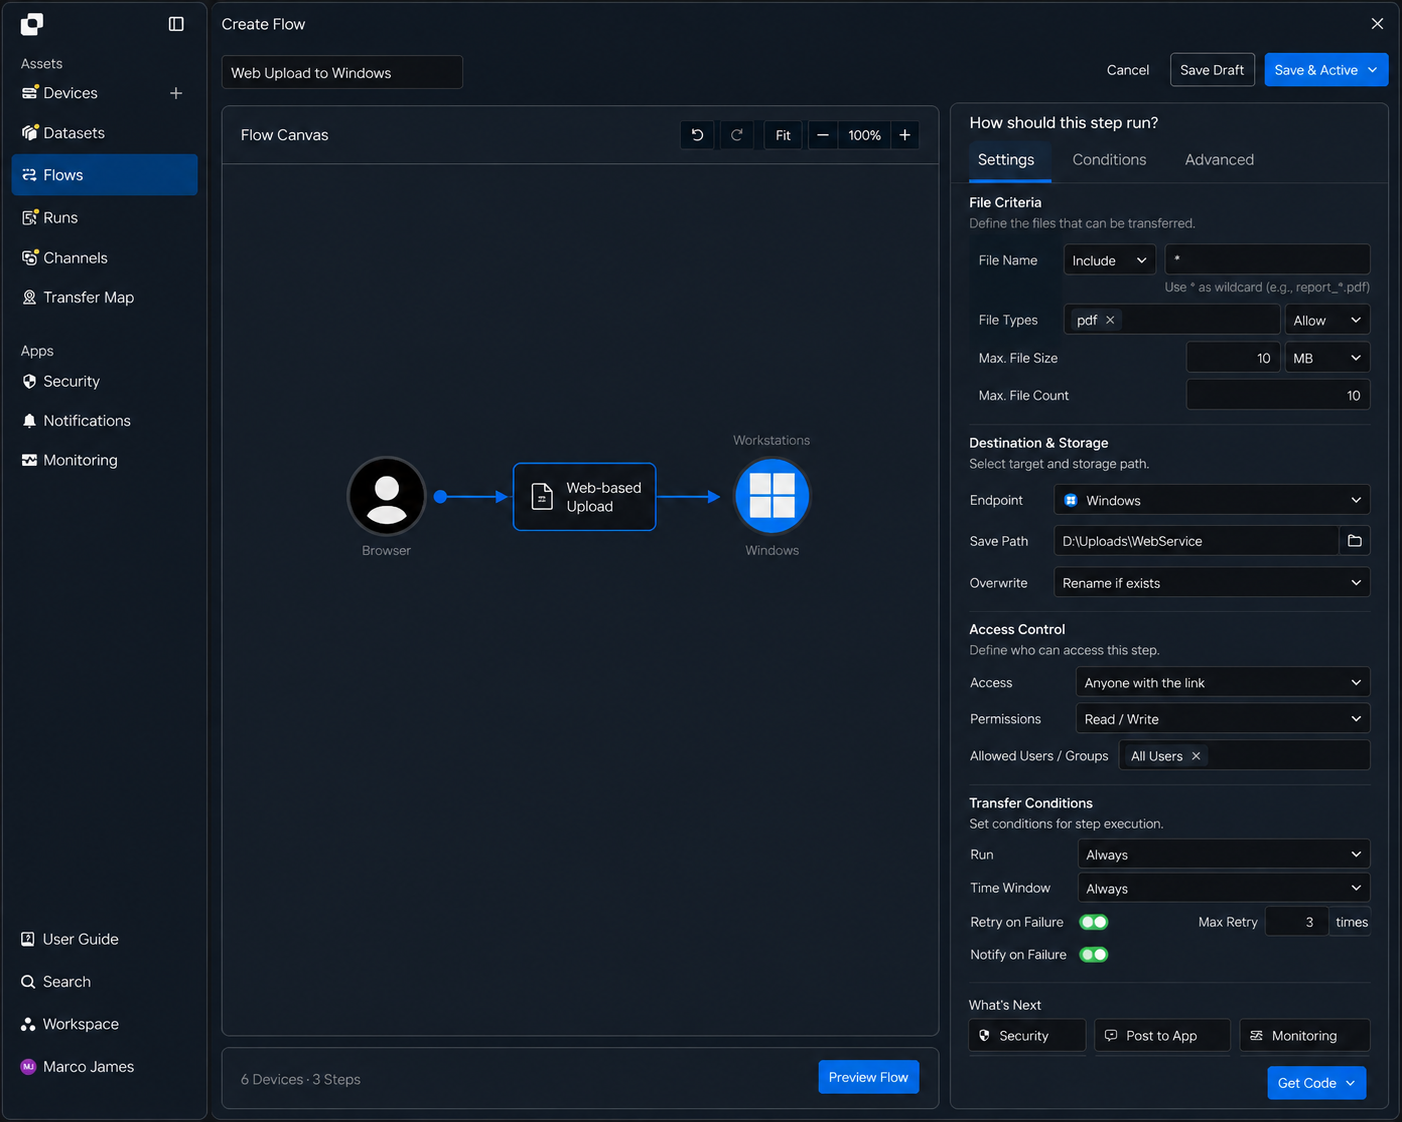
Key configuration areas include:
| Configuration area | Applied settings |
|---|---|
| File criteria | Select file names, extensions, and transfer targets |
| Storage location | Specify upload and download paths |
| Access scope | Configure file access by user and system |
| Transfer conditions | Set execution criteria for the business environment |
Applying these criteria lets you manage the files and transfer environment used by the web service according to business requirements.
Workflow Integration
Connect file transfers to the next step in the workflow
After a file transfer completes, you can connect subsequent tasks to create a single workflow.
For example, you can transfer an uploaded file to a processing server and run a conversion task, then prepare the result file in a designated workspace and notify the user when processing is complete.
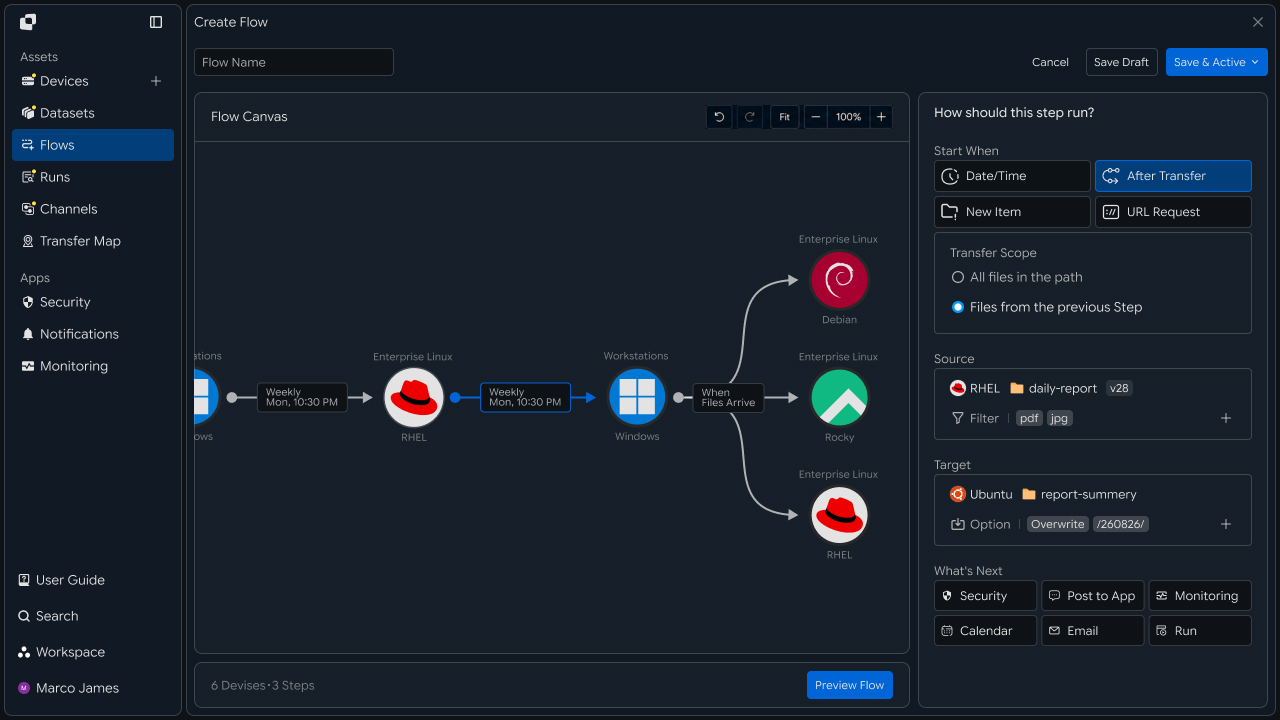
The overall flow can be configured as follows.
Web Upload
    ↓

File Transfer
    ↓

Processing
    ↓

Result Storage
    ↓

Notification
    ↓

Web Download
Connecting external services lets you extend file transfer results into business and operational workflows.
| Integration area | How it is used |
|---|---|
| Business · Collaboration | Notify users when file processing is complete |
| Work Management | Create and manage follow-up tasks |
| Monitoring | Review transfer status and operational information |
| Security | Manage file processing environments and events |
Verify Results
Review executed transfers and processing results
When a file transfer runs from the web, you can review the processing results through Runs and execution history.
Operators can review the status of all transfer jobs and per-file processing results, and manage the operational status of the transfer environment.
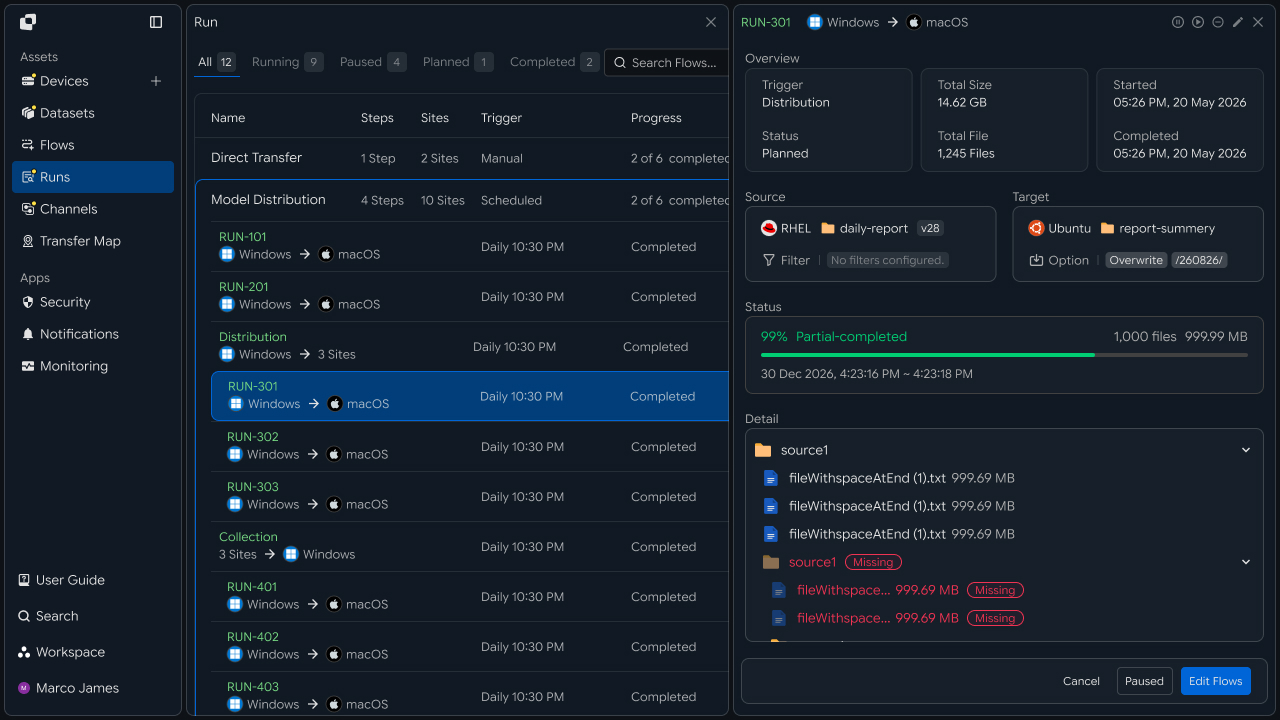
Key items to review include:
| Item | Details |
|---|---|
| Transfer | Upload or download job |
| Files | Number of processed files |
| Size | Total transfer size |
| Progress | Current transfer progress |
| Status | Job status |
| Started | Start time |
| Completed | Completion time |
Unlike business teams, which check the current transfer status of individual files, IT engineers use execution history to manage entire transfer jobs and processing results by system.
Incident Response
Review transfer status and rerun required tasks
When a transfer requires investigation, review the execution information and processing flow in Runs and Audit Log.
In the file transfer environment, you can investigate the transfer process by checking the connection status between the web service and server, file paths, access permissions, and target system status.
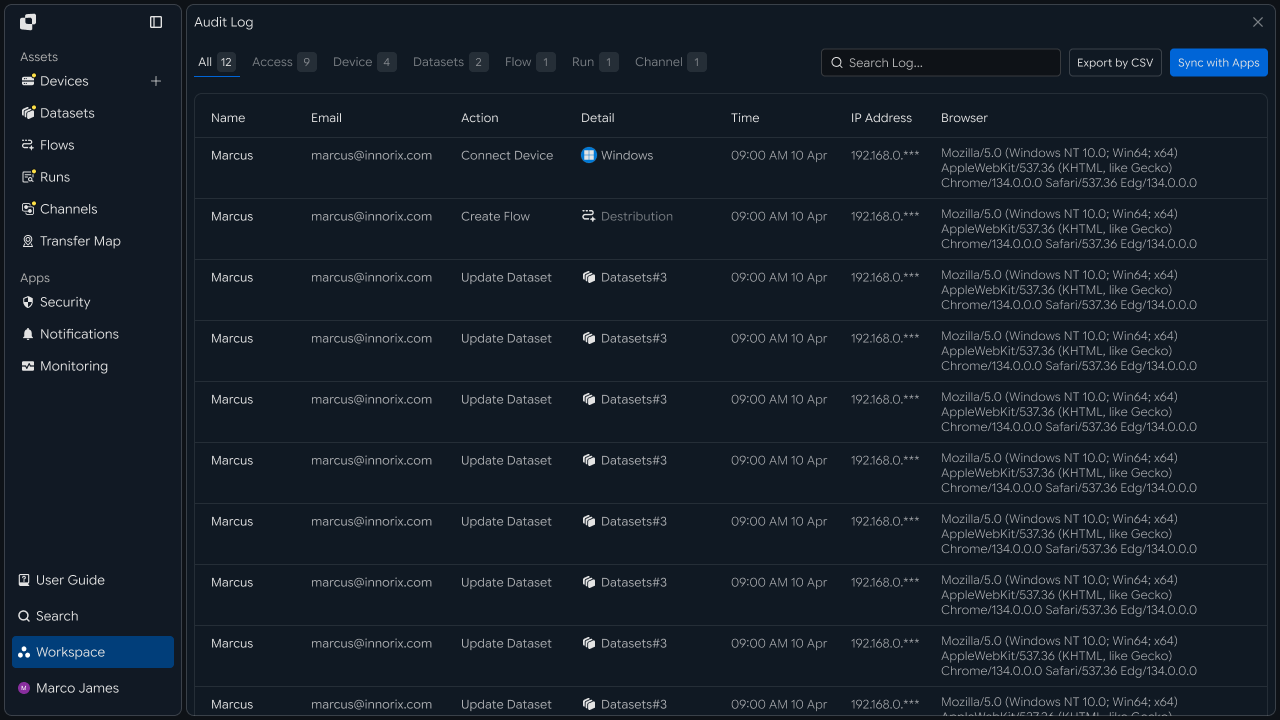
The review flow is as follows.
Review Transfer Job
    ↓

Check Execution Status
    ↓

Review Details
    ↓

Check Connection · Path · Permissions
    ↓

Adjust Environment
    ↓

Rerun Job
    ↓

Review New Run
| Item | What to check | Follow-up action |
|---|---|---|
| Web service connection | Transfer request and system connection status | Check connection environment |
| File path | Source and Target paths | Check path settings |
| Access permissions | File read and write scope | Check permission settings |
| File status | Information about files to transfer | Check file status |
| Execution history | Run and Audit Log | Review processing flow |
After completing the review, rerun the required transfer and use the new Run to verify the file processing result.
This structure separates the business team's flow for directly transferring and using files from the web from the IT engineer's flow for configuring and operating the web file transfer environment, providing information suited to each role.
Developers
Connect transfer capabilities by pasting code generated by the Code Generator into a web page
Developers do not need to build the transfer control from scratch. Select the target device and folder in the management interface to generate code connected to that location, then paste the code into the web page and connect it to the existing business logic.
Generate Code
Select a device folder and generate transfer code
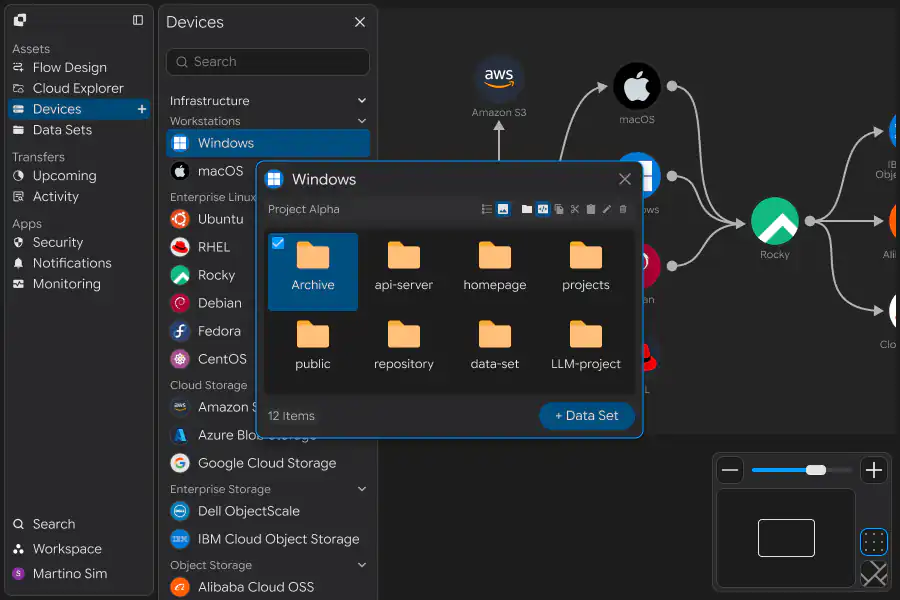
In Devices, select the web server that will send or receive files and click Browse to open the file explorer.
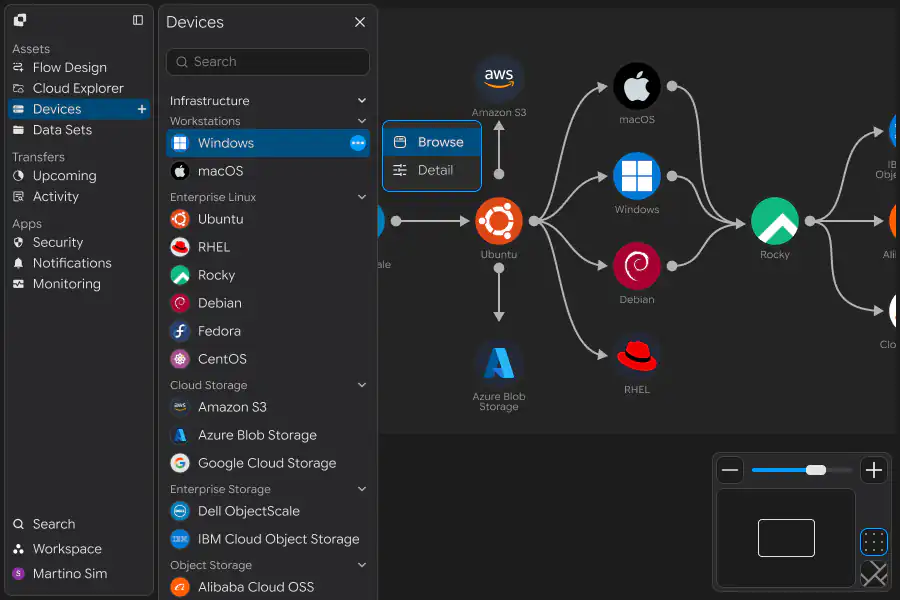
In the explorer, select the target folder and click the Generate menu.
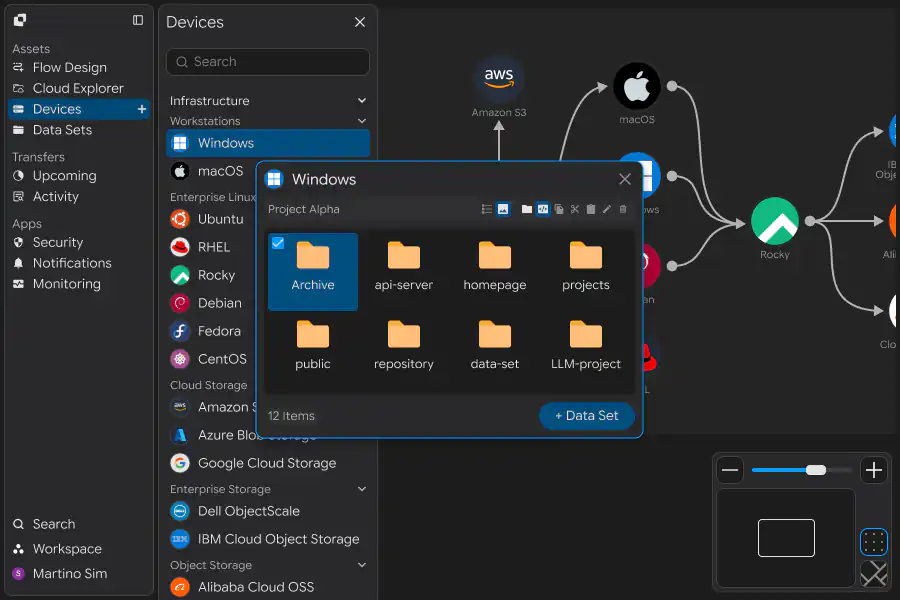
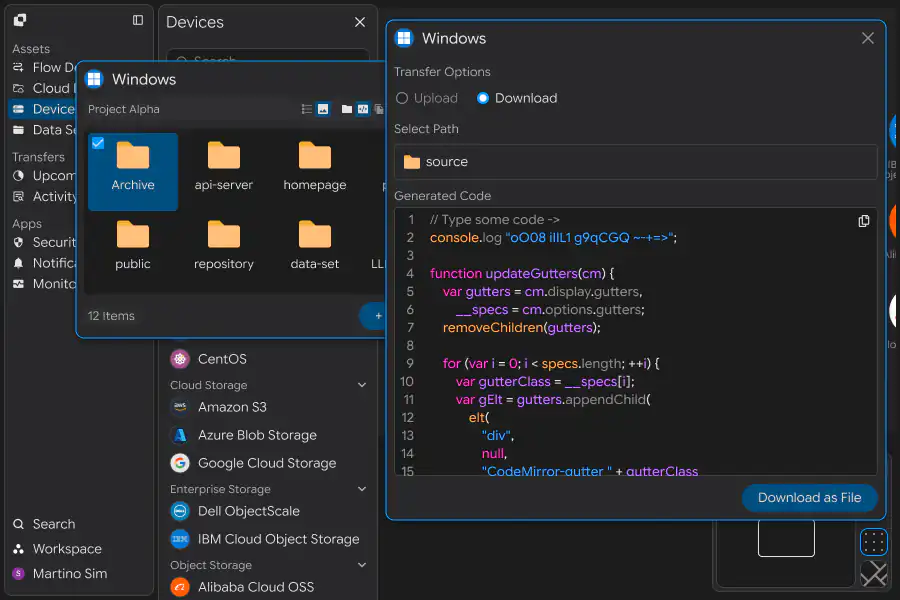
In the INNORIX Code Generator, select the transfer direction. When a folder is selected, upload is selected by default, and you can also select the download checkbox.
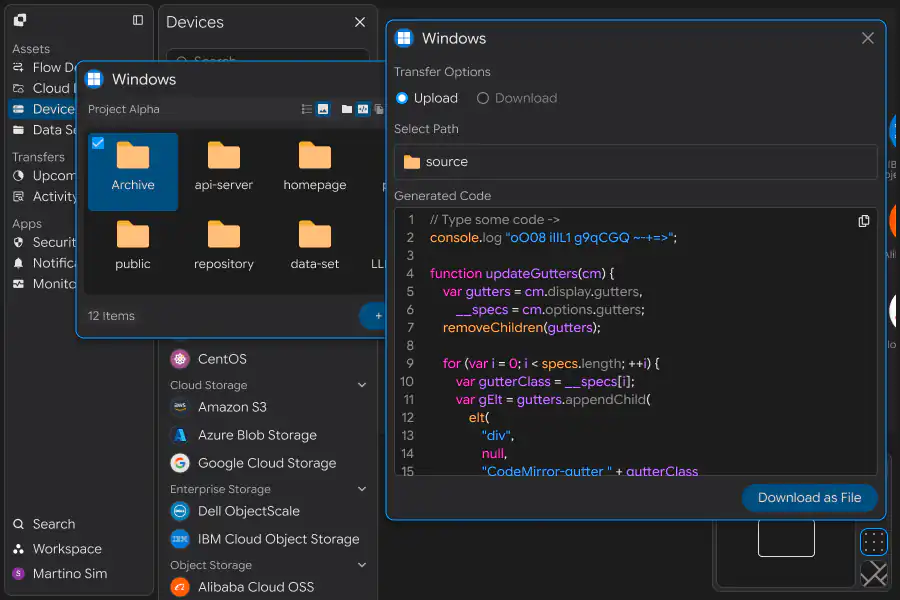
| Selected item | Available generated code |
|---|---|
| Folder | Upload · Download |
| File | Download only |
When a file is selected, download is selected automatically. You can also select multiple files and generate download code for them at once.
Copy the code with Copy to Clipboard or save it using Download as File.
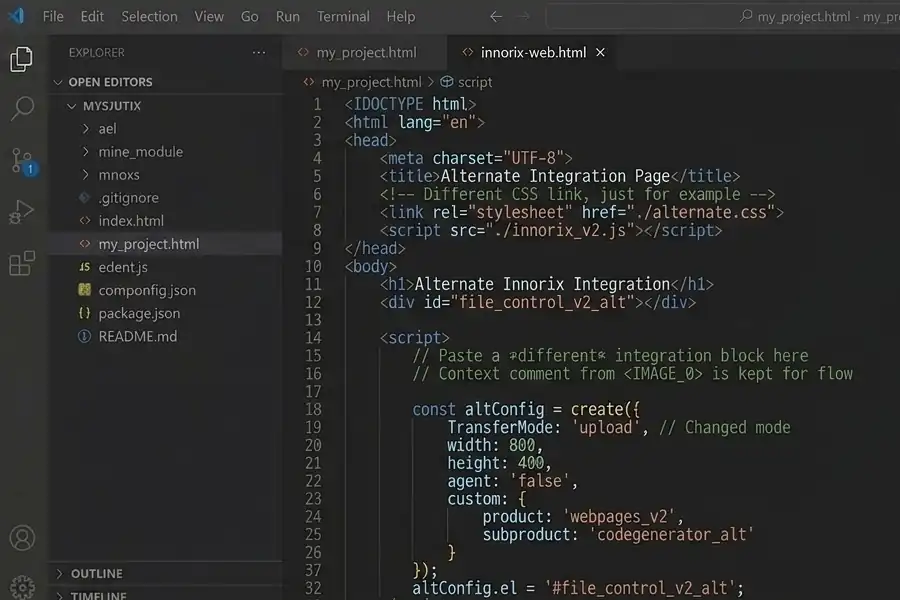
In this approach, you do not need to build a separate server-side script to receive uploads. The generated code connects directly to the selected folder on the selected device, and the agent on that device handles file receipt.
Generated Code Structure
Review the structure of the generated code
The generated code consists of a control creation call and a render target.
<div id="file_control"></div>

<script>
  const config = create({
    TransferMode: 'upload',
    width: 800,
    height: 400,
    agent: 'false',
    custom: {
      product: 'webpages',
      subproduct: 'codegenerator'
    }
  });

  config.el = '#file_control';
</script>
| Item | Description |
|---|---|
TransferMode | upload or download |
width · height | Control display size |
agent | Whether to use the agent installation method |
custom | Values used to identify the request |
el | Element selector where the control is rendered |
The target folder and device information are included in the generated code. Do not modify this section. To change the path, regenerate the code from the management interface instead of editing it directly.
The el value must match the element ID on the page. To place more than one control on a page, assign different element IDs and el values to each control.
Embed in a Web Page
Paste the generated code into an existing page
Paste the copied code where you want the control to appear.
<!DOCTYPE html>
<html lang="en">
<head>
    <meta charset="UTF-8">
    <title>Build File Upload</title>
    <link rel="stylesheet" href="./site.css">
    <script src="./innorix.js"></script>
</head>
<body>
    <h1>INNORIX Web-based Upload</h1>


    <div id="file_control"></div>

    <script>
      const config = create({
        TransferMode: 'upload',
        width: 800,
        height: 400,
        agent: 'false',
        custom: { product: 'webpages', subproduct: 'codegenerator' }
      });

      config.el = '#file_control';
    </script>
</body>
</html>
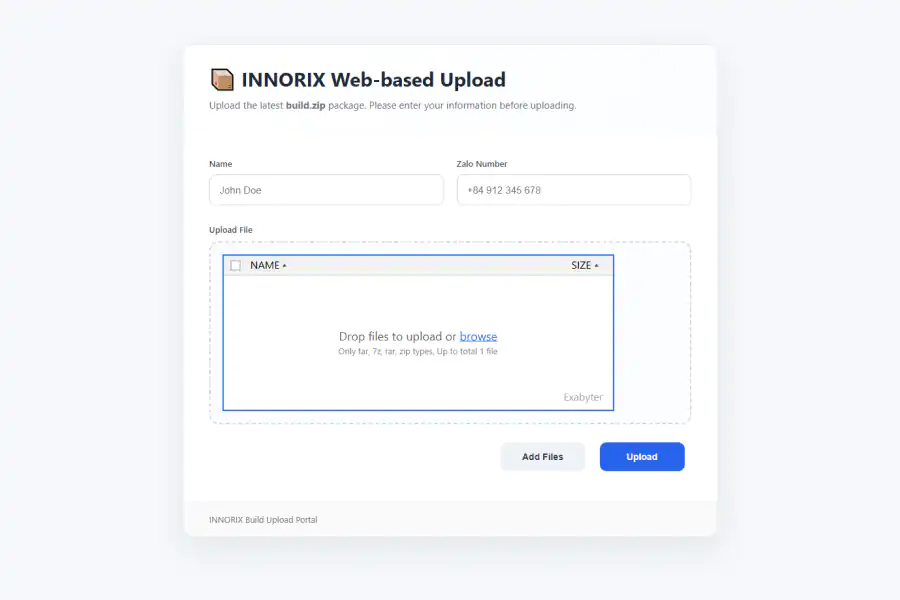
When the page opens, the control appears and users can add files and upload them directly to the specified folder.
When adding the control to an existing page, check two things: that the control resource script is included on the page, and that the element referenced by el actually exists.
Connect Download Code
Add download code for folders and files
To generate folder download code, select a folder and enable the download checkbox.
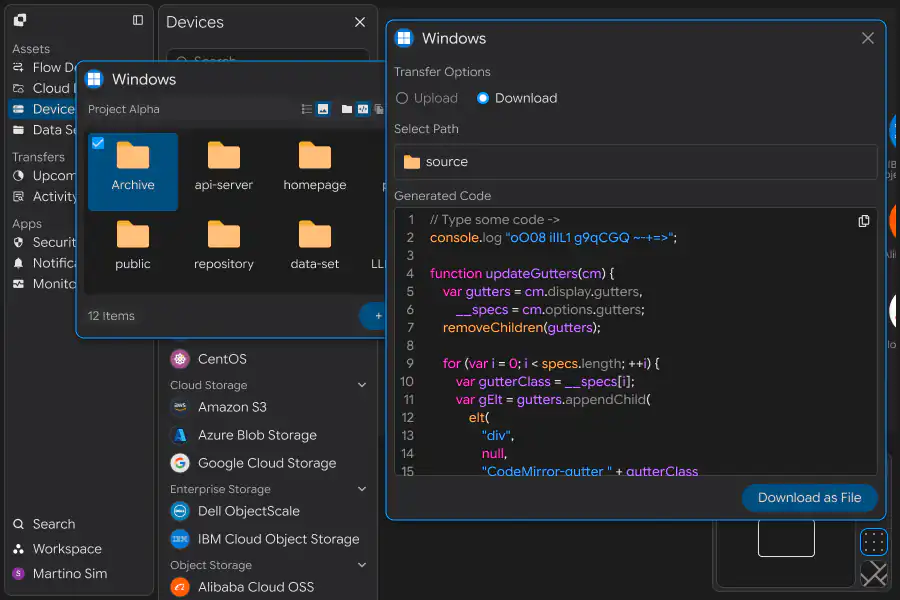
To allow users to download only specific files, select the files in the explorer. Files can only be downloaded, so the transfer direction is selected automatically.
The generated code has the same structure as the upload code; only TransferMode is different.
<div id="download_control"></div>

<script>
  const downloadConfig = create({
    TransferMode: 'download',
    width: 800,
    height: 400,
    agent: 'false',
    custom: { product: 'webpages', subproduct: 'codegenerator' }
  });

  downloadConfig.el = '#download_control';
</script>
To provide both upload and download on the same page, generate the code twice and add each block separately. Make sure the element IDs and el values are different.
<div id="upload_control"></div>
<div id="download_control"></div>
| Generated type | Selected item | Purpose |
|---|---|---|
| Upload | Folder | Interface for users to upload files |
| Folder download | Folder | Interface for downloading files from a folder |
| File download | File (multiple selection supported) | Interface for downloading only specified files |
Pass Business Information
Pass page input values with the transfer
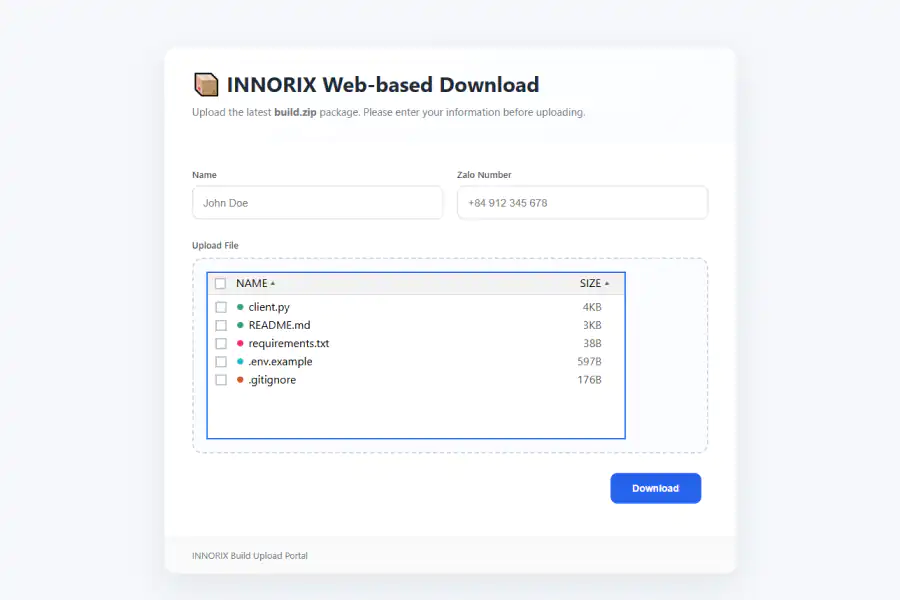
Upload pages often include input fields in addition to files, such as the name or contact information of the person responsible.
Pass these values with the transfer through custom. Keep the fields already included in the generated code and add only the keys you need.
<input id="name" placeholder="John Doe">
<input id="contact" placeholder="+84 912 345 678">

<script>
  const config = create({
    TransferMode: 'upload',
    width: 800,
    height: 400,
    agent: 'false',
    custom: {
      product: 'webpages',
      subproduct: 'codegenerator'
    }
  });

  config.el = '#file_control';

  document.querySelector('#uploadBtn').addEventListener('click', function () {
    // Values entered on the page are sent along with the transfer
    config.custom.uploader = document.querySelector('#name').value;
    config.custom.contact = document.querySelector('#contact').value;
  });
</script>
Values stored in custom are recorded with the transfer history, so you can later identify which person uploaded the files.
These values are created in the browser. Do not use them to make authorization decisions. For information that must be reliably recorded, compare it against the server session before storing it.
Apply File Policies
Limit the types and number of files accepted
Set limits for files accepted by the upload interface.
const config = create({
  TransferMode: 'upload',
  width: 800,
  height: 400,
  agent: 'false',
  allowType: ['tar', '7z', 'rar', 'zip'],
  maxFileCount: 1,
  maxFileSize: 10737418240,
  custom: { product: 'webpages', subproduct: 'codegenerator' }
});

config.el = '#file_control';
| Option | Type | Description |
|---|---|---|
allowType | string[] | List of allowed file extensions |
denyType | string[] | List of blocked file extensions |
maxFileCount | number | Maximum number of files that can be uploaded at once |
maxFileSize | number | Maximum size of a single file, in bytes |
maxTotalSize | number | Maximum total size, in bytes |
The control guidance also changes based on the configured conditions, allowing users to see which files they can upload before selecting them.
Use allowType to define extension restrictions. With denyType, the list must be updated whenever new extensions need to be blocked.
These limits are intended to filter invalid files in the interface before upload. If a rule must always be enforced, configure it as part of the transfer policy in the IT Engineers section as well.
Completion Handling
Connect transfer completion to business logic
By specifying callbacks in the generated configuration, you can detect when the control is ready and when the transfer completes.
const config = create({
  TransferMode: 'upload',
  width: 800,
  height: 400,
  agent: 'false',
  custom: { product: 'webpages', subproduct: 'codegenerator' },

  notifyReadyEvent: function () {
    // The control is ready; enable the submit button
    document.querySelector('#uploadBtn').disabled = false;
  },

  uploadCompletedEvent: function (result) {
    // Hand the finished upload over to the application
    fetch('/api/submissions', {
      method: 'POST',
      headers: { 'Content-Type': 'application/json' },
      body: JSON.stringify({
        uploader: document.querySelector('#name').value,
        files: result
      })
    });
  }
});

config.el = '#file_control';
| Callback | When it occurs |
|---|---|
notifyReadyEvent | Control is ready |
uploadCompletedEvent | Upload completes |
downloadCompletedEvent | Download completes |
transferErrorEvent | Transfer error occurs |
It is best to keep the transfer button disabled until the control is ready. Enabling it in the ready callback prevents users from interacting with an empty control.
Completion callbacks run in the browser. If the user closes the window, the callback will not run. For long-running transfers, such as transfers of tens of GB, do not rely on this callback alone for completion records. Add a process to cross-check the transfer history described in the IT Engineers section.
Regenerate and Manage Code
Update code when the target changes
The generated code contains device and folder information. In the following cases, regenerate the code from the management interface instead of editing the target information manually.
| Situation | Action |
|---|---|
| Target folder changes | Select the new folder and regenerate |
| Target device changes | Regenerate from the new device |
| Change from upload to download | Change the direction and regenerate |
| Display size or file policy changes | Edit only the options in the generated code |
A practical rule is to regenerate when the direction or target changes, and edit the code when only display or policy options change.
If multiple pages use the same folder, moving the generated code into a shared file and loading it from each page can simplify maintenance. When the folder changes, you only need to update one place.
<script src="./innorix-upload.js"></script>
<div id="file_control"></div>
| Item to check | What to verify |
|---|---|
| Code generation | Target device and folder, transfer direction |
| Embedding | Control resources and render target element |
| Business information | Input values passed through custom |
| Policy | Allowed extensions and file count/size limits |
| Completion handling | Business logic triggered by callbacks |
| Regeneration | Update procedure when the target changes |