
Getting Started#
Basic Concept#
Automatically upload files created in a Windows folder to Amazon S3
In business environments, various programs and systems create files in specific folders on Windows servers.
For example, business systems may generate daily reports, data-processing programs may save CSV files, and backup programs may create backup files in designated locations.
To use these files in the cloud, a person may need to check the files and upload them directly to S3 or run a separate upload program.
Automatic Windows folder upload is a method that directly connects the Windows environment where files are created to Amazon S3 and automatically uploads files matching specified conditions.
By connecting the folder where files are created to the S3 storage location and configuring which files to upload and when, you can automate the entire flow from file preparation to cloud storage.
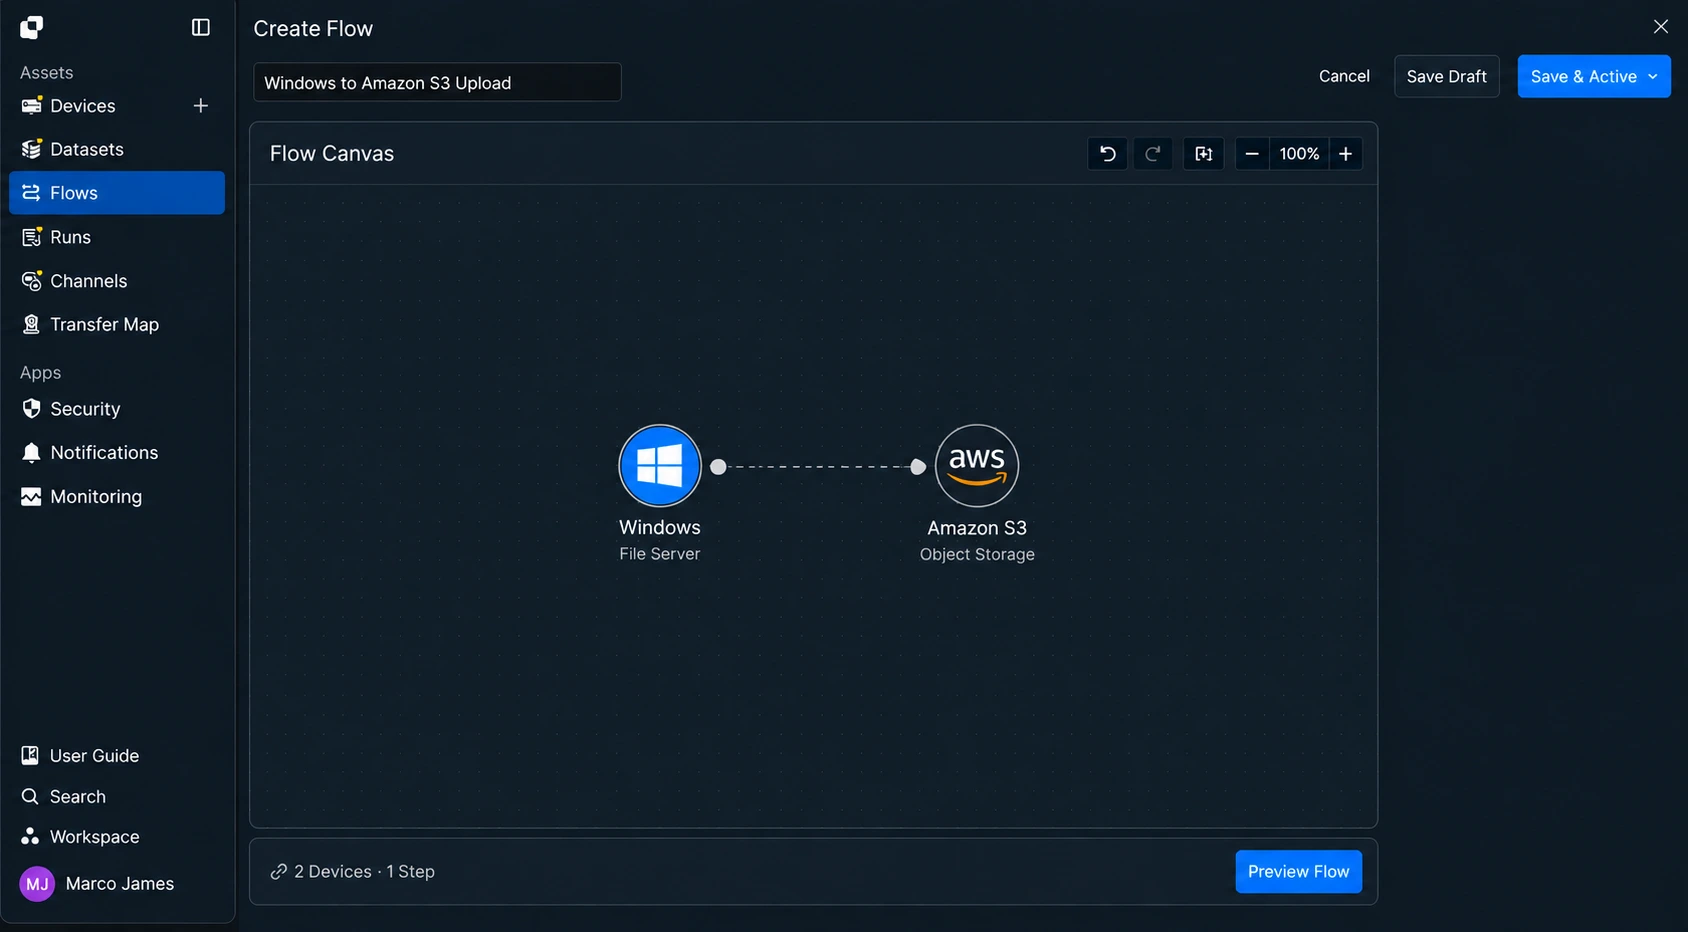
This allows required files to be automatically applied to the cloud environment according to specified rules without repeatedly performing Check File → Manual Upload → Save to S3 after files are created in the Windows folder.
Upload Flow#
Automatically continue from file creation through S3 storage
Automatic upload can start when a file is created or changed in a specified Windows folder.
The Flow first checks files in the configured folder and determines whether they match conditions including filename, extension, and path.
Files matching the conditions are transferred to the specified Amazon S3 bucket and storage path.
After the transfer completes, you can check the actual upload results and processing status for each file through the Run.
- Create file in Windows folder
- Detect file creation or change
- Check upload target conditions
- Transfer file to Amazon S3
- Save file to specified S3 path
- Check results in Run
For example, you can configure the following flow.
With this configuration, simply creating a file in the business system can automatically continue the subsequent cloud upload task.
Workflow Change#
Reduce repetitive manual uploads after file creation
When files created in Windows need to be stored in S3, the existing process may require checking whether files were created, selecting the required files, and manually running the upload.
If the file creation location and S3 storage location are fixed for recurring work, the same process must be performed repeatedly.
With automatic upload, you can connect the file creation location and cloud storage location in advance and automatically process tasks after file creation.
Before and After Upload
| Category | Existing File Upload | Automatic Windows Folder Upload |
|---|---|---|
| File Check | Manually check created files | Automatically detect files in specified folder |
| Upload Preparation | Select files and run upload | Automatically select files matching conditions |
| Target Selection | Manually select S3 bucket and path | Use preconfigured S3 path |
| File Transfer | Run manually whenever needed | Run automatically based on file creation conditions |
| Result Check | Check manually after upload | Check processing results in Run |
For example, if daily reports, data-processing results, or backup files must be stored in the same S3 location, you can reduce repetitive tasks from file creation through upload.
In this way, automatic Windows folder upload directly connects the system that creates files with the cloud environment that uses them.
IT Engineer#
Environment Connection#
Connect the Windows file path to the Amazon S3 storage location
To configure automatic upload, first connect the Windows device where files are created to Amazon S3.
In Source, specify the Windows device and folder path where files will be checked. In Target, configure the S3 bucket and storage location where files will be uploaded.
For example, assume files are created in the following Windows path.
D:\Data\ExportYou can connect files created in that folder to upload to the following S3 location.
s3://company-data/export/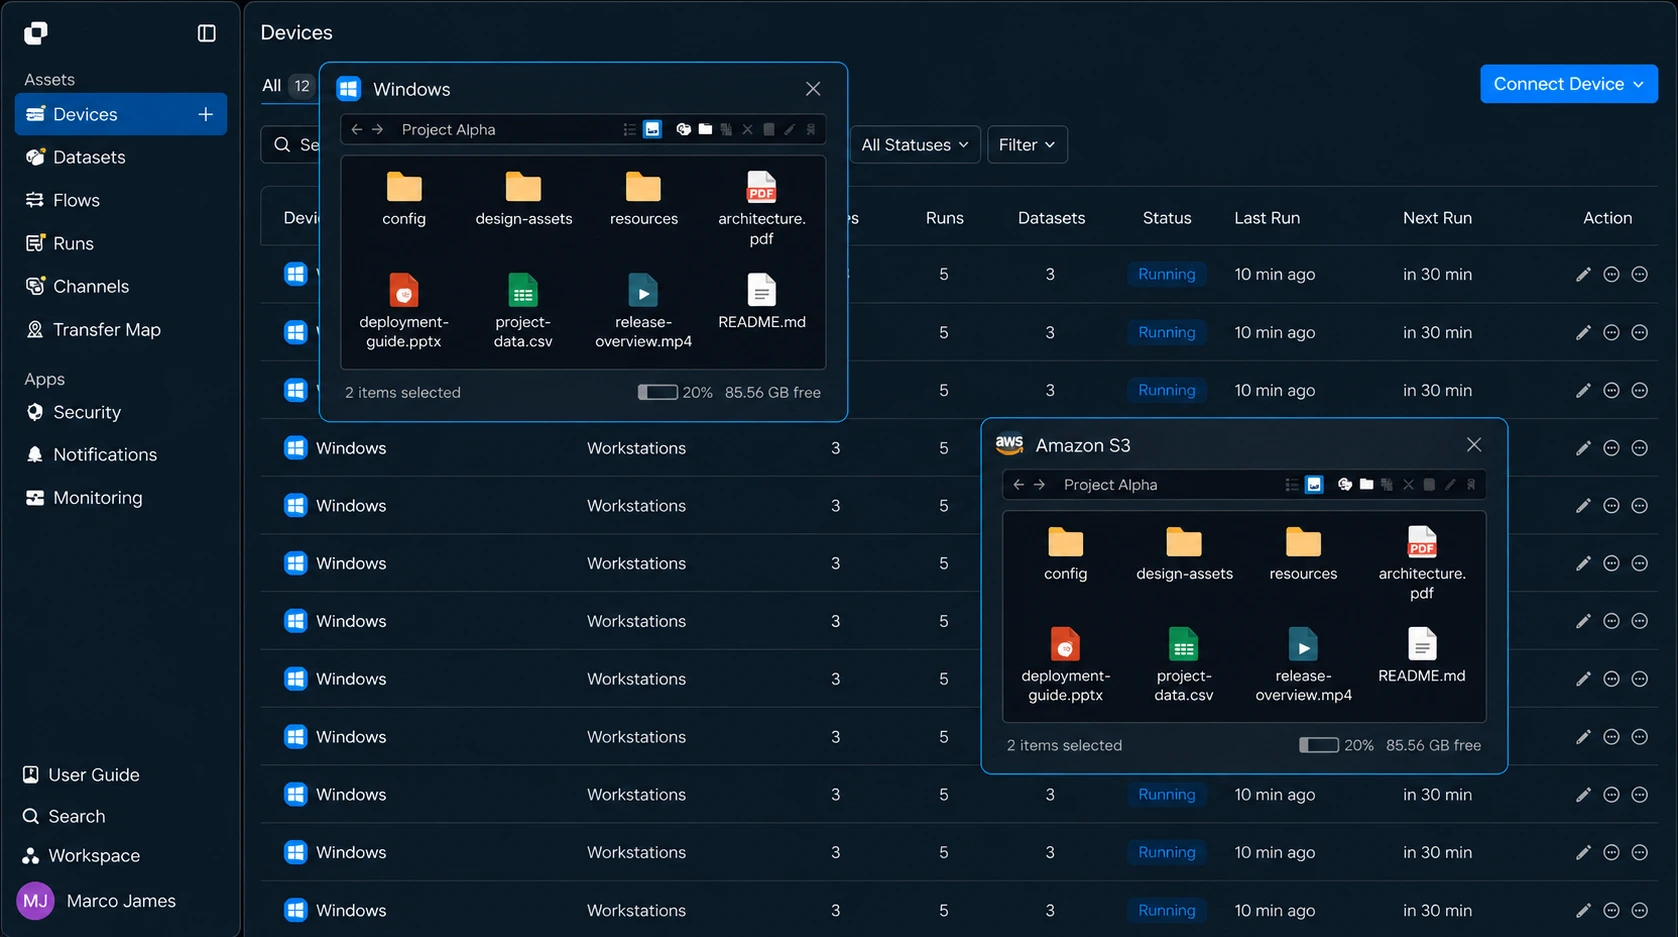
Configure the following items together in the transfer environment.
| Category | Configuration Details |
|---|---|
| Source | Windows device where files are created |
| Source Path | Folder path where files are checked |
| Target | Amazon S3 environment to use |
| Bucket | Bucket where files are stored |
| Target Path | Actual storage location inside the bucket |
| Access Scope | Permissions required to read files and store them in S3 |
This allows you to clearly configure which Windows folder's files are stored in which S3 location.
You can also connect multiple folders on a single Windows server to different S3 paths.
Windows Server
- D:\ReportsS3 /reports/
- D:\ImagesS3 /images/
- D:\BackupS3 /backup/
Using this structure, files created on a single device can also be automatically separated into different S3 storage areas according to business purpose.
Detection Conditions#
Configure which files to upload and when
After connecting Windows and S3, configure the conditions that start automatic upload.
Instead of uploading every file, you can run only when specific files are created or limit upload targets based on specified extensions and filenames.
For example, you can use the following conditions.
| Condition | Usage |
|---|---|
| File Creation | Upload when a new file is created |
| File Change | Upload based on modified files |
| File Path | Process only specified folders and subpaths |
| File Name | Process only files matching a specific naming rule |
| Extension | Process only required files including CSV, JSON, and ZIP |
| Date/Time | Upload files at a specified time |
| After Transfer | Run after the previous file task completes |
For example, you can upload only CSV files from the /daily folder to S3 and store only ZIP files from the /backup folder in a separate S3 path.
D:\DataDaily/report-01.csvCSVS3 /reports/report-02.csvCSVS3 /reports/temporary.txtTXTExcludeBackup/backup-01.zipZIPS3 /backup/backup-02.zipZIPS3 /backup/
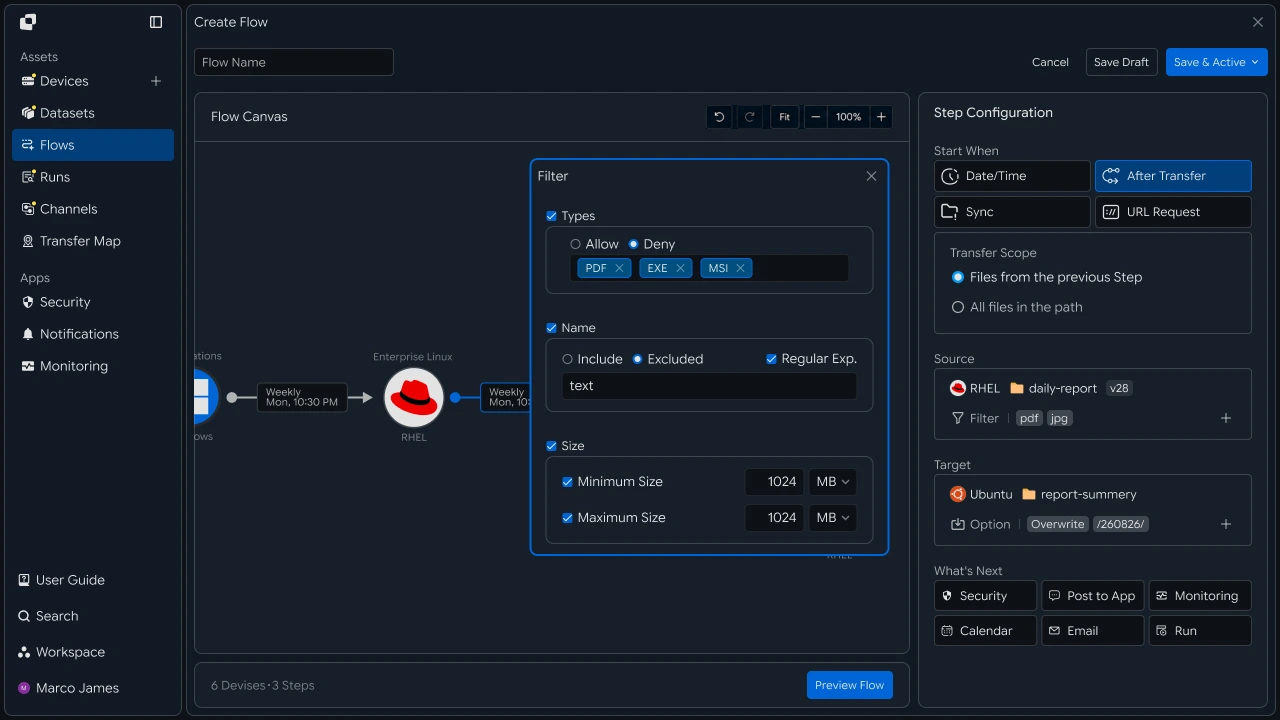
With this configuration, even on a single Windows device you can create different upload flows according to file type and creation location.
Flow Configuration#
Connect file detection and S3 upload into one Flow
After configuring the Source, Target, and execution conditions, connect them into a single Flow.
The Flow checks files in the Windows folder, determines upload targets according to the configured conditions, and then transfers the files to Amazon S3.

Basically, one folder can be connected to one S3 path, but in actual business environments this can be expanded in several ways.
Collect Multiple Folders into One S3 Location#
Result files or log files created on multiple servers can be collected into a single S3 bucket.
Route One Folder to Multiple S3 Paths#
You can also configure data files and backup files to be stored in different S3 paths according to file type.
By connecting file conditions and target locations in a Flow, you can create an automation structure suited to the actual file-processing environment, not just a simple upload task.
Result Check#
Check automatic upload tasks and per-file S3 results
When the Flow runs, you can check the progress and results of automatic upload tasks in Runs.
In the execution list, you can check the status of multiple automatic upload tasks. When you select a specific Run, you can check the actual processed files and Source and Target information in detail.
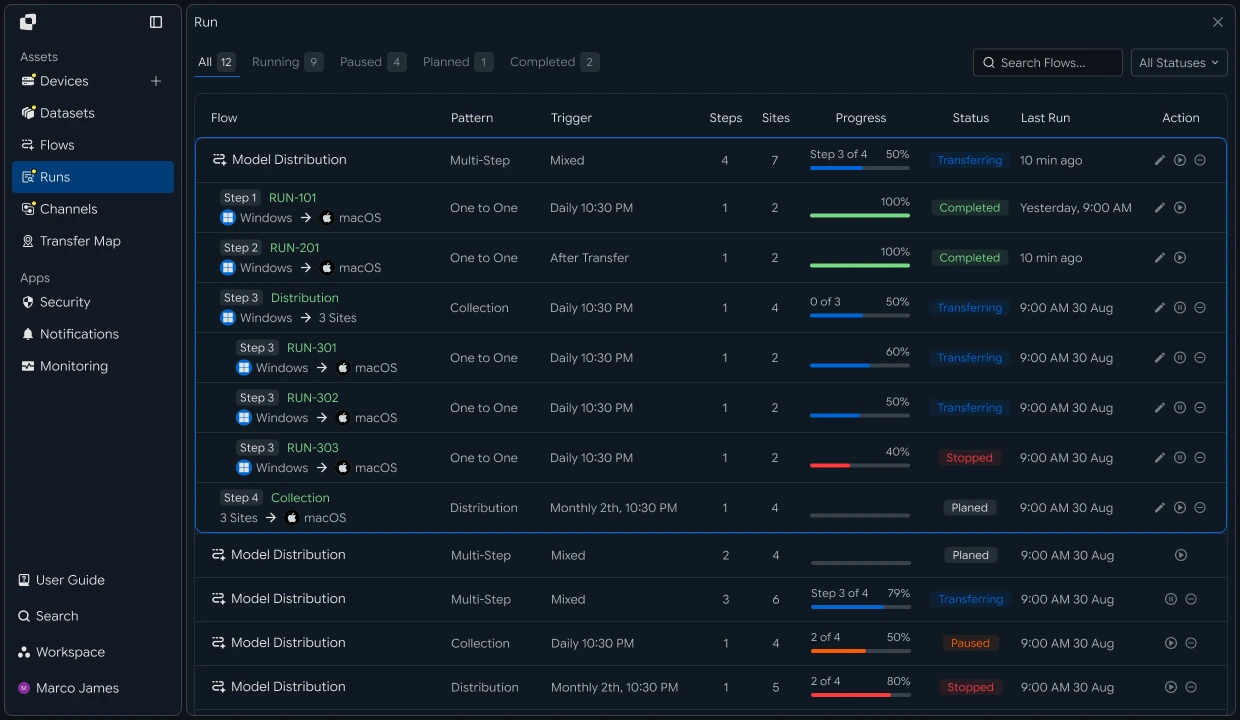
In each Run, you can check the following information.
| Check Item | Details |
|---|---|
| Source | Windows device and path where files were created |
| Target | Amazon S3 bucket and storage location |
| Total Files | Number of files to process |
| Total Size | Total upload size |
| Progress | Current upload progress |
| Status | In Progress, Completed, or status requiring additional review |
| Started | Upload start time |
| Completed | Upload completion time |
In Run details, you can check not only the overall task but also the processing status of individual files.
RUN-20260902-001SourceWindows / D:\Data\ExportFilesreport-01.csvCSVCompletedreport-02.csvCSVCompletedreport-03.csvCSVProcessingTargetAmazon S3 /data/export/
This allows you to check whether automatic upload ran correctly and manage the process of applying actual files to the specified S3 location.
Follow-up Connection#
Automatically continue to data processing and notifications after S3 upload
After files are uploaded to Amazon S3, you can automatically connect the next task based on the results.
For example, when data files are stored in S3, you can start an analytics task, or when a backup file upload completes, notify the responsible person of the result.

| Connected Area | Usage |
|---|---|
| Data Processing | Start analytics or conversion after S3 upload |
| Next Flow | Run another file transfer or follow-up task |
| Business, Collaboration | Notify the responsible person of upload completion |
| Monitoring | Check upload status and execution results |
For example, after uploading daily CSV files to S3, you can start a data-processing Flow, or notify the operations manager when a backup file upload completes.
This connection goes beyond simply uploading files from a Windows folder to S3.
File Creation → Automatic Detection → Check Conditions → S3 Upload → Check Results → Follow-up Processing
This can be expanded into a single file automation flow.
Failure Handling#
Check upload status and rerun required files or tasks
If a situation requiring additional review occurs during automatic upload, use the Run details to identify the stage where processing did not proceed.
You can check the Windows Source connection status and original file path together with the Amazon S3 Target access status and storage location.

Failure handling can proceed through the following flow.
When checking the upload environment, review the following items together.
| Check Item | Details | Follow-up Action |
|---|---|---|
| Windows Connection | Source device connection status | Check device connection |
| File Path | Actual file creation location | Adjust Source path |
| File Status | Information about files targeted for upload | Check file readiness |
| S3 Connection | Target access status | Check connection information |
| Storage Path | Bucket and target path | Adjust Target location |
| Access Permission | File read and S3 storage permissions | Check permission settings |
| Execution History | Run details and per-file results | Adjust environment and rerun |
For example, if the Windows folder path changed or the S3 storage location cannot be accessed, adjust the relevant settings and rerun the task.
After rerunning, use the new Run to check whether the files were successfully applied to Amazon S3.
Through this process, you can reliably operate an automatic upload flow from the Windows file creation environment through Amazon S3 storage and follow-up work connections.
Developer#
Register automation in code to monitor a Windows folder and transfer files to S3
Prepare the following items before starting.
| Requirement | Details |
|---|---|
| INNORIX Authentication | INNORIX_ACCESS_TOKEN (Authorization: Bearer) |
| Windows Device | Source device ID and folder path to monitor (e.g., C:/data/export) |
| S3 Device | Target device ID and upload path (e.g., my-bucket/incoming) |
| Runtime | Python 3 + requests, Java 17+, Node.js 18+, .NET 8+ |
Python, Node.js define and use a minimal
api()helper that directly calls REST (see API Call Recipe). Java, C# use the bundled-sourceInnorixClientandJsonhelper (Jfor C#), which includeencode_pathandnow_iso. Replace the device identifiers (device-win-01,device-s3) and paths with actual values.
Create Monitoring Automation#
Create sync automation that monitors the source folder. Real-time monitoring is configured with transferType: "sync" and the synchronization options (syncType, watchFolderType) in transferOptions. For paths, use a token (encode_path) that combines the device identifier and encoded path.
def create_watch_upload(source, source_path, target, target_path,
                        action="overwrite", watch_type=1):
    body = {
        "name": "windows to s3 watch",
        "flowName": "windows to s3 watch",
        "transferType": "sync",
        "isUpcoming": False,
        "timezone": "Asia/Seoul",
        "details": [{
            "senderId": source,
            "receiverId": target,
            "sourceItem": [{
                "hash": encode_path(source, source_path),
                "filePath": str(source_path or "").replace("\\", "/"),
                "isDir": True,
            }],
            "targetPath": encode_path(target, target_path),
            "step": 1,
            "transferOptions": {
                "noSchedule": True,
                "target-action": action,
                "send-fileoption": {},
                "syncType": 1,                  # one-way sync
                "watchFolderType": watch_type,  # 1 = on create, 2 = on modify
            },
        }],
        "schedules": [{
            "type": "none", "startDateType": "now",
            "startDate": now_iso(), "timezone": "Asia/Seoul",
        }],
        "step": 1,
    }

    return api("POST", "/api/automations", body)["automationId"]


automation_id = create_watch_upload(
    "device-win-01", "C:/data/export",
    "device-s3", "my-bucket/incoming")
static String createWatchUpload(InnorixClient client, String source, String sourcePath,
String target, String targetPath, String action, int watchType) {
Map<String, Object> detail = Json.newObj(
"senderId", source,
"receiverId", target,
"sourceItem", Json.newArr(Json.newObj(
"hash", InnorixClient.encodePath(source, sourcePath),
"filePath", sourcePath.replace("\\", "/"),
"isDir", true)),
"targetPath", InnorixClient.encodePath(target, targetPath),
"step", 1,
"transferOptions", Json.newObj(
"noSchedule", true,
"target-action", action,
"send-fileoption", Json.newObj(),
"syncType", 1, // one-way sync
"watchFolderType", watchType)); // 1 = on create, 2 = on modify
Map<String, Object> body = Json.newObj(
"name", "windows to s3 watch",
"flowName", "windows to s3 watch",
"transferType", "sync",
"isUpcoming", false,
"timezone", "Asia/Seoul",
"details", Json.newArr(detail),
"schedules", Json.newArr(Json.newObj(
"type", "none", "startDateType", "now",
"startDate", InnorixClient.nowIso(), "timezone", "Asia/Seoul")),
"step", 1);
return Json.str(client.apiObj("POST", "/api/automations", body, null), "automationId");
}async function createWatchUpload(source, sourcePath, target, targetPath,
action = "overwrite", watchType = 1) {
const body = {
name: "windows to s3 watch",
flowName: "windows to s3 watch",
transferType: "sync",
isUpcoming: false,
timezone: "Asia/Seoul",
details: [{
senderId: source,
receiverId: target,
sourceItem: [{
hash: encodePath(source, sourcePath),
filePath: String(sourcePath ?? "").replace(/\\/g, "/"),
isDir: true,
}],
targetPath: encodePath(target, targetPath),
step: 1,
transferOptions: {
noSchedule: true,
"target-action": action,
"send-fileoption": {},
syncType: 1, // one-way sync
watchFolderType: watchType, // 1 = on create, 2 = on modify
},
}],
schedules: [{
type: "none", startDateType: "now",
startDate: nowIso(), timezone: "Asia/Seoul",
}],
step: 1,
};
return (await api("POST", "/api/automations", body)).automationId;
}
const automationId = await createWatchUpload(
"device-win-01", "C:/data/export",
"device-s3", "my-bucket/incoming");static async Task<string> CreateWatchUploadAsync(InnorixClient client, string source, string sourcePath,
string target, string targetPath, string action = "overwrite", int watchType = 1)
{
var detail = new JsonObject
{
["senderId"] = source,
["receiverId"] = target,
["sourceItem"] = new JsonArray
{
new JsonObject
{
["hash"] = InnorixClient.EncodePath(source, sourcePath),
["filePath"] = sourcePath.Replace("\\", "/"),
["isDir"] = true,
}
},
["targetPath"] = InnorixClient.EncodePath(target, targetPath),
["step"] = 1,
["transferOptions"] = new JsonObject
{
["noSchedule"] = true,
["target-action"] = action,
["send-fileoption"] = new JsonObject(),
["syncType"] = 1, // one-way sync
["watchFolderType"] = watchType, // 1 = on create, 2 = on modify
},
};
var body = new JsonObject
{
["name"] = "windows to s3 watch",
["flowName"] = "windows to s3 watch",
["transferType"] = "sync",
["isUpcoming"] = false,
["timezone"] = "Asia/Seoul",
["details"] = new JsonArray { detail },
["schedules"] = new JsonArray
{
new JsonObject
{
["type"] = "none", ["startDateType"] = "now",
["startDate"] = InnorixClient.NowIso(), ["timezone"] = "Asia/Seoul",
}
},
["step"] = 1,
};
return J.Str(await client.ApiObjAsync("POST", "/api/automations", body), "automationId");
}| Item | Value | Description |
|---|---|---|
transferType |
"sync" |
Real-time monitoring transfer |
transferOptions.syncType |
1 |
Windows → S3 one-way synchronization |
transferOptions.watchFolderType |
1, 2 |
1=trigger on file creation, 2=trigger on modification |
transferOptions.target-action |
numbering, overwrite, nosend |
Target duplicate handling |
sourceItem[].filePath |
string | Plain-text path of the folder to monitor (required for sync) |
Caution Sync automation reads the monitoring path from
sourceItem[0].filePath. If onlyhash(token) is provided andfilePathis omitted, the monitoring path is not specified.
Check Execution#
Execution history accumulates each time the monitoring automation runs. Query the status and monitorId for each execution. The newest execution appears first in the array.
runs = api("GET", f"/api/automations/{automation_id}/executions") or []

for run in runs:
print(run["startTime"], run["status"], run["monitorId"])List<Object> runs = Json.asArr(client.api("GET", "/api/automations/" + automationId + "/executions"));
for (Object run : runs) {
Map<String, Object> r = Json.asObj(run);
System.out.println(Json.str(r, "startTime") + " " + Json.intOrNull(r, "status") + " " + Json.str(r, "monitorId"));
}const runs = (await api("GET", `/api/automations/${automationId}/executions`)) || [];
for (const run of runs) {
console.log(run.startTime, run.status, run.monitorId);
}JsonArray runs = J.AsArr(await client.ApiAsync("GET", quot;/api/automations/{automationId}/executions"));
foreach (JsonNode run in runs)
Console.WriteLine(quot;{J.Str(run, "startTime")} {J.IntOrNull(run, "status")} {J.Str(run, "monitorId")}");Each execution's monitorId connects to file-level results (see API Call Recipe for transfer status and file queries).
Pause, Resume, Delete Monitoring#
To temporarily stop monitoring, pause it; to turn it back on, resume it. To end monitoring completely, delete the automation. To change the monitored folder or target path, delete the existing automation and create a new automation with the changed path.
api("POST", f"/api/automations/{automation_id}/pause", {"pause": True})   # pause
api("POST", f"/api/automations/{automation_id}/pause", {"pause": False})  # resume
api("DELETE", f"/api/automations/{automation_id}") # delete automation (permanent)client.api("POST", "/api/automations/" + automationId + "/pause", Json.newObj("pause", true)); // pause
client.api("POST", "/api/automations/" + automationId + "/pause", Json.newObj("pause", false)); // resume
client.api("DELETE", "/api/automations/" + automationId); // delete automation (permanent)await api("POST", `/api/automations/${automationId}/pause`, { pause: true }); // pause
await api("POST", `/api/automations/${automationId}/pause`, { pause: false }); // resume
await api("DELETE", `/api/automations/${automationId}`); // delete automation (permanent)await client.ApiAsync("POST", quot;/api/automations/{automationId}/pause", new JsonObject { ["pause"] = true }); // pause
await client.ApiAsync("POST", quot;/api/automations/{automationId}/pause", new JsonObject { ["pause"] = false }); // resume
await client.ApiAsync("DELETE", quot;/api/automations/{automationId}"); // delete automation (permanent)Implementation Result#
Applying this recipe allows you to automatically upload files from a Windows folder to S3 through the following flow.
- File Created in Windows Folder
- Run Monitoring Automation (sync)
- Transfer to Amazon S3
- Check Execution History, monitorId
Files created in the Windows folder can be continuously uploaded to S3 automatically without human intervention.