Overview
INNORIX is a file transfer platform that connects files across different devices and Storage environments, making it easy to transfer and manage the data you need.
You can connect various environments, including PCs, servers, and Object Storage, to manage files in one place, and transfer files directly or automatically according to a schedule. Synchronization is also supported to continuously reflect changes to files.
When a transfer runs, you can check its progress and results, and share transfer tasks with other users to manage them together.
Simple Sign-Up and Login
You can get started with INNORIX for free and create an account without complex configuration.
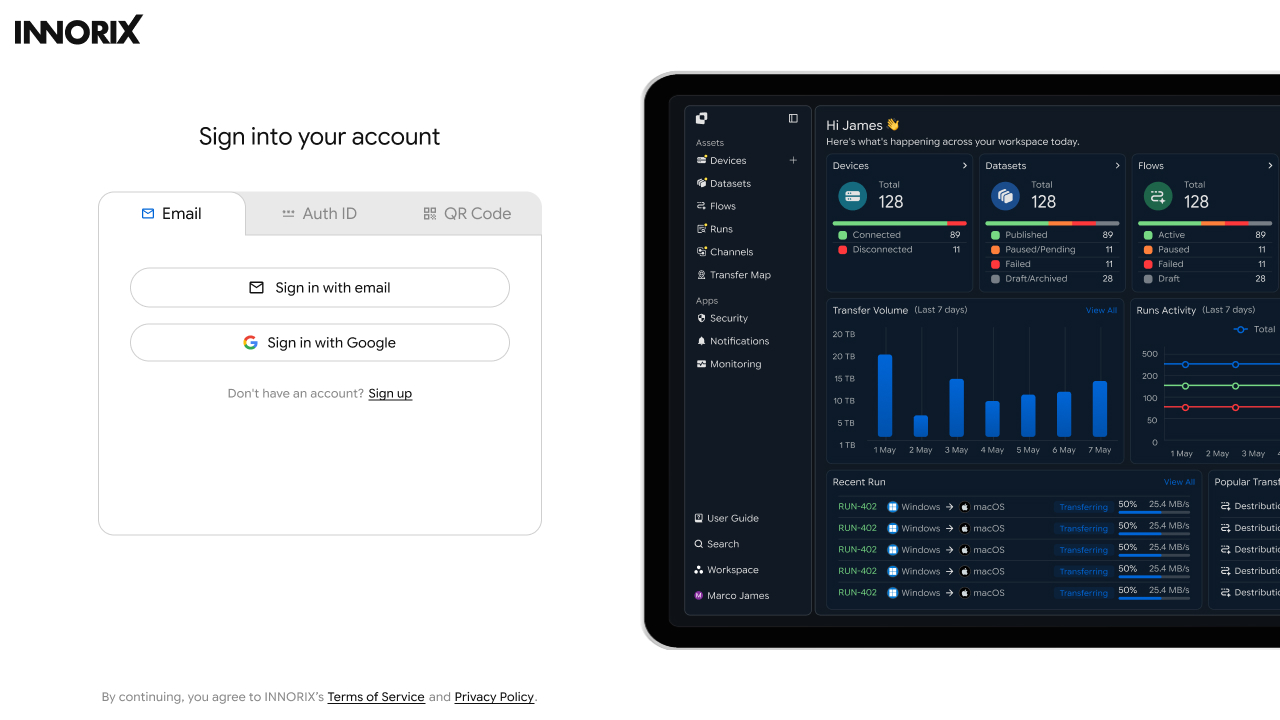
You can sign up directly with your email address or easily sign up using your Google account. After signing up, you can log in with your newly created account and use INNORIX.
Explore Your Workspace and Key Features
After signing up, your own Workspace is created.
In the Workspace, you can start various INNORIX tasks, such as connecting devices and transferring files between devices.
Main Menu and Screen Layout
You can see INNORIX's main features at a glance in the menu on the left side of the screen.
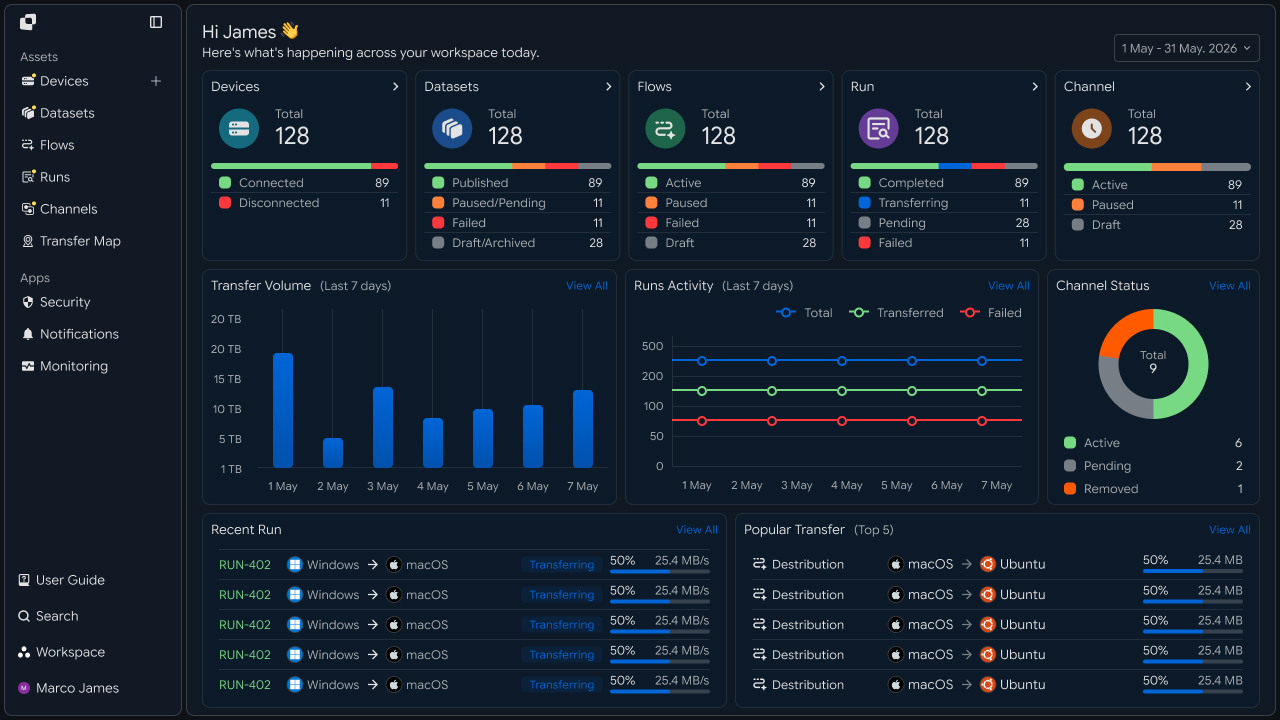
| Menu | Description |
|---|---|
| Devices | Connect computers or Storage where files are stored and browse files. |
| Datasets | Manage files and folders that you use frequently or need to manage by version. |
| Flows | Configure where, when, and under what conditions to transfer files. |
| Runs | Check the progress and results of executed transfers. |
| Channels | Share transfer tasks with other users and manage task permissions. |
| Apps | Connect external services to transfer tasks. |
Devices
You can connect files on PCs, servers, and Object Storage to INNORIX to manage and transfer them in one place. After connecting a device, you can browse its files or transfer them directly to another device.
Connect a Device Through an Agent
You can use files on PCs or servers directly in INNORIX. Install and connect an Agent on a device to browse or transfer files and folders.
It is available on Windows and macOS, as well as Ubuntu, RHEL, CentOS, Rocky Linux, and Fedora.
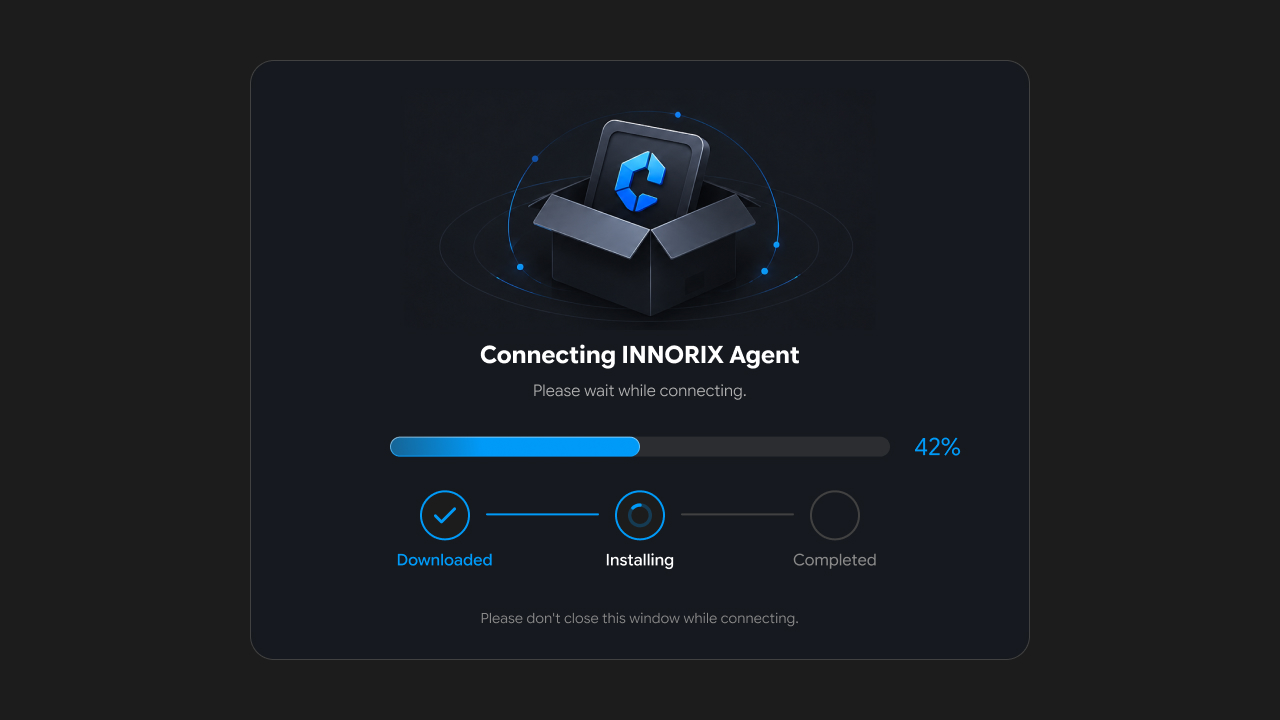
After installing the Agent, follow the on-screen instructions to connect your device.
Connect Object Storage as a Device
You can also transfer files in Cloud or Object Storage directly with INNORIX. Connect the Storage you use to view files and use them for transfers just as you would with a PC or server.
You can connect the following Storage types.
| Storage Type | Connection Target |
|---|---|
| Cloud Storage | Amazon S3, Microsoft Azure Blob Storage, Google Cloud Storage |
| Enterprise Storage | Dell Object Storage, IBM Cloud Object Storage |
| Object Storage | Alibaba Cloud OSS |
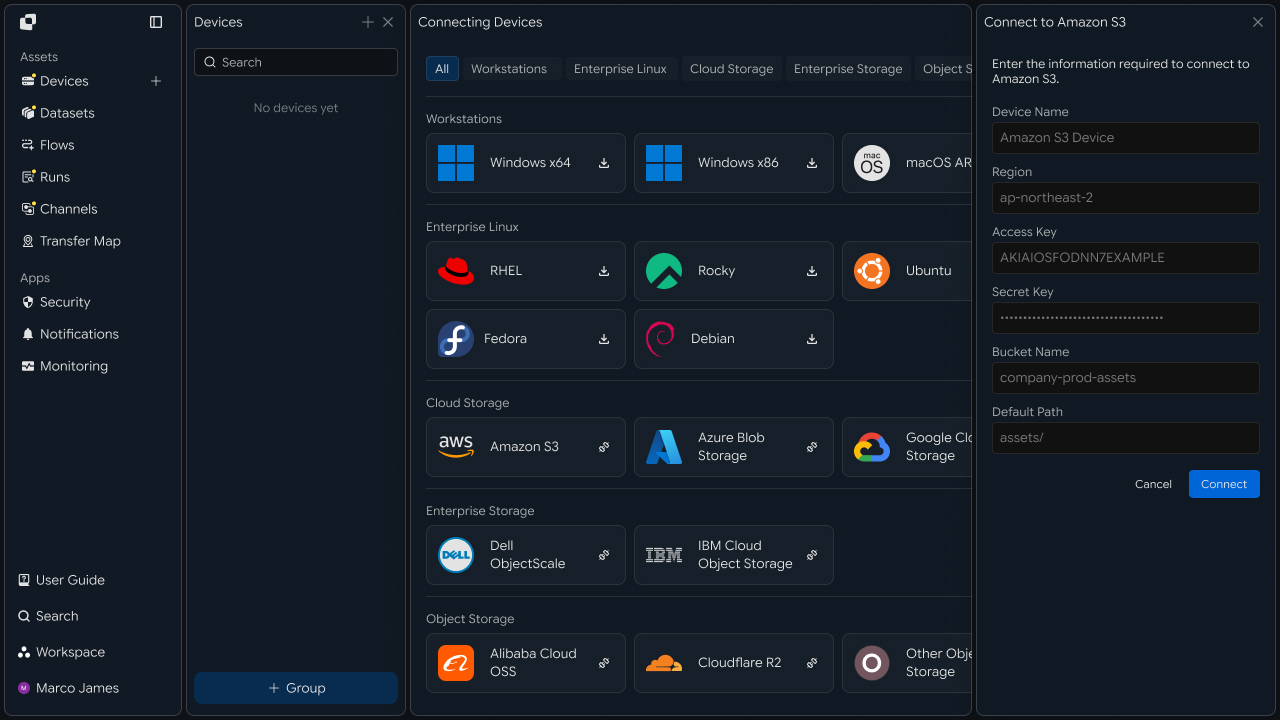
After selecting the Storage to use, enter the connection information by following the on-screen instructions to complete the connection.
Manage Device Information, Settings, and Status
You can view all connected devices together in Devices.
The device list lets you check basic information such as the device name, connection status, and operating system. Select a device to view more detailed information and its current status.
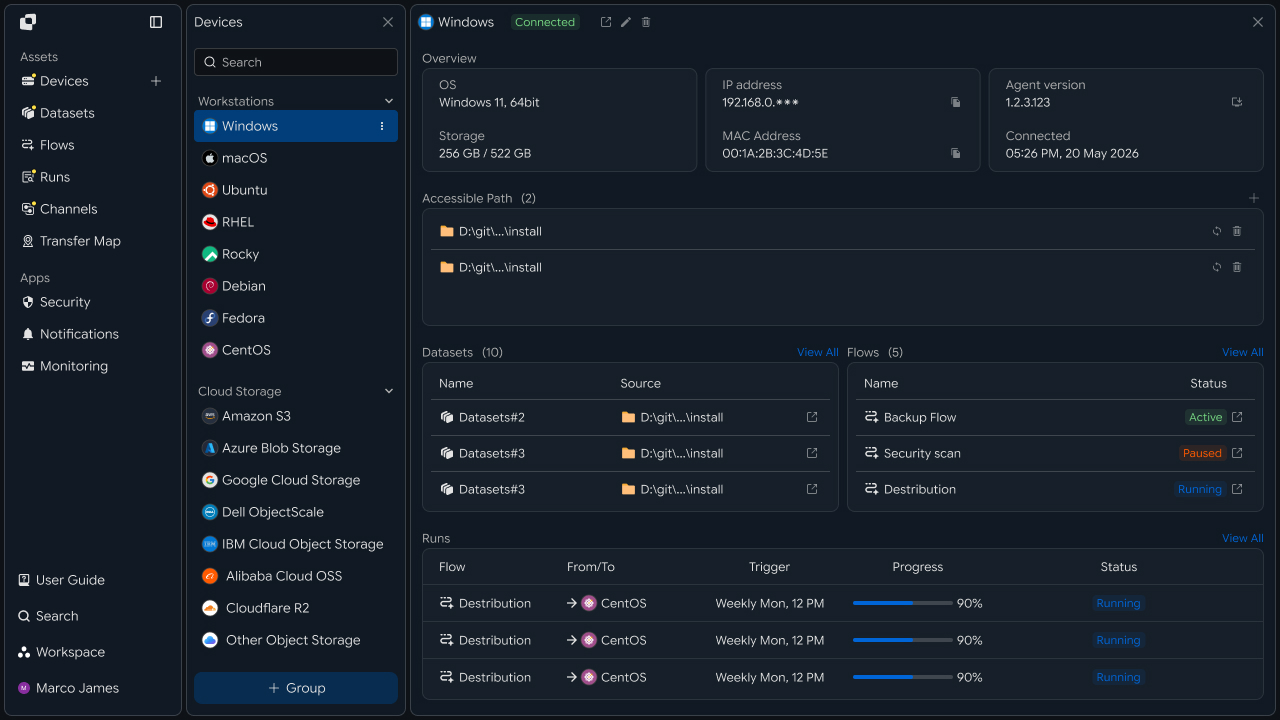
On the details screen, you can review the device's connection and system information and change settings as needed.
You can manage devices by changing their names or other information needed for management, or disconnecting devices that are no longer in use.
Create Device Groups and Change Their Configuration
As the number of devices grows, you can group similar devices together for easier management.
You can automatically organize devices into groups based on IP network ranges, or create groups manually, add devices, or move them to other groups as needed.
Selecting a group lets you see all devices in that group at a glance, making it convenient to manage many devices according to your chosen criteria.
Browse Files and Folders on a Device
You can view files and folders on connected devices directly in the file browser.
Select a device to display its folder structure, then navigate through folders to find the files you need. You can also view information such as the name, size, and modified date of files and folders.
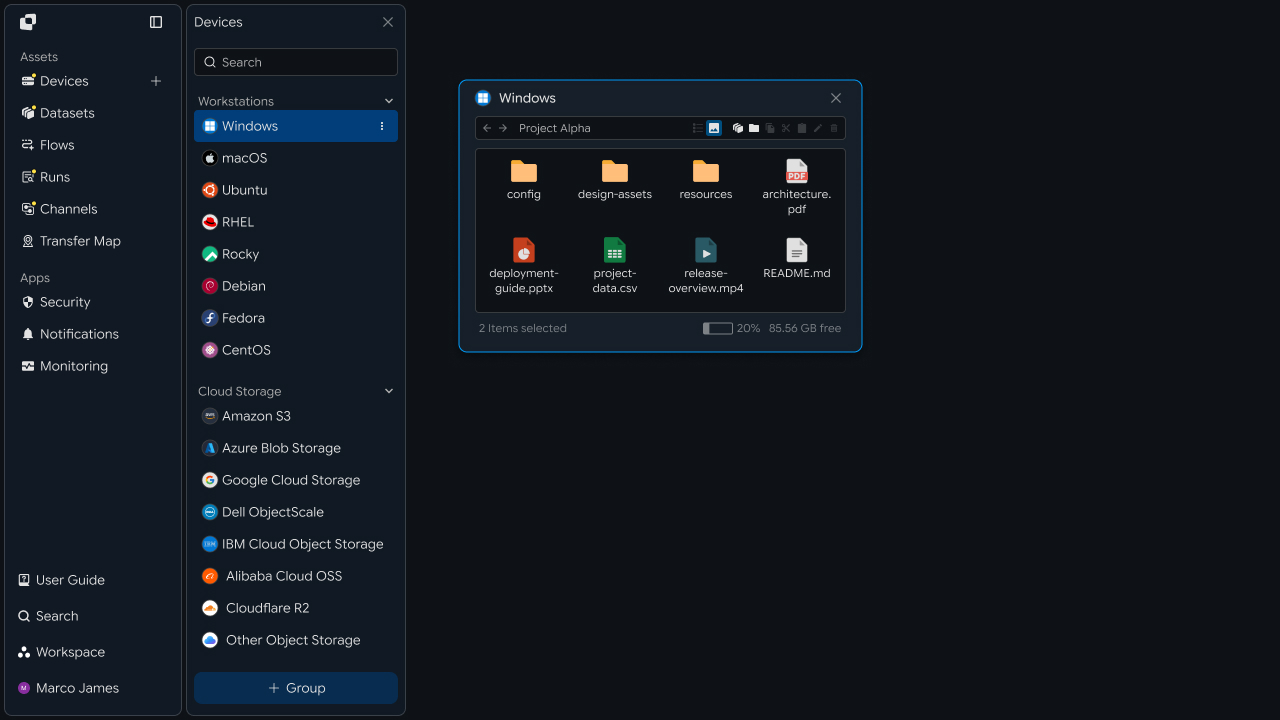
Once you find the files or folders you need, select them to continue with the next task.
Transfer Files and Folders Through the File Browser
You can select files or folders in the file browser and transfer them directly to another device.
Select the files or folders to transfer, then drag them to the desired location on another device to start the transfer. You can also select and transfer multiple files or folders at once, and check the progress after the transfer starts.
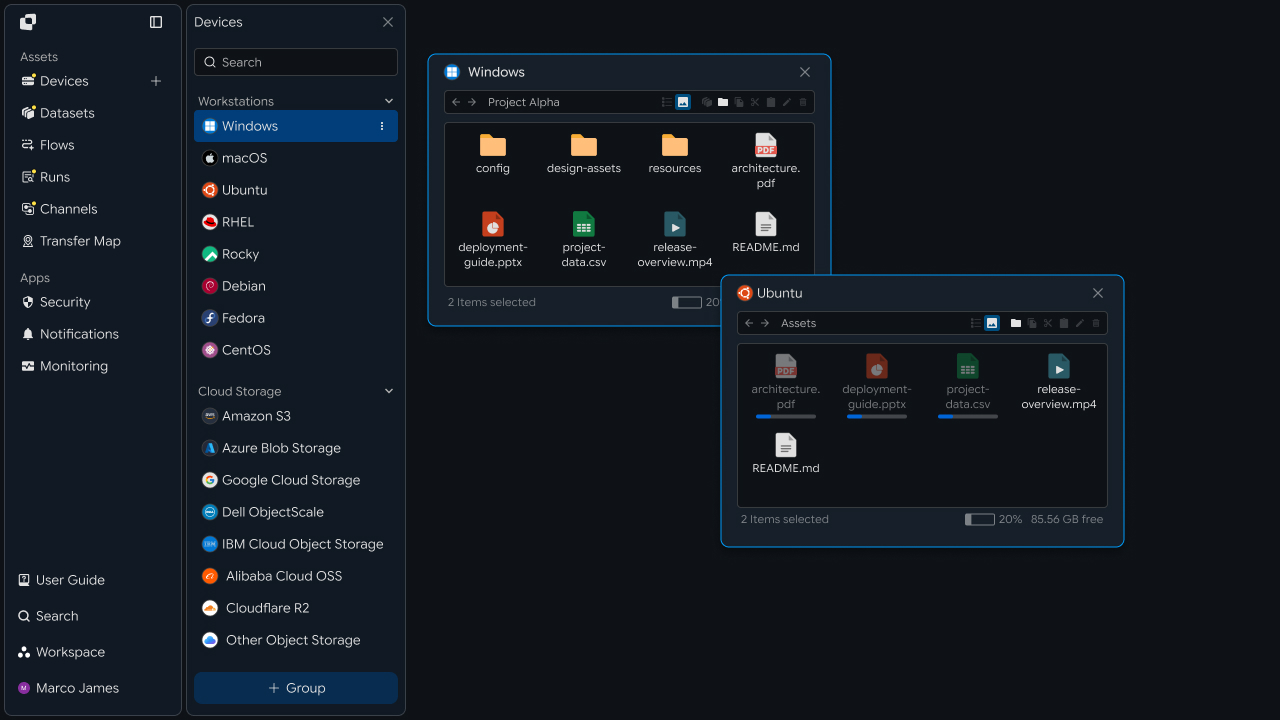
Datasets
When managing files and folders across multiple locations, it can be difficult to identify changes or decide which files and folders to transfer. With Datasets, you can group and manage the files and folders you need while checking changes, and use Reversion to manage the files and folders to transfer by version.
Define Files and Folders on a Device as a Dataset
You can define frequently used files and folders, or files and folders managed together, as a Dataset.
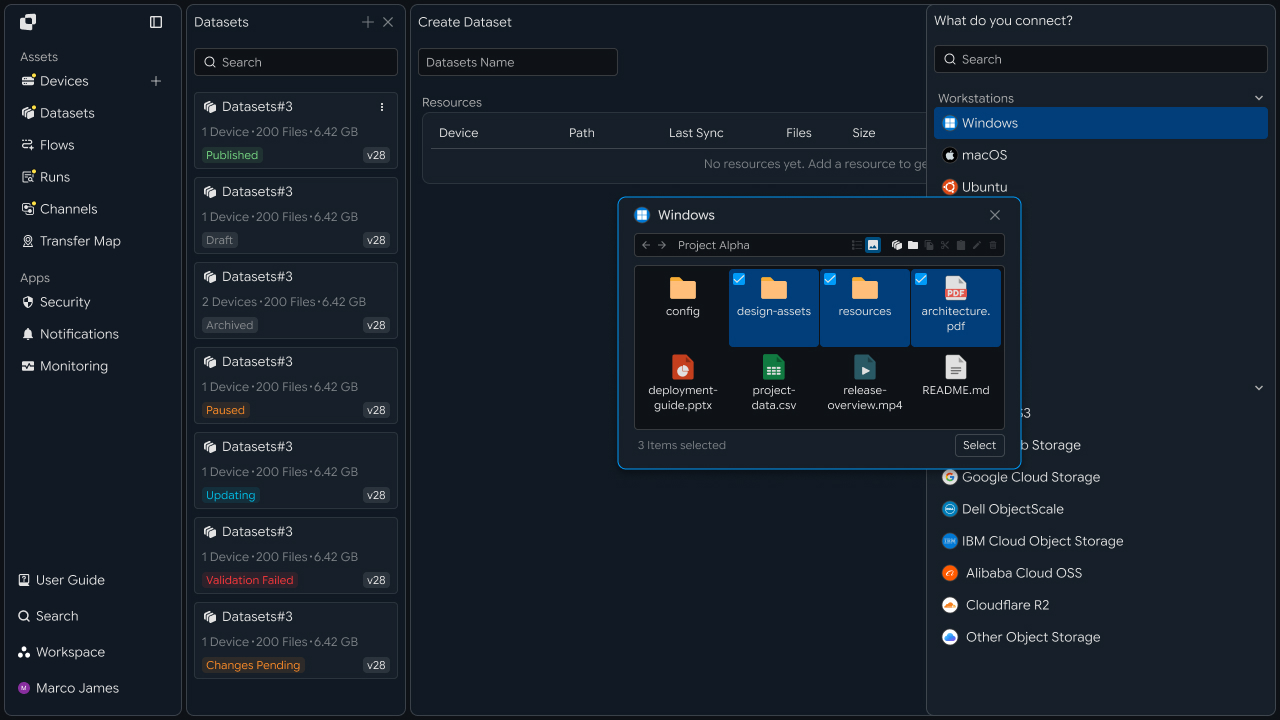
You can create a Dataset by selecting the Device and path containing the files and folders. A Dataset can include files and folders from one Device or from multiple Devices.
Check Dataset Configuration and Execution Status
After creating a Dataset, you can view its current configuration at a glance on the details screen.
You can check the connected Device and path, included files and folders, and the current Reversion of the Dataset.
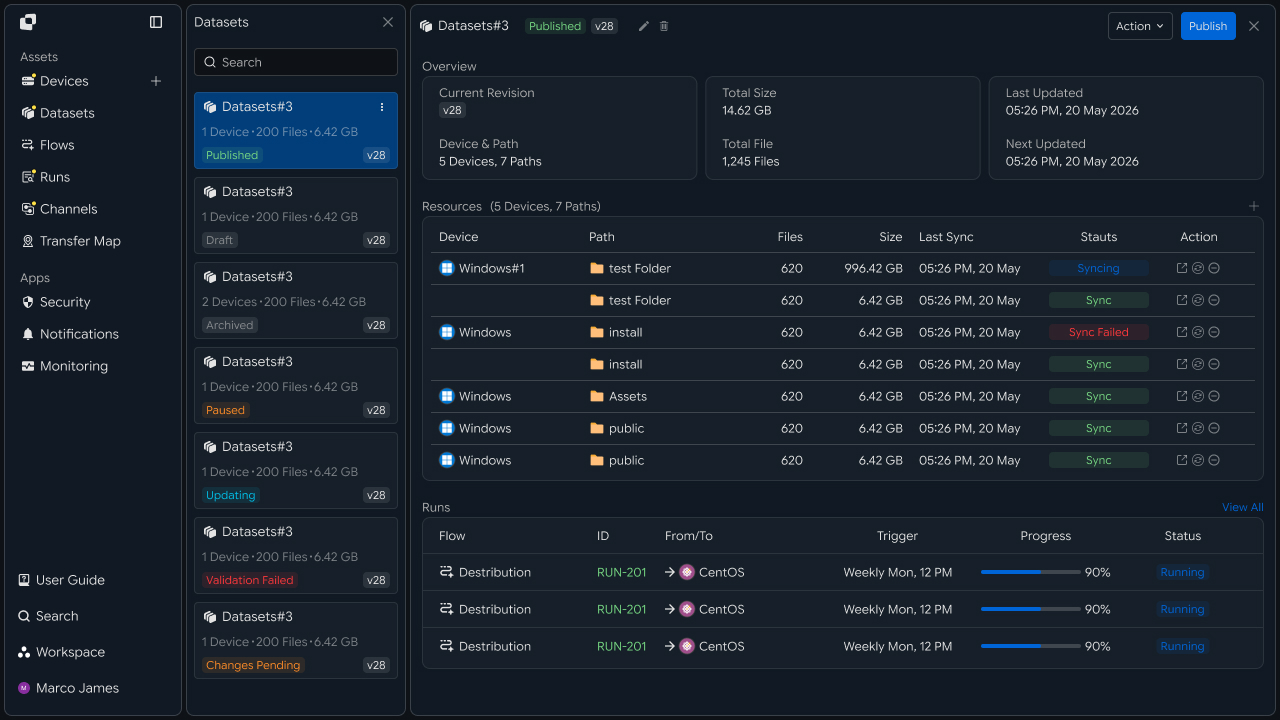
If there are transfers running with the Dataset, you can also check their current status to see where the Dataset is being used in one place.
Create and Manage Dataset Reversions
When files and folders continue to change, it can be difficult to determine exactly what content is being transferred.
With Reversion, you can manage the files and folders in a Dataset by version and easily check what is included in each version.
Each Reversion lets you review the included files and folders and any changes, making it clear to manage the content to transfer by version.
Update a Dataset Reversion
When applying file and folder changes to a new Reversion, you can update manually when needed or configure automatic updates based on changes.
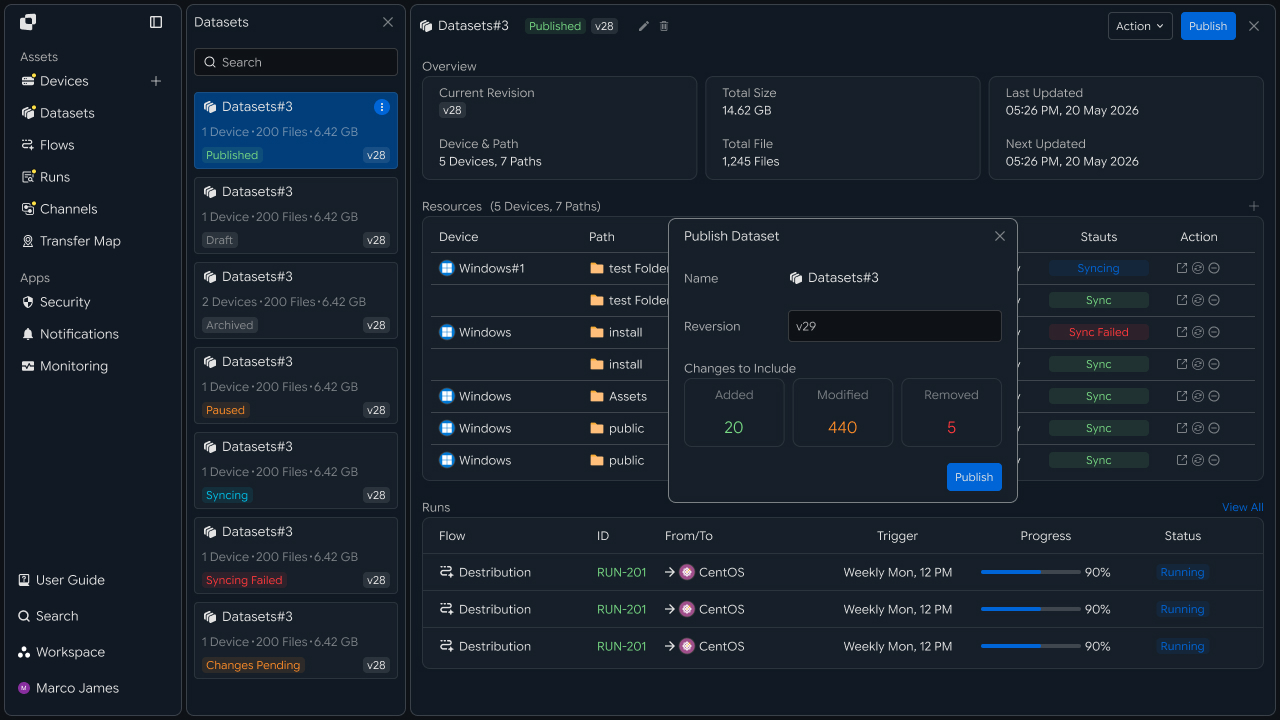
By configuring the Dataset to update before a transfer, you can apply the latest changes before the transfer starts and transfer files and folders in their latest state.
Flows
You can build the required transfer structure in a single Flow, from transferring files from one location to another to distributing them to multiple locations.
First, place the transfer targets as Sites and connect Sites with Steps to create the path along which files move. Then configure the transfer method and execution conditions for each Step to transfer files as needed.
You can create a simple transfer with one Step, or connect multiple Steps to run the next transfer after the previous one finishes or distribute files to multiple locations.
Configure a File Transfer Task
You can decide where to send files from and to, and configure the transfer task.
Place the transfer targets as Sites and connect Sites with Steps to create the path along which files move. Then configure the required transfer method and execution conditions for each Step to complete a Flow.
Configure Transfer Locations and Targets
Use Sites when placing sources or destinations for sending or receiving files in a Flow.
You can configure Devices, users, Object Storage, Datasets, and more as Sites, then connect those Sites to create the structure through which files move.
Configure Transfers Between Sites
A Step defines how files are transferred between Sites.
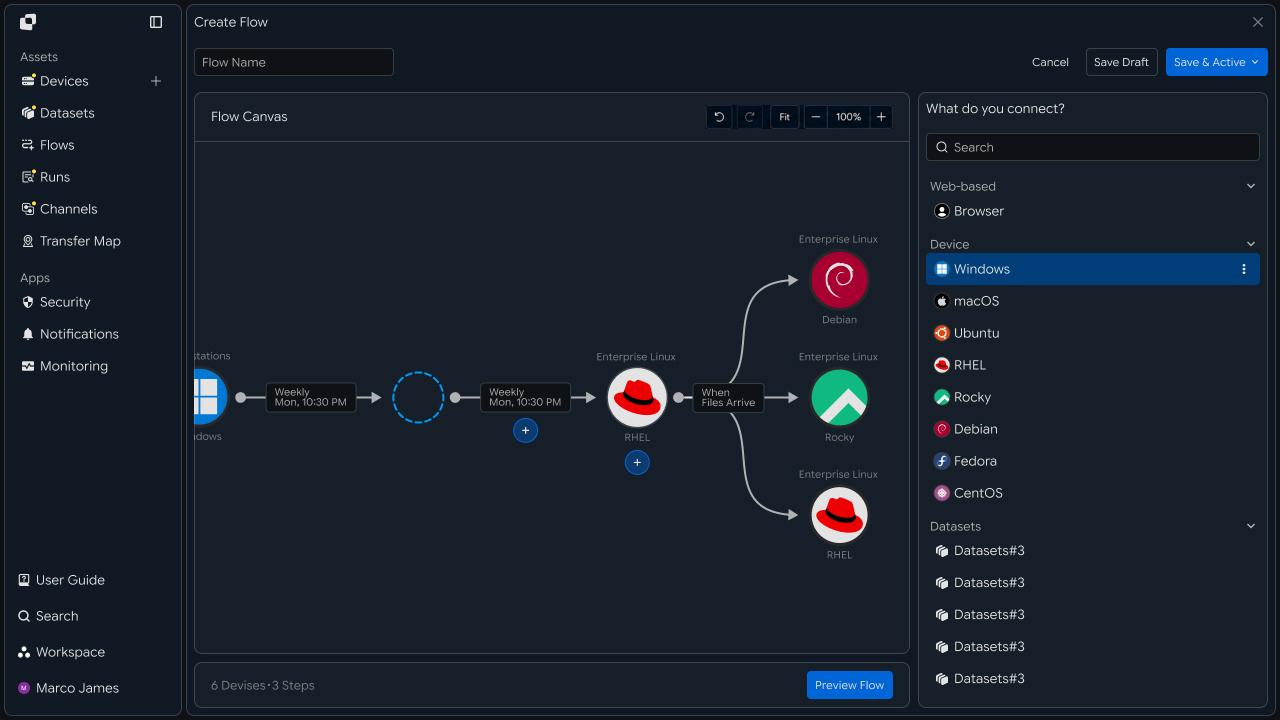
In a Step, you can configure the files and folders to transfer, transfer direction and method, execution conditions, storage method, and more. By connecting multiple Steps, you can run multiple transfers in sequence within a single Flow.
Set Conditions for Starting Transfers
You can configure the execution conditions of a Step based on when files should be transferred.
You can transfer on a defined schedule or start the next transfer after the previous Step finishes. You can also start transfers when file or folder changes are detected or when an external URL is called.
Transfer According to a Defined Schedule
If files need to be sent at a specific time, you can configure transfers to run according to the schedule you want.
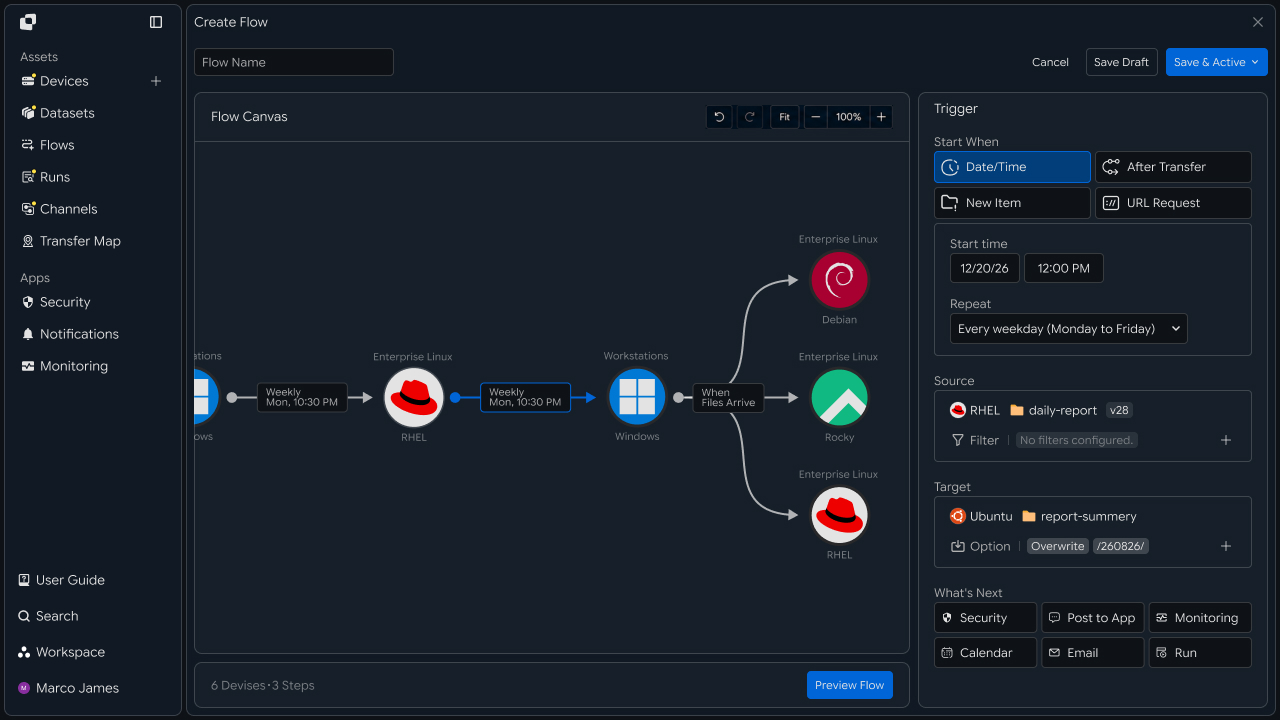
You can configure a transfer to run once or repeat by hour, day, week, or month.
Start the Next Transfer After the Previous Step Finishes
If multiple transfers need to run in sequence, you can connect and configure Steps.
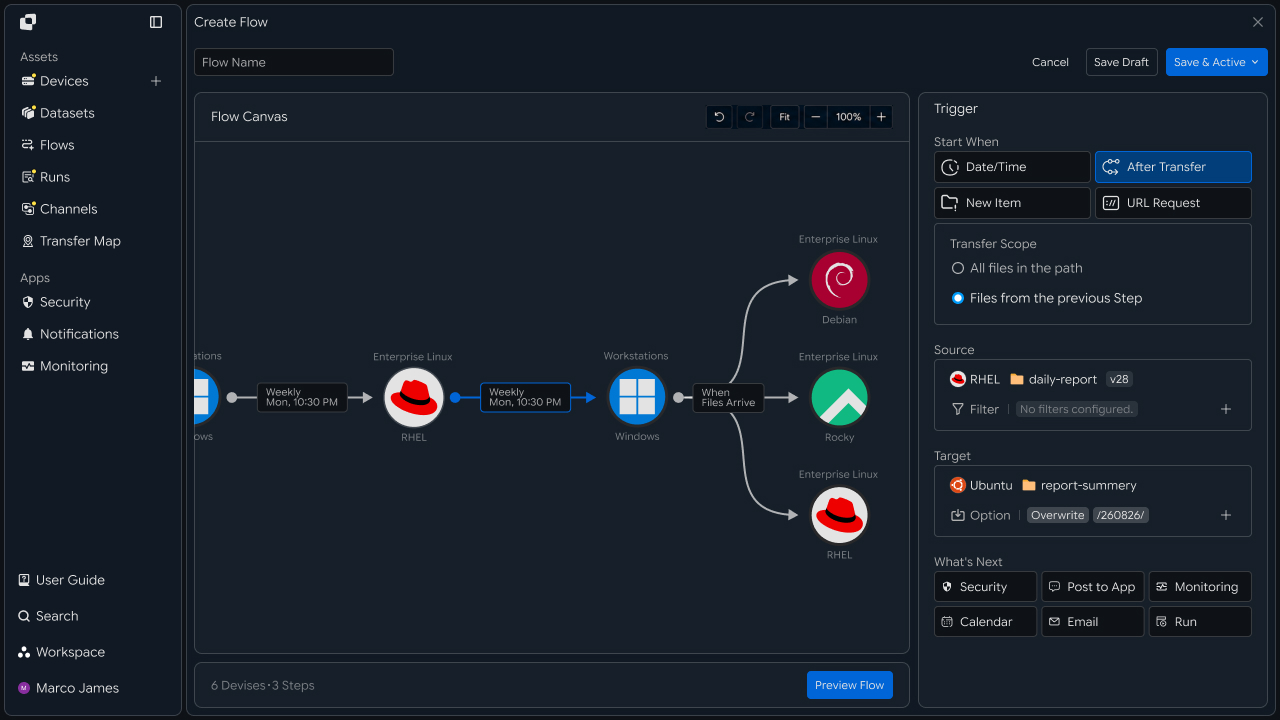
You can configure the next Step to start after the previous Step finishes, and also create multi-stage transfers that continue transferring files or folders received in the previous transfer to the next Site.
Continuously Synchronize Changed Files and Folders
Use synchronization when changes to files or folders in one location must continue to be reflected in another location.
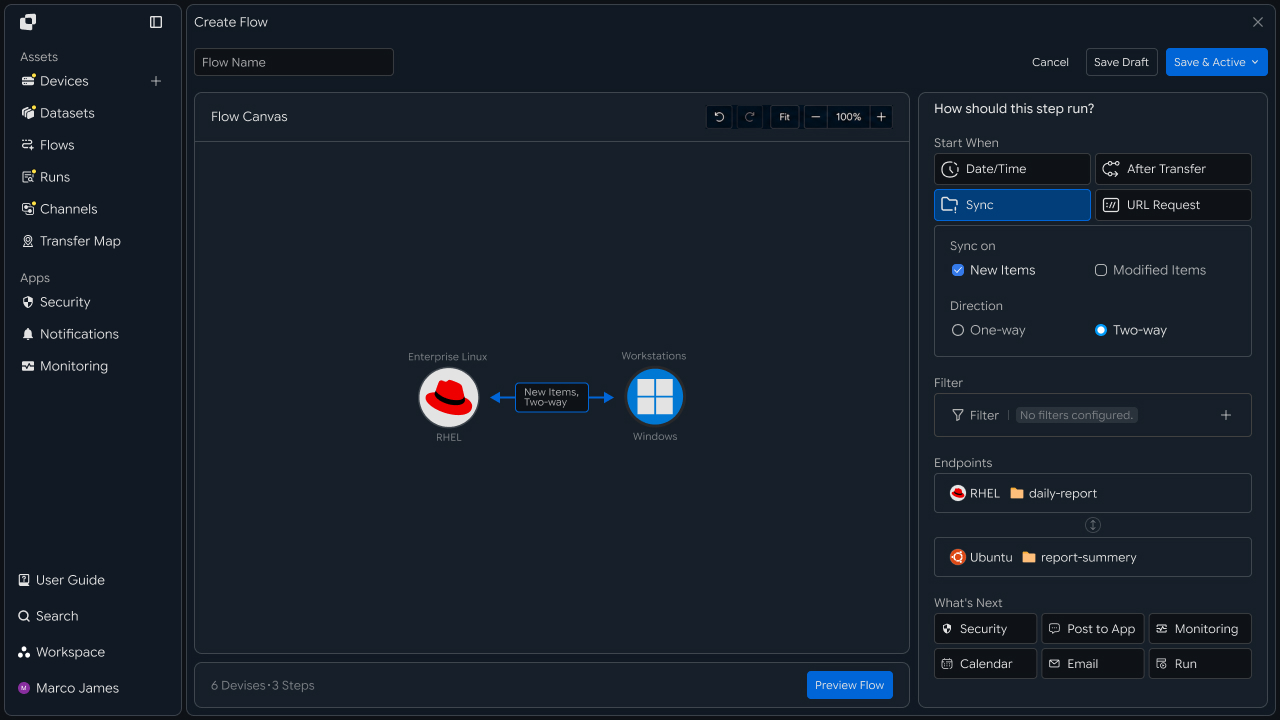
You can synchronize in one or both directions, and configure synchronization to reflect only newly added files and folders or changes to existing files and folders as well.
Run Transfers Through External URL Calls
If another system or automation task needs to start a file transfer at a specific time, you can run the transfer by calling a URL externally.
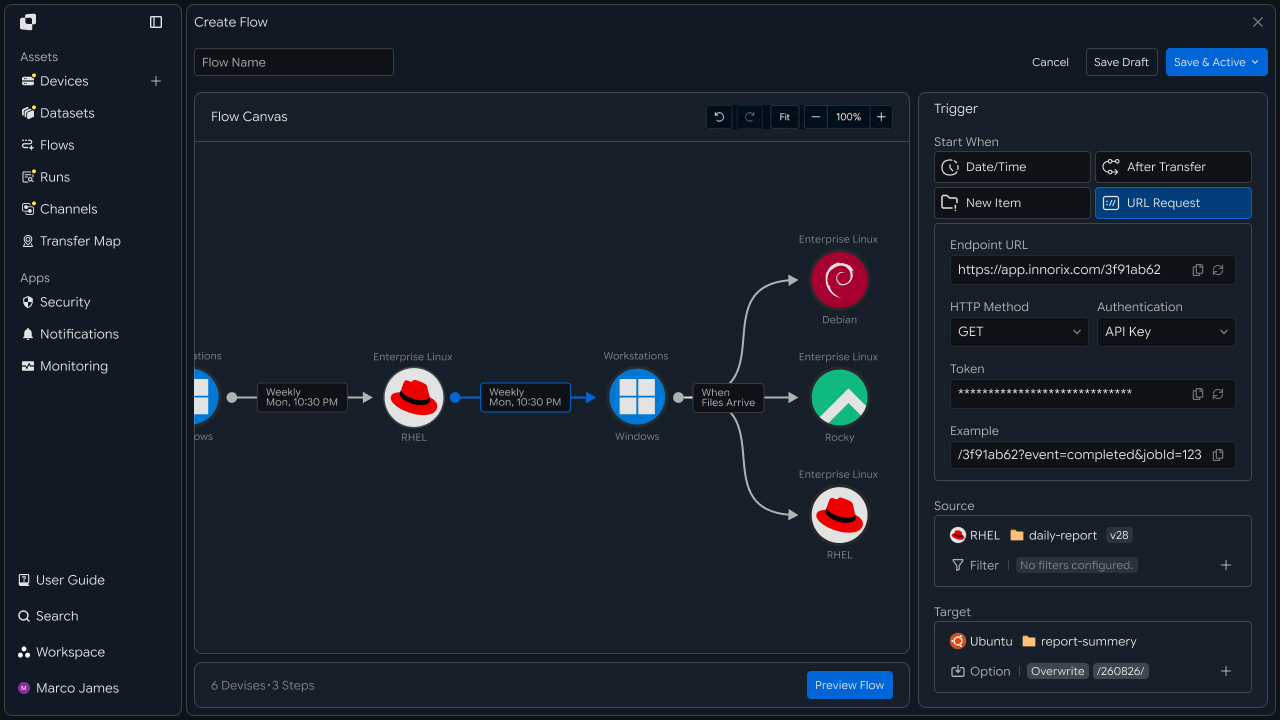
When you configure a URL transfer in a Flow, the transfer starts when an external system calls that URL, allowing you to run file transfers together with tasks in other systems.
Collect or Distribute Files Across Multiple Locations
When you need to collect files from multiple locations into one place or send the same files to multiple locations, you can connect multiple Sites.
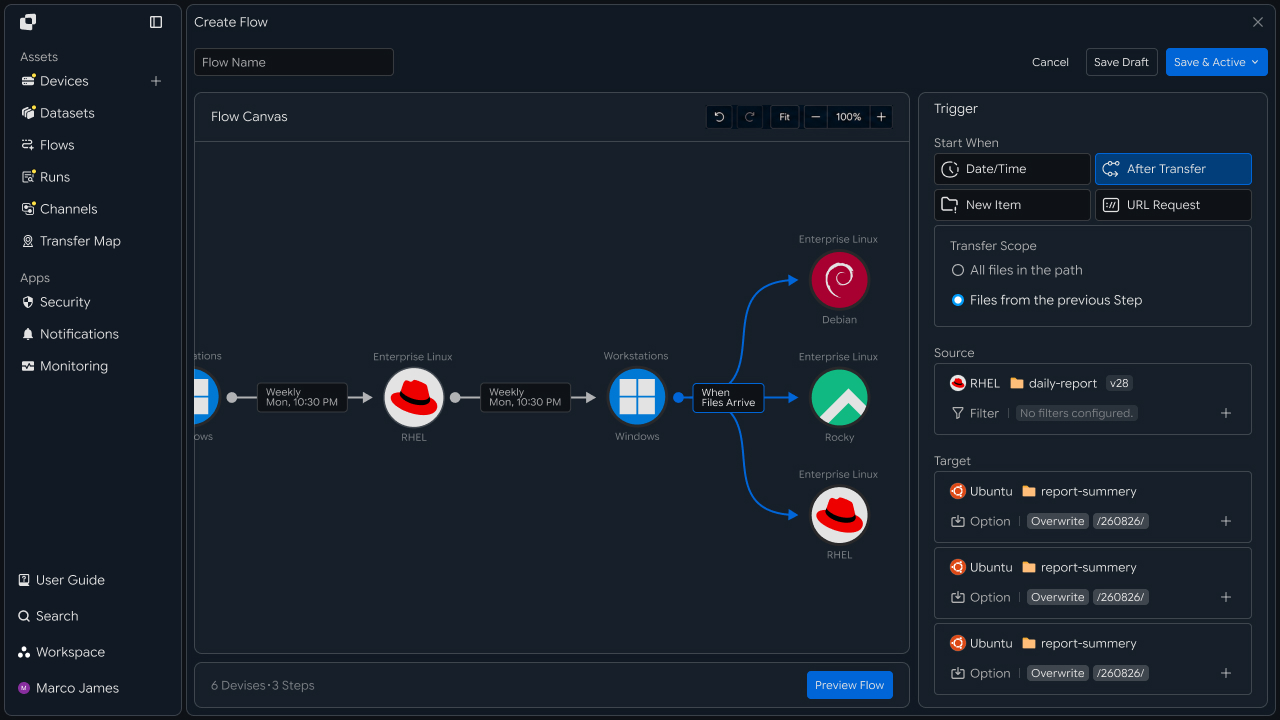
Connecting multiple Sites to one Site lets you collect files from multiple locations into one place, while connecting one Site to multiple Sites lets you distribute the same files to multiple locations.
Specify the Transfer Location and Files or Folders
You can specify the location to send files from and the actual files or folders to transfer.
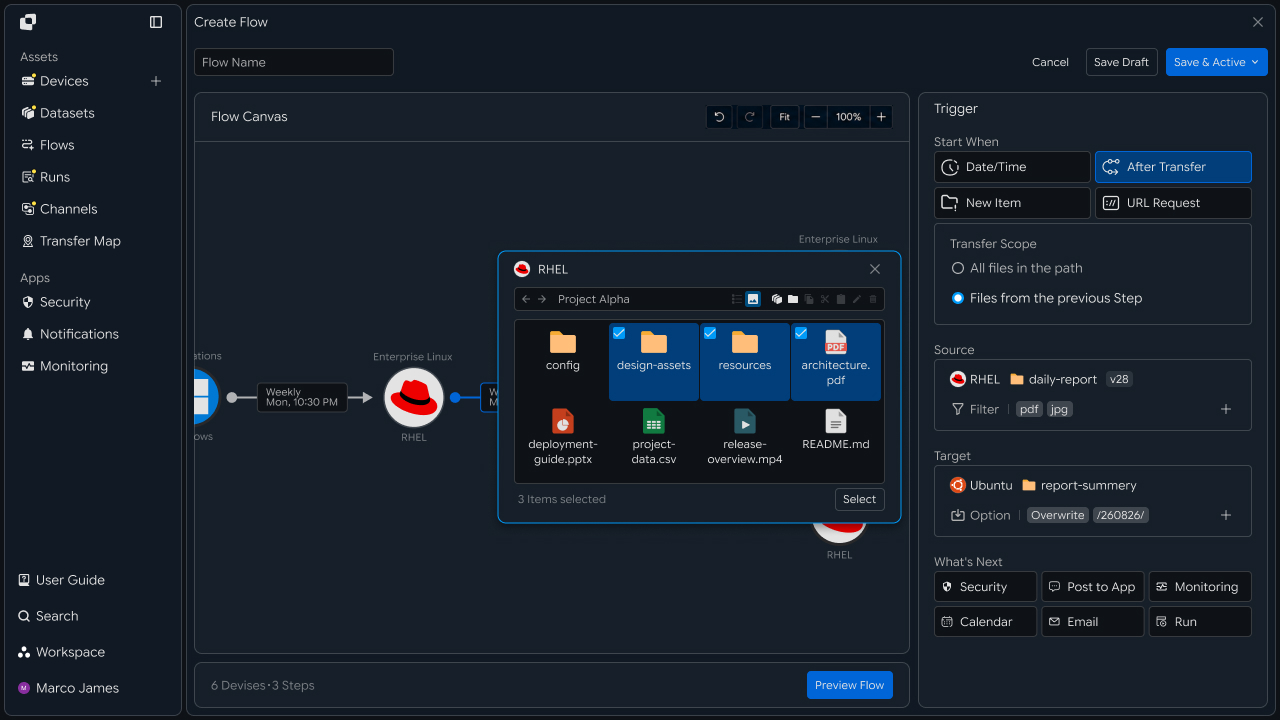
You can select a path on a Device or specify a Dataset to configure the files and folders to transfer.
Set Conditions for Files or Folders to Transfer
When there are many files and folders to transfer or you need to select only specific files, you can set conditions to define the transfer scope.
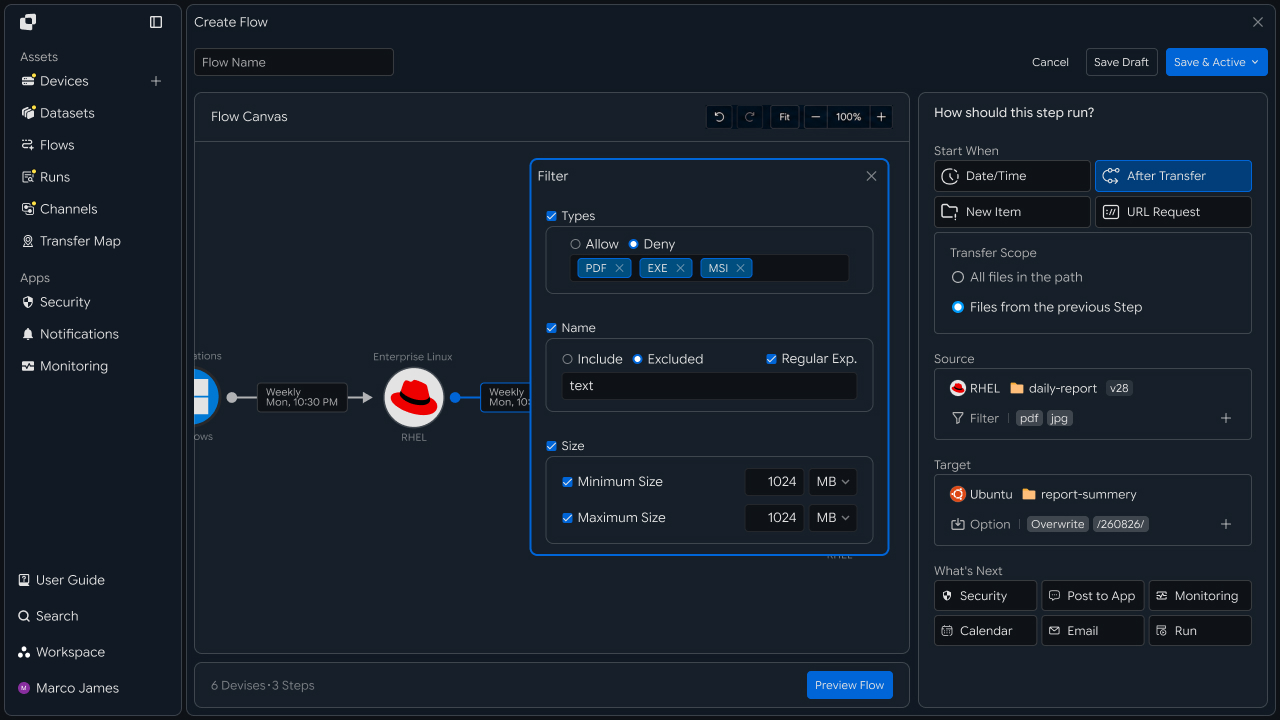
You can set conditions based on file name, extension, file size, and more, and combine multiple conditions to transfer only the files and folders you need.
Specify the Location and Path for Receiving Files
You can specify where to save the transferred files and folders.
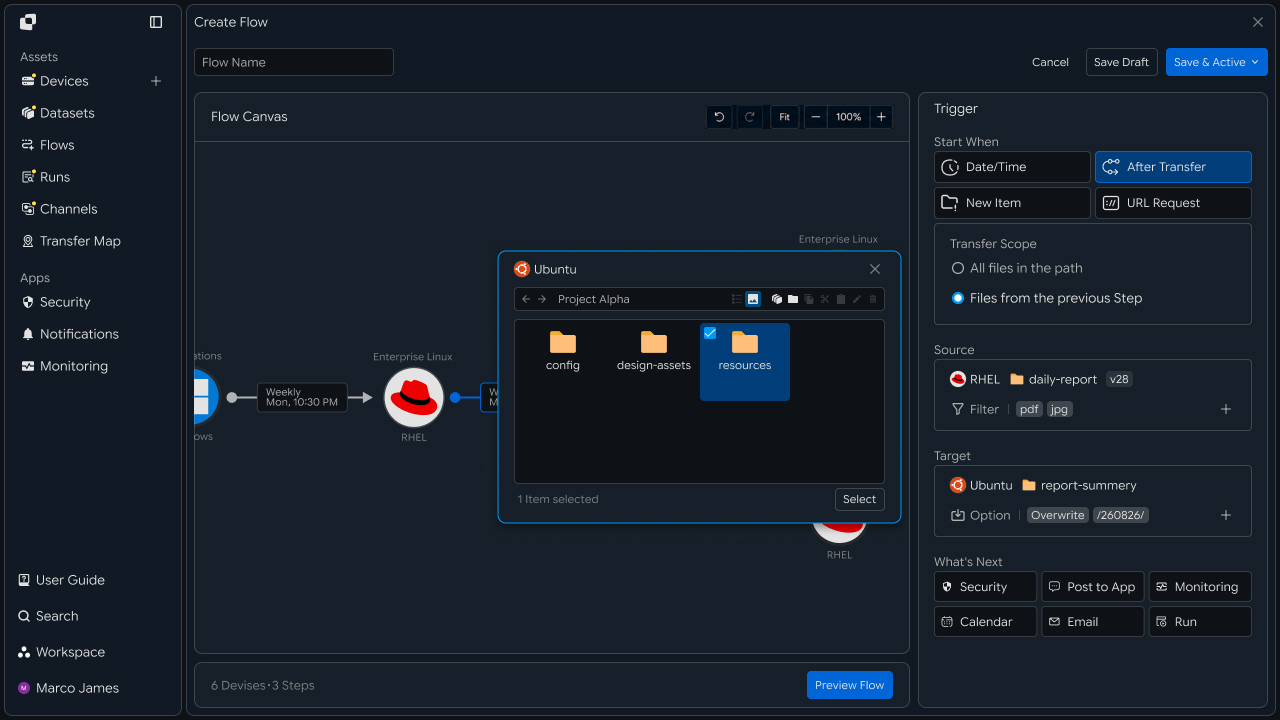
Select a Device and specify the path where files and folders should be saved to transfer them to that location.
Configure File Storage Methods and Paths for a Target
When saving transferred files and folders to a Target, you can configure the file name, folder structure, and storage path.
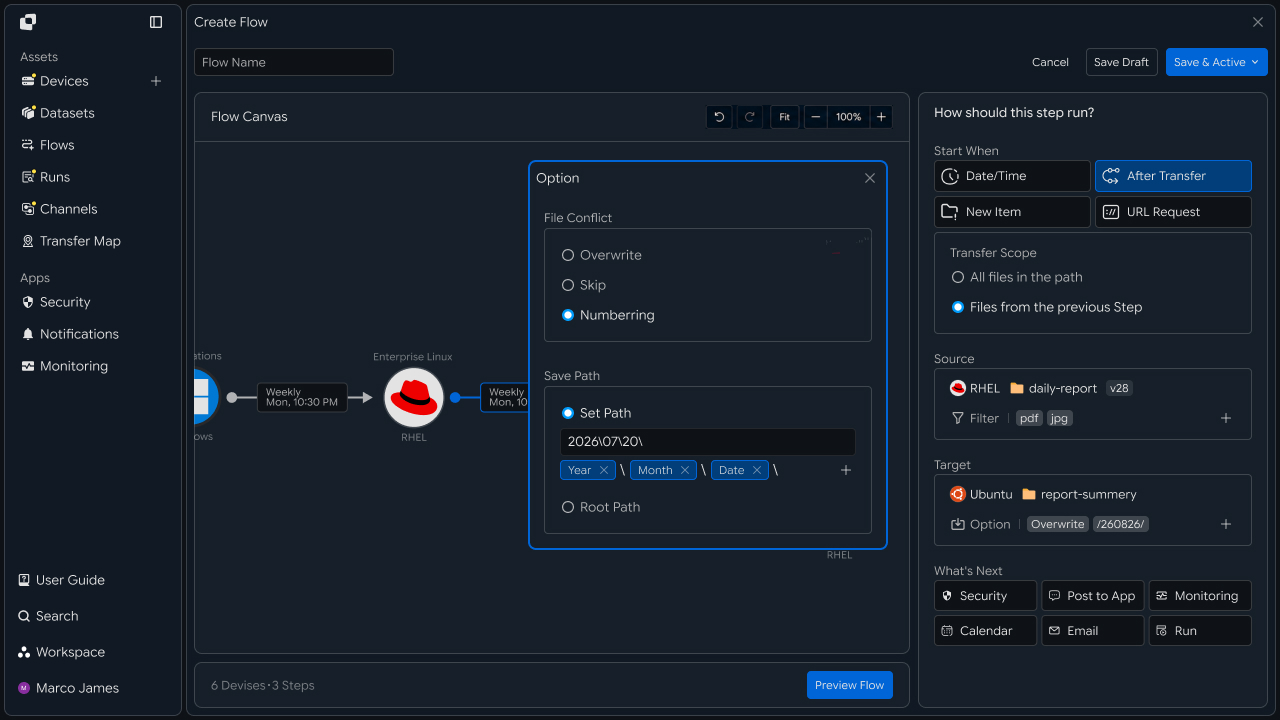
When a file with the same name already exists, you can overwrite it, save the new file with a different name, or keep the existing file and skip the transfer. You can also save files and folders in separate subfolders or include the year, month, day, device name, time, or custom text in the storage path.
Connect Tasks to Run After a Transfer Completes
If there are follow-up tasks such as security scanning or notifications after a file transfer finishes, you can connect them as post-processing tasks.
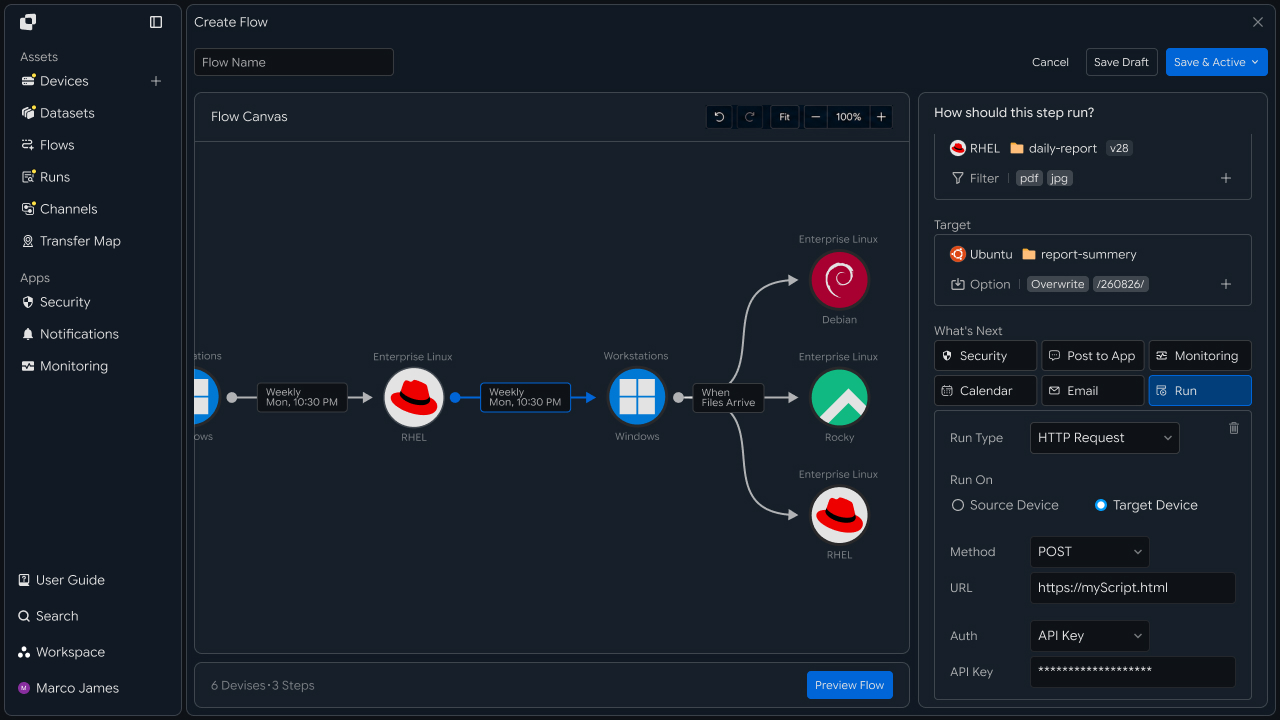
You can connect security scanning through Security, message delivery, Monitoring, Calendar, Email, URL calls, and script execution to continue processing required tasks after the transfer finishes.
Manage Flow Configuration and Execution Status
When the transfer environment or work process changes, you can modify an existing Flow to match the required configuration.
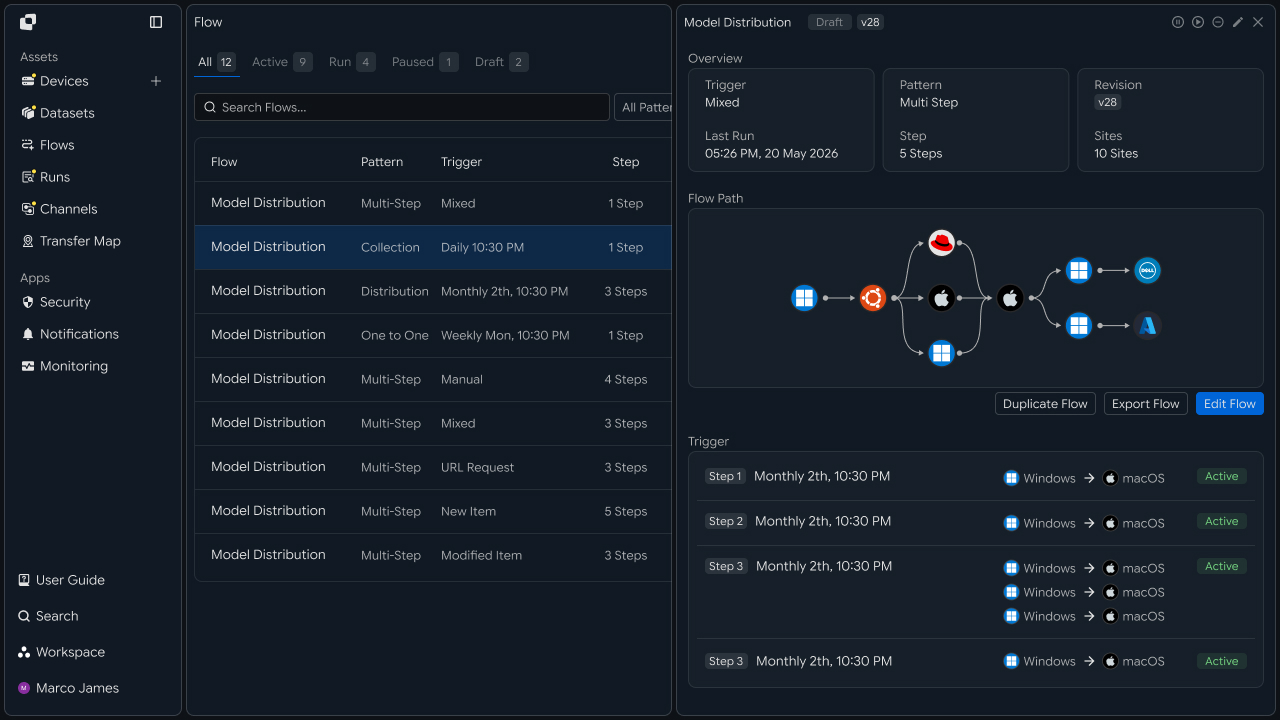
You can modify the configuration and connections of Sites and Steps, execution conditions, files and folders to transfer, storage methods, and more. You can also activate or pause the modified Flow and check its current status and change history.
Runs
After creating a Flow and configuring a transfer task, you can check how the actual transfer is running.
In Runs, you can view transfers executed according to a Flow in one place and review progress and results from the overall transfer to each Step and individual transfer.
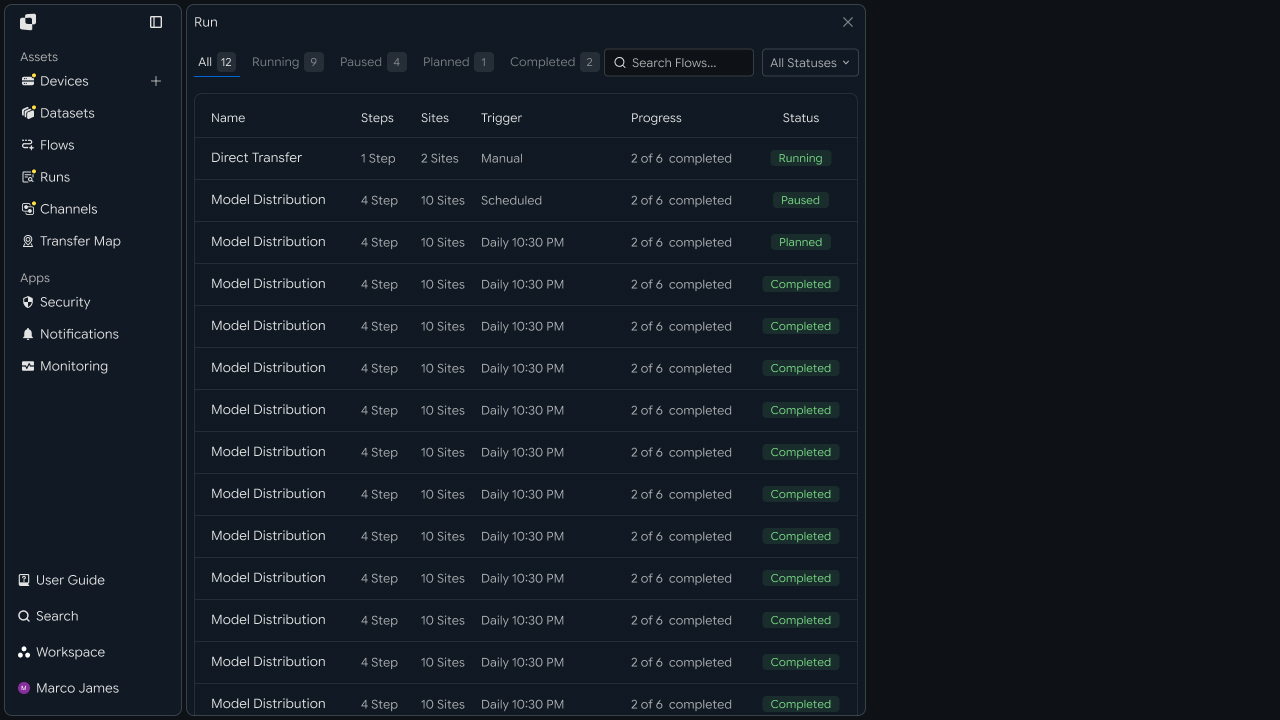
When a transfer runs, you can see its current stage. After it finishes, you can also check which files and folders were actually transferred and processed successfully.
Check Transfers Executed from a Flow
When a transfer configured in a Flow runs, you can check the task in Runs.
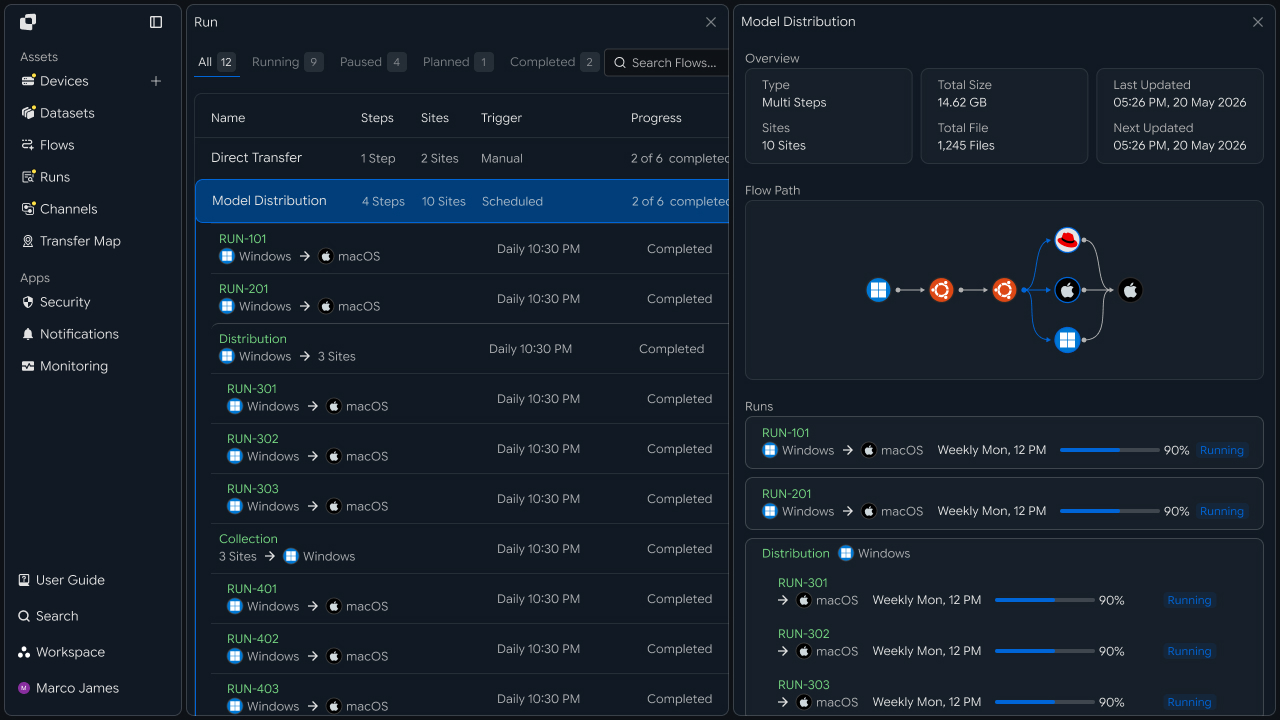
You can view running and completed transfers in one place, and check basic information such as transfer status, progress, and execution time in the list. Select a transfer to review its entire process and results in detail on the details screen.
Check the Entire Transfer Process and Results
Select an executed transfer to view the entire transfer process and results on that Run's details screen.
You can check how the entire Flow ran and review the progress and transfer results of each Step. If a Step distributes files to multiple locations or collects files from multiple locations, you can also check the results of each individual transfer by location.
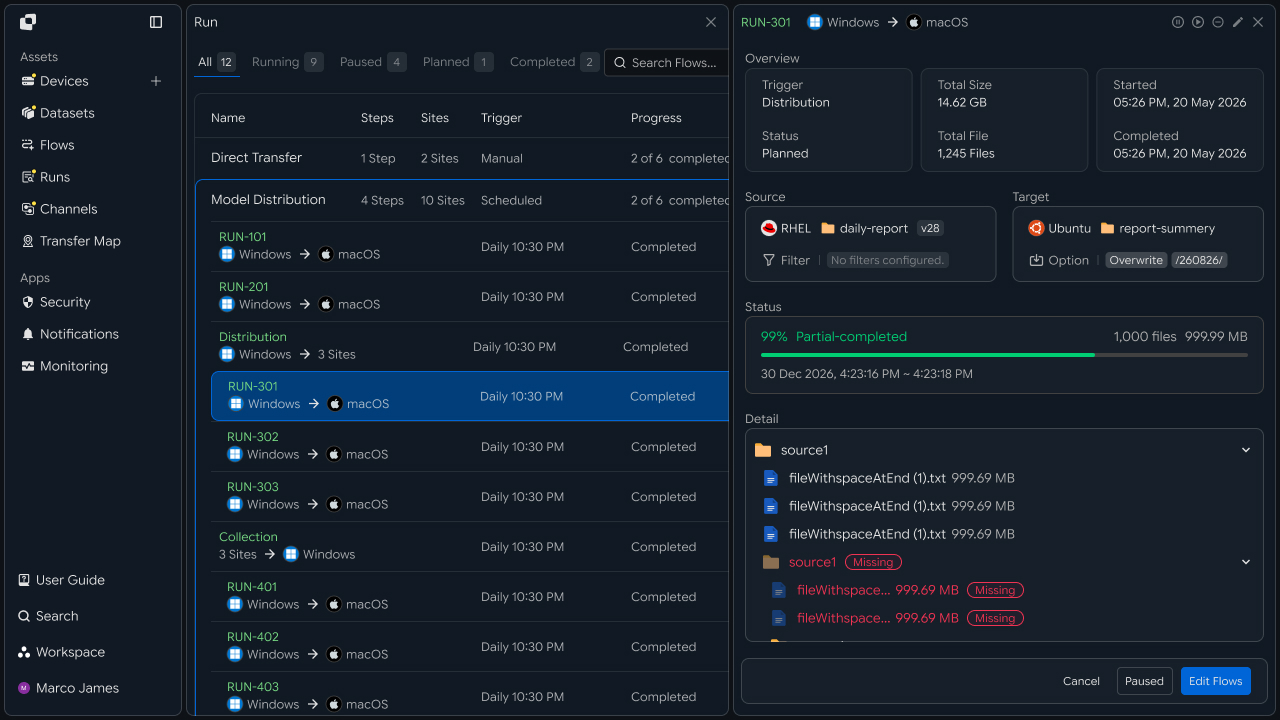
You can also review the transferred files and folders, transfer counts and volume, and successful and failed transfers, making it easy to understand how the entire Flow, each Step, and individual transfers progressed and completed.
Manage Running Transfers
You can control a task according to the situation while a transfer is in progress.
When needed, you can pause or restart a transfer, and cancel a transfer that should no longer continue. If a transfer needs to be run again, you can rerun it depending on the situation.
Check Error Details and Processing Status
If a problem occurs during a transfer, you can identify the Step, individual transfer, file, or folder where the error occurred.
You can check the error details and cause and take the required action. If retrying is available, you can run the transfer again. If a problem occurs with only some files during a multi-file transfer, you can distinguish successfully transferred files from failed files.
Channels
Sometimes you need to use a Flow together with other people rather than alone.
Other people may need to participate in the transfer process, such as by providing their devices for a transfer, receiving files, or sharing transfer results.
With a Channel, you can share these Flows with others so that each person can participate in transfer tasks in the role they need. In addition to sending and receiving files, participants can review the transfer process and results together, allowing multiple people to manage a single transfer task in sequence.
Create a Channel to Share a Flow
If there is a Flow you want to use with others, you can create a Channel for that Flow and share it.
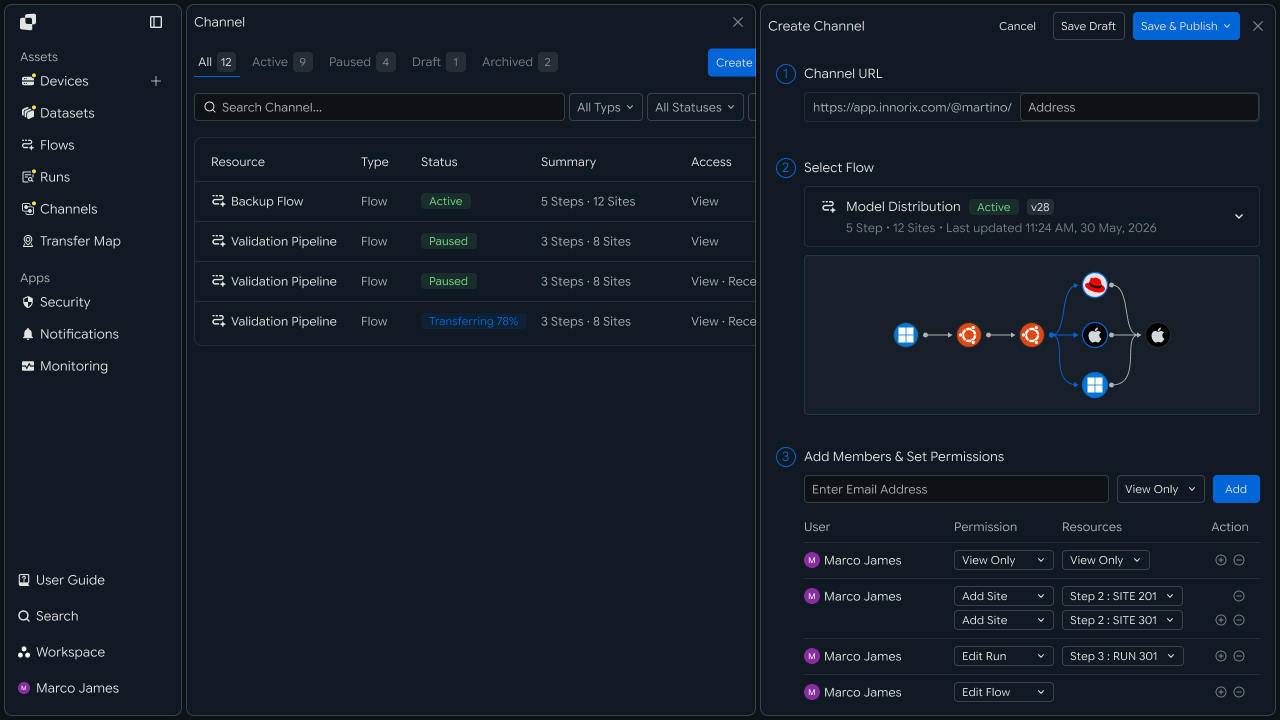
Select a Flow, set the Channel name and description, then define the access method and available features. After completing the required settings, the Channel is created and ready for other users to join.
Join a Shared Flow
Users who receive a shared Channel can join it and perform the tasks allowed to them.
They can connect their own devices for the transfer or send and receive files, and if authorized, check the transfer process and results. People providing their devices for a transfer, receiving files, or checking transfer results can participate in tasks within the same Channel according to their respective roles.
Manage Participants and Channel Settings
While operating a Channel, you can change settings such as participants, permissions, and access methods.
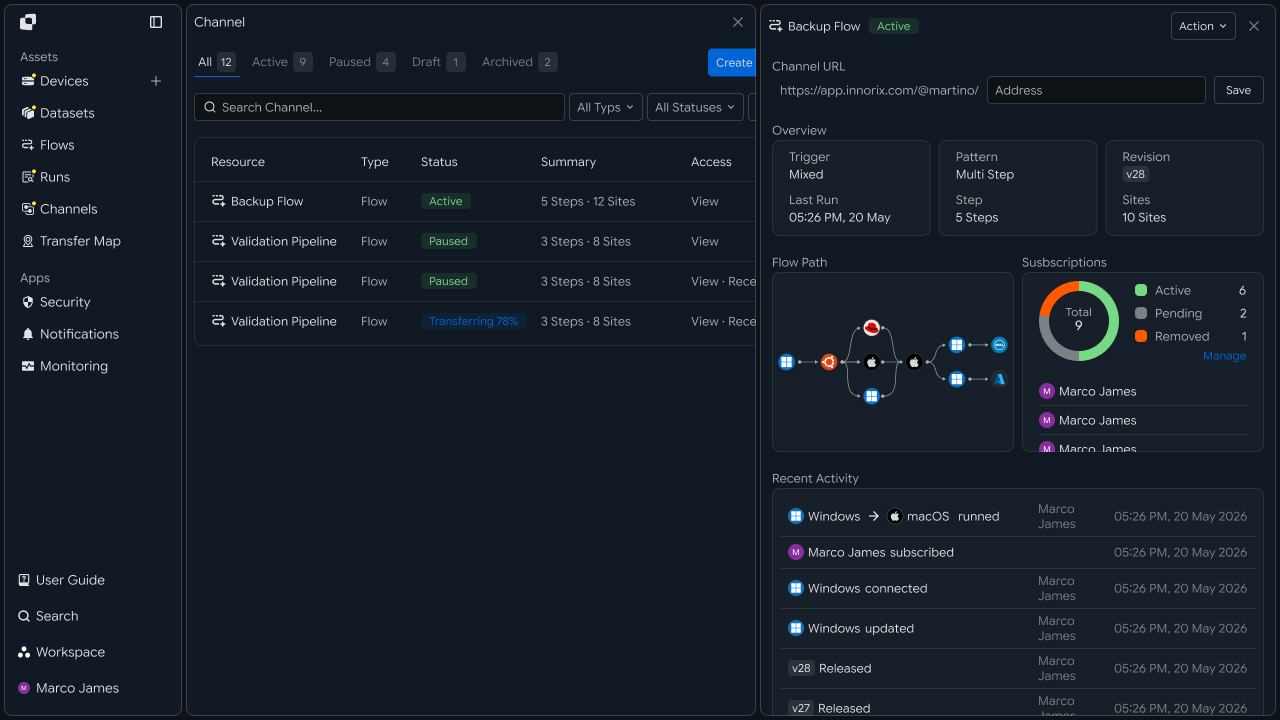
You can assign permissions for each user to view files, connect devices, run transfers, check results, and more, and add or remove participants as needed. You can change Channel sharing and transfer settings, or pause or archive a Channel that is no longer in use.
Integrations
When transferring files, you may need to perform security scanning, send transfer status notifications, or check transfer status from another system.
INNORIX lets you integrate Security, Notification, and Monitoring with external services to use the features required for transfer tasks.
You can connect each required service and configure it to run at the desired point in a Flow, allowing you to manage file transfers and related tasks as one continuous flow.
Integrate Security Services
If you need to check the security status of transferred files, you can integrate Security with an external security service.
After connecting the security service you use, you can configure security scanning to run at the required point in a Flow. 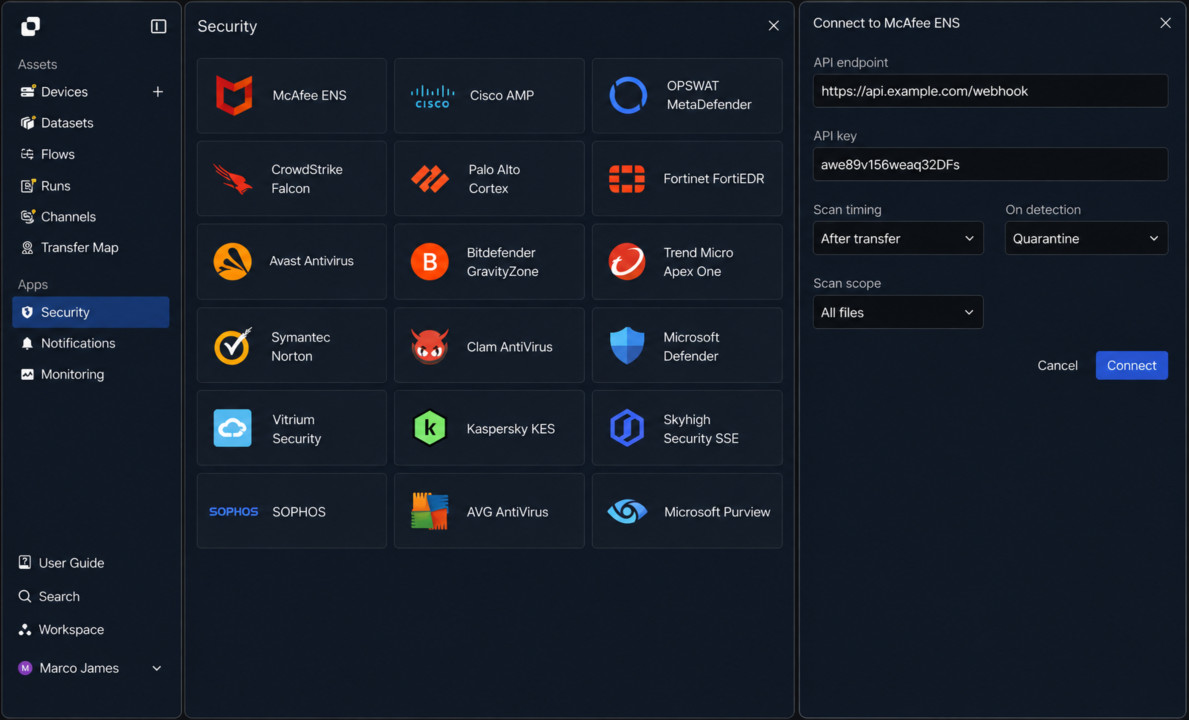
Integrate Notification Services
If you need to notify users when a file transfer starts or finishes, or when a problem occurs, you can integrate Notification.
Connect the notification service you use and configure the required situations to send notifications according to transfer status. 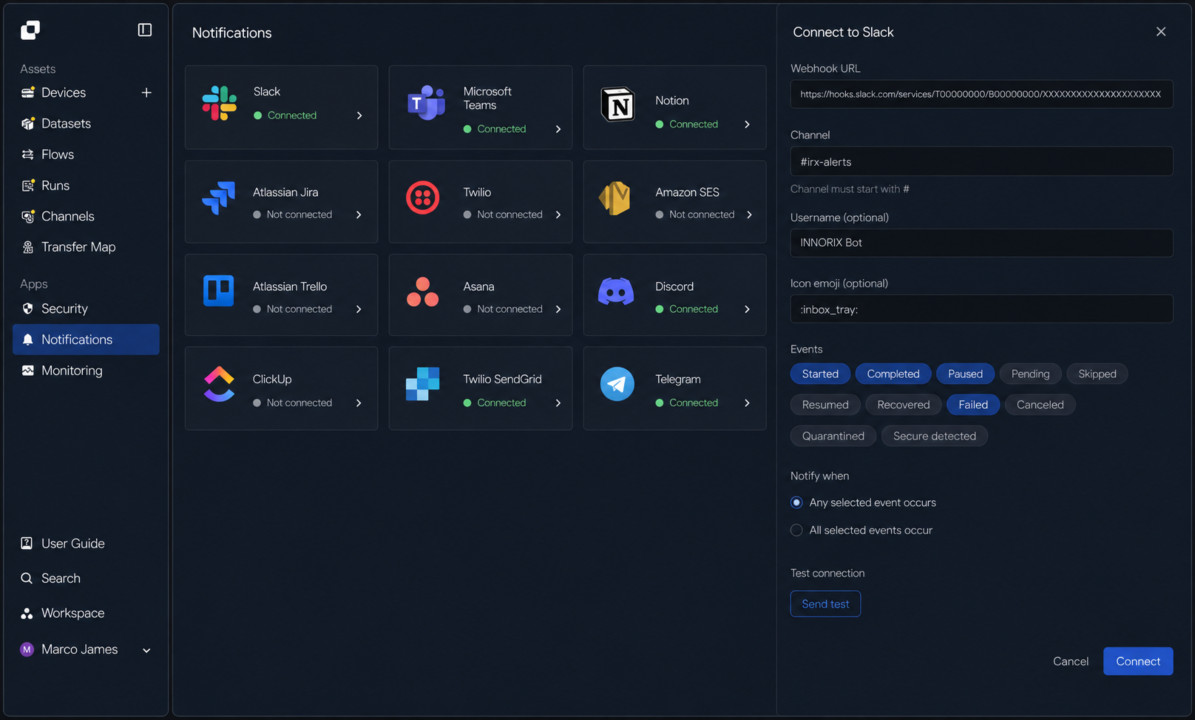
Integrate Monitoring Services
If you need to check transfer task status and results in a separate monitoring environment, you can integrate Monitoring.
Connect the monitoring service you use to check transfer status and results in an external monitoring environment. 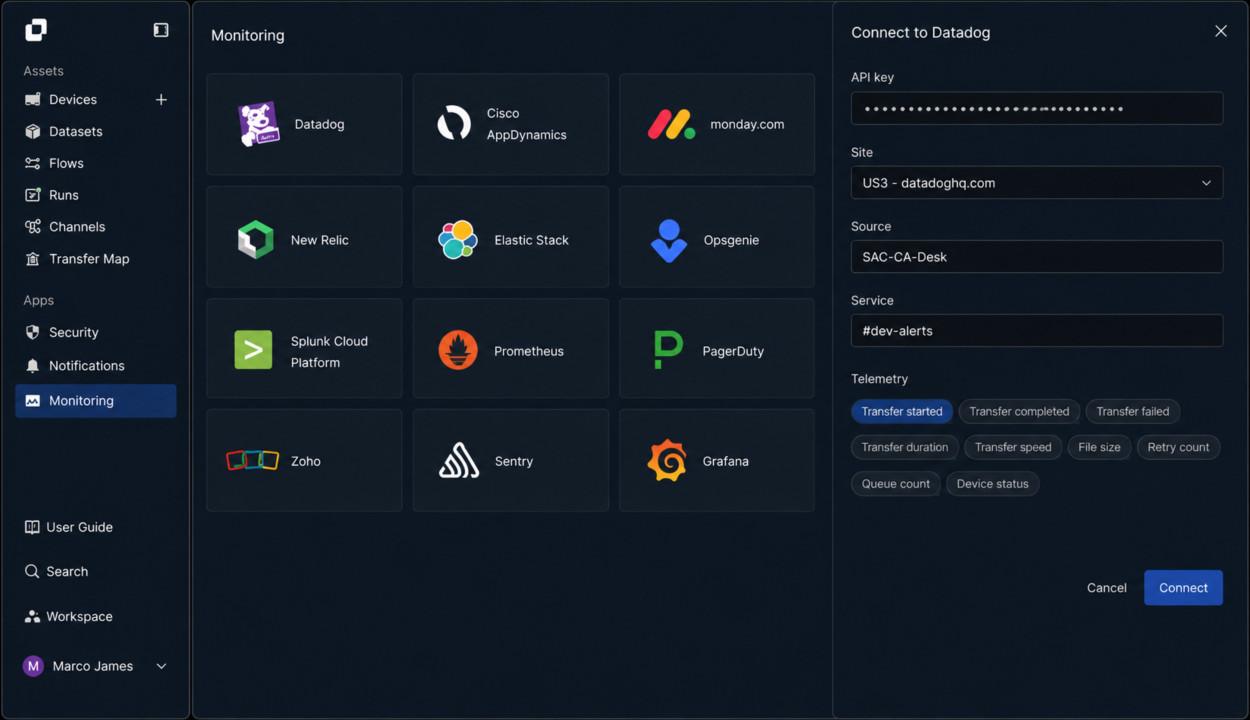
Manage Connected Services
You can view and manage connected Security, Notification, and Monitoring services in one place.
You can check connection status and service information, change settings as needed, or disconnect a service.
Troubleshooting
Even when a file transfer does not proceed as expected, you can investigate the cause of the problem in INNORIX.
You can review the information you need, from the devices used for transfers to files and folders, transfer tasks, and actual execution results, making it easy to identify where the problem occurred.
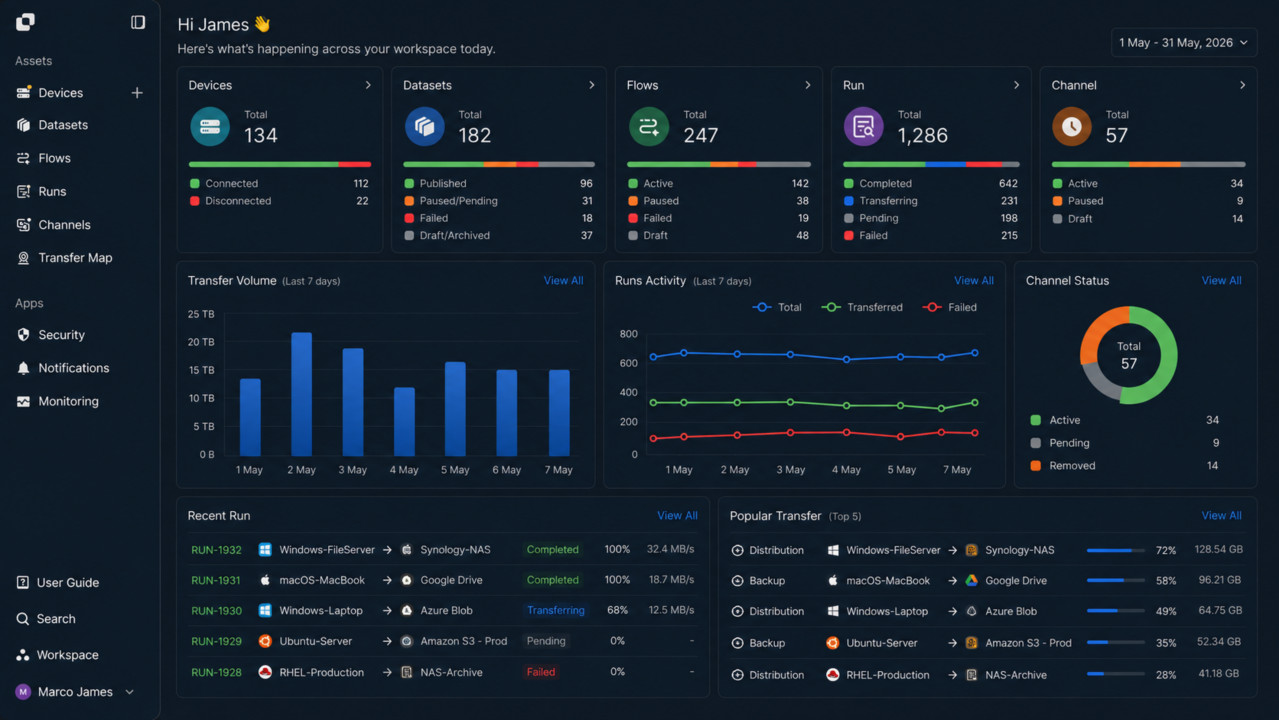
Based on the information checked at each stage, you can review connection status, access permissions, file and folder configuration, transfer settings, and the errors and processing results from actual transfers.
Check Devices Used for Transfers
If a transfer does not start or a problem occurs while reading or saving files, first check the status of the relevant device in Devices.
On an individual Device's details screen, you can review the Agent or Storage connection information and system information in detail.
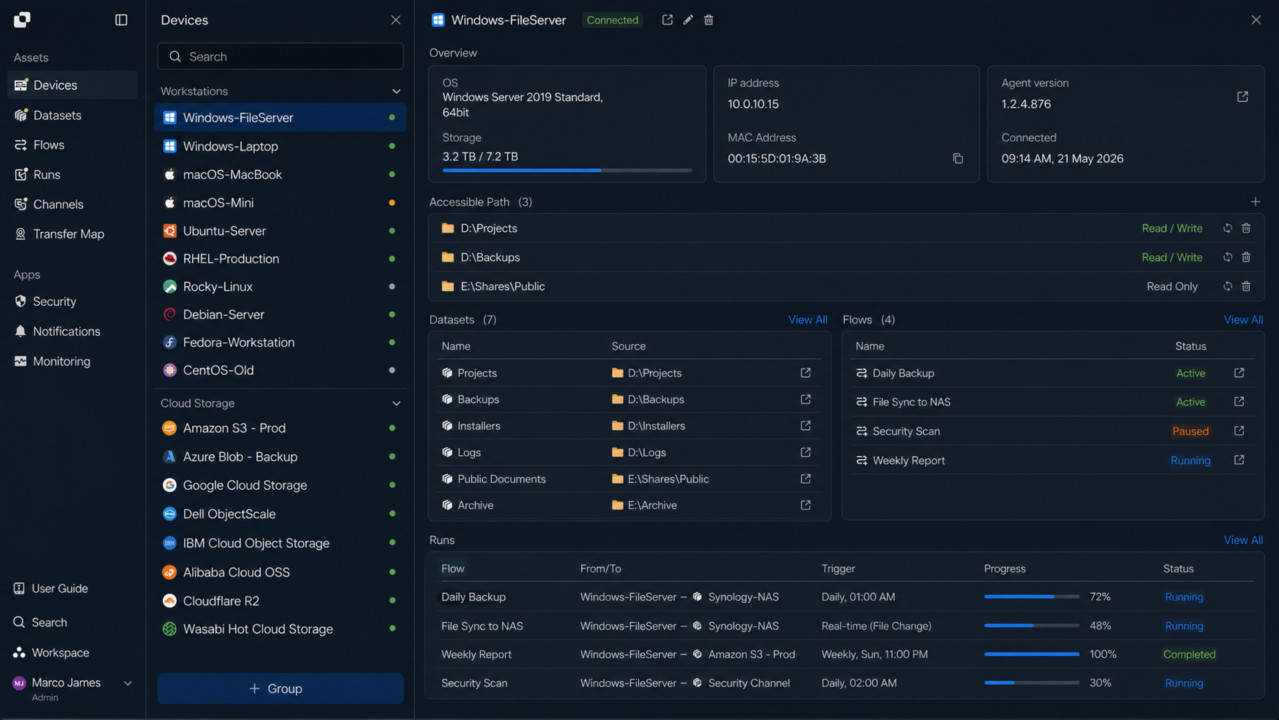
When using a PC or server, check that the Agent installed on the device is running correctly and can access the file paths used for the transfer. Also verify read permission when files must be read and write permission when files must be saved.
When using Object Storage, check the Storage connection information and authentication status, and verify that the configured account can access the required paths.
Check Files and Folders to Transfer
If there is no problem with the device but the files or folders to transfer are different from what you expect, check the status of Datasets.
On an individual Dataset's details screen, you can check the connected Device and path, included files and folders, and current Reversion.
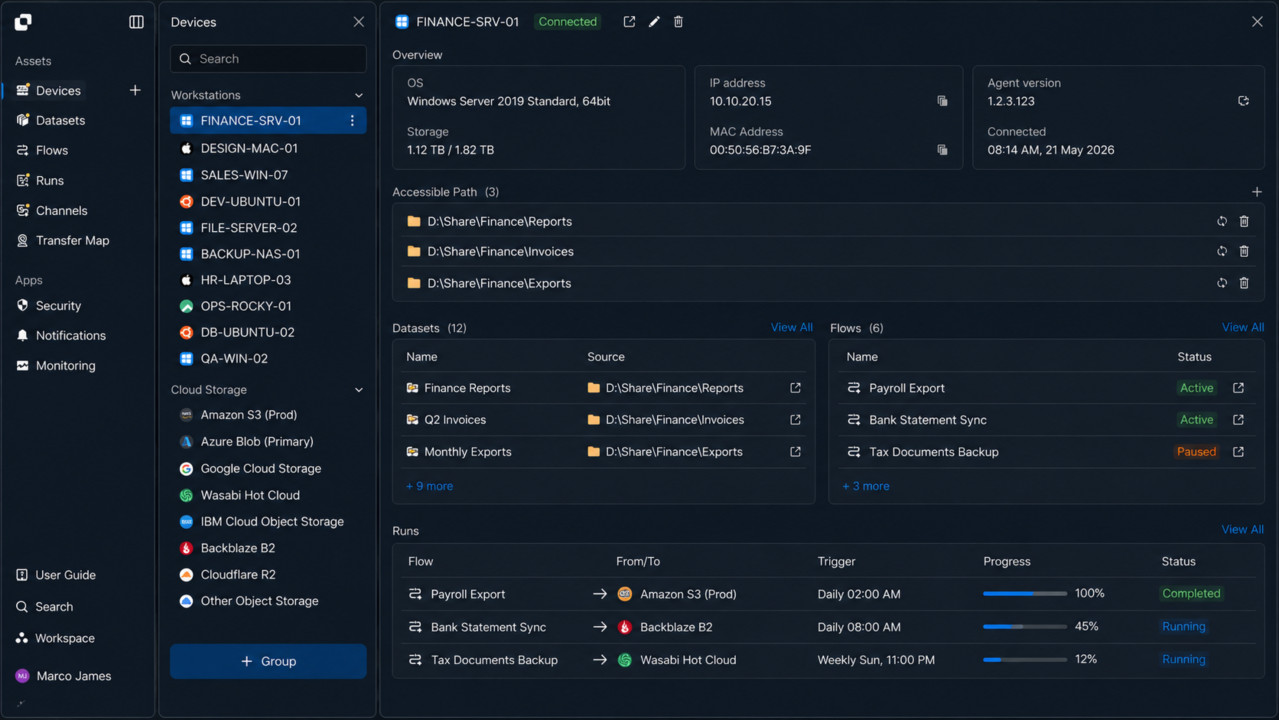
Check that the files and folders you intend to transfer are correctly included in the Dataset and that the required changes are reflected in the current Reversion. If files or folders are not visible, also check the path configured for the Dataset, permission to access that path, and permission to read the files.
Check Transfer Structure and Execution Settings
If the Device and Dataset are working normally, check the transfer task configuration in Flows.
The Flows dashboard lets you check a Flow's current status, while an individual Flow's details screen lets you check the connection structure of Sites and Steps, Source and Target, files and folders to transfer, execution conditions, storage methods, and more.
If a transfer does not start, first check the Step's execution conditions. For a scheduled transfer, check the schedule and repeat settings. When the previous Step finishing is used as the condition, check the status of the preceding Step. When using file change detection or a URL call, also check that the relevant condition occurred correctly.
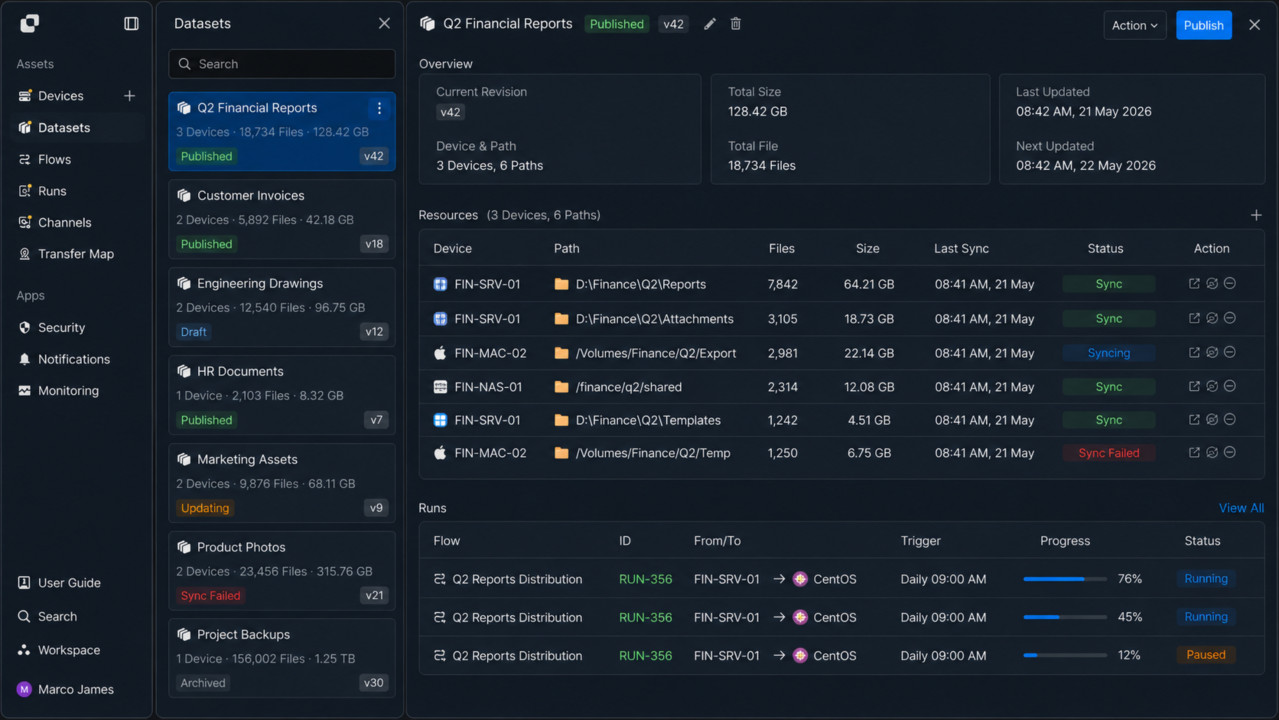
If a transfer starts but cannot send or receive files, also check the communication status and access permissions of the Source and Target. Check whether the Source can read files and folders and whether the Target can save files and folders to the specified path.
If the files to transfer or their saved location differ from what you expect, also check file filters, the Target path, storage methods, and settings for handling files with the same name.
Check the Actual Transfer Process and Results
After checking the Flow configuration, check how the actual transfer ran in Runs.
The Runs dashboard lets you check the status and progress of running or completed transfers. On an individual Run's details screen, you can check the execution process of the entire Flow, the status of each Step, and the progress and results of individual transfers.
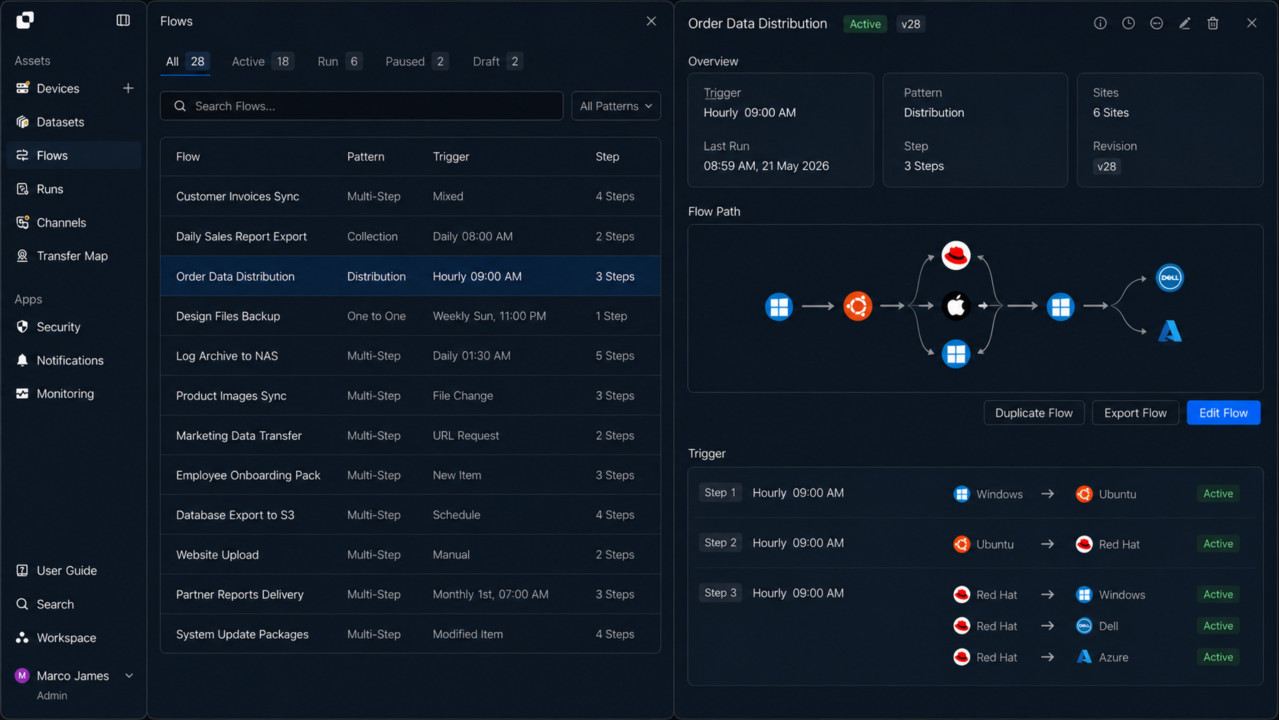
When distributing files to multiple locations or collecting files from multiple locations, you can also check the results for each transfer destination.
This lets you identify the Step where a problem occurred in the overall Flow and narrow the scope down to individual transfers in that Step to review failed files and folders, error details, and processing status.
If a transfer did not run, check whether a Run was created and its execution status. If it ran but did not progress, check the status of the relevant Step and individual transfer. If only some files or folders failed, you can distinguish successfully processed items from failed items.
Resolve Problems and Run Transfers Again
After identifying the cause of a problem and completing the required action, you can control the transfer according to the Run's status.
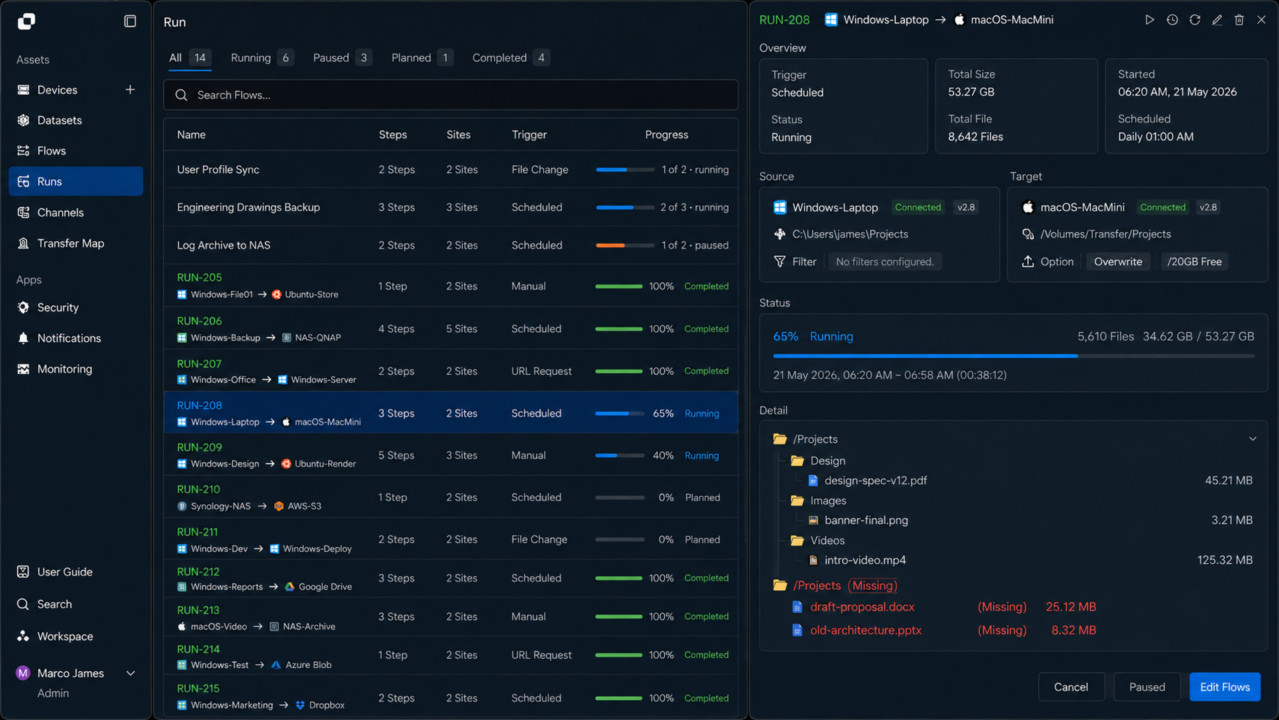
You can pause or restart a running transfer as needed, and cancel a transfer that should no longer continue. After resolving the cause of an error, you can run the failed transfer again if retrying is available.
If only some files or folders fail, you can distinguish the overall transfer result from individual transfer results and perform the required follow-up tasks based on successfully processed and failed files.