Getting Started
Core Concepts
View files from multiple systems in one place
Unified file exploration connects multiple systems so their files and folders can be viewed from a single exploration screen.
Users can select a connected system and browse its folders to find the files they need, then continue using files from multiple systems within a single work environment.
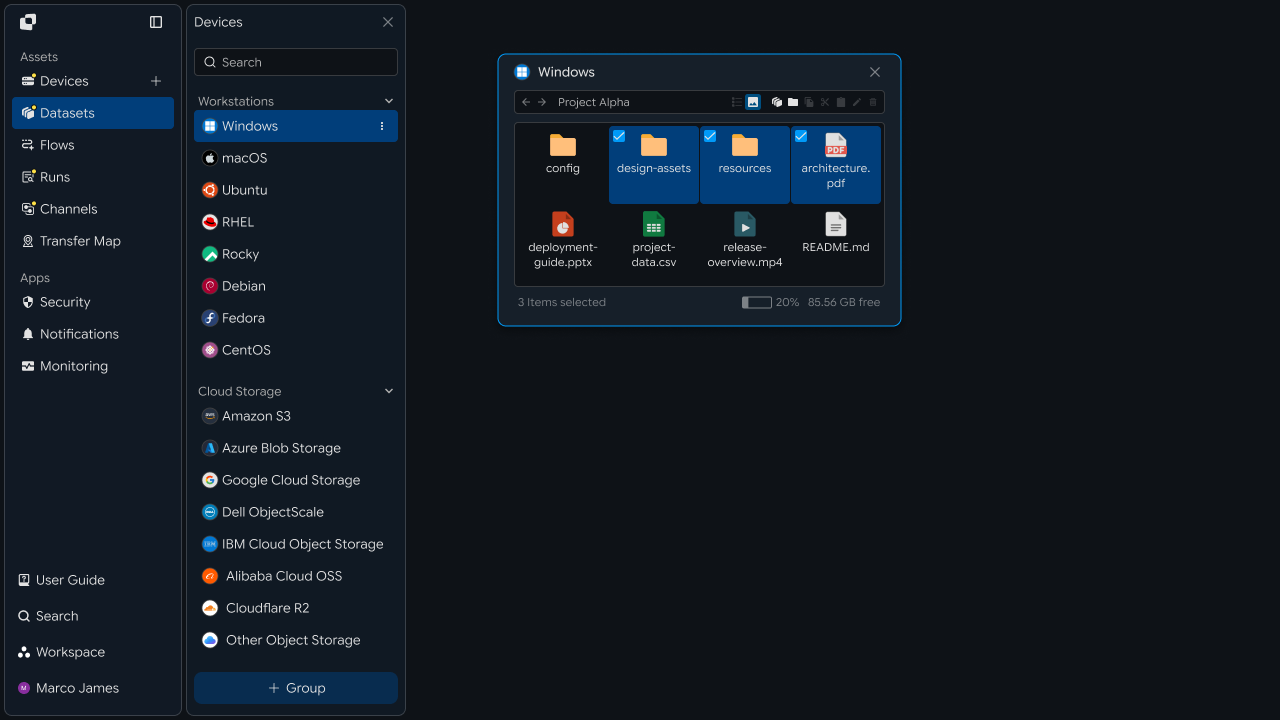
For example, you can view documents on a work PC, data on a server, and result files on storage from one exploration environment and select the files you need.
Exploration Flow
Continue from system selection through file discovery and transfer
Unified file exploration lets users find required files on connected systems and transfer selected files to the next work environment.
① Select System
↓
② Browse Folders
↓
③ Review Files
↓
④ Select Required Files
↓
⑤ Select Destination
↓
⑥ Transfer Files
↓
⑦ Check Results
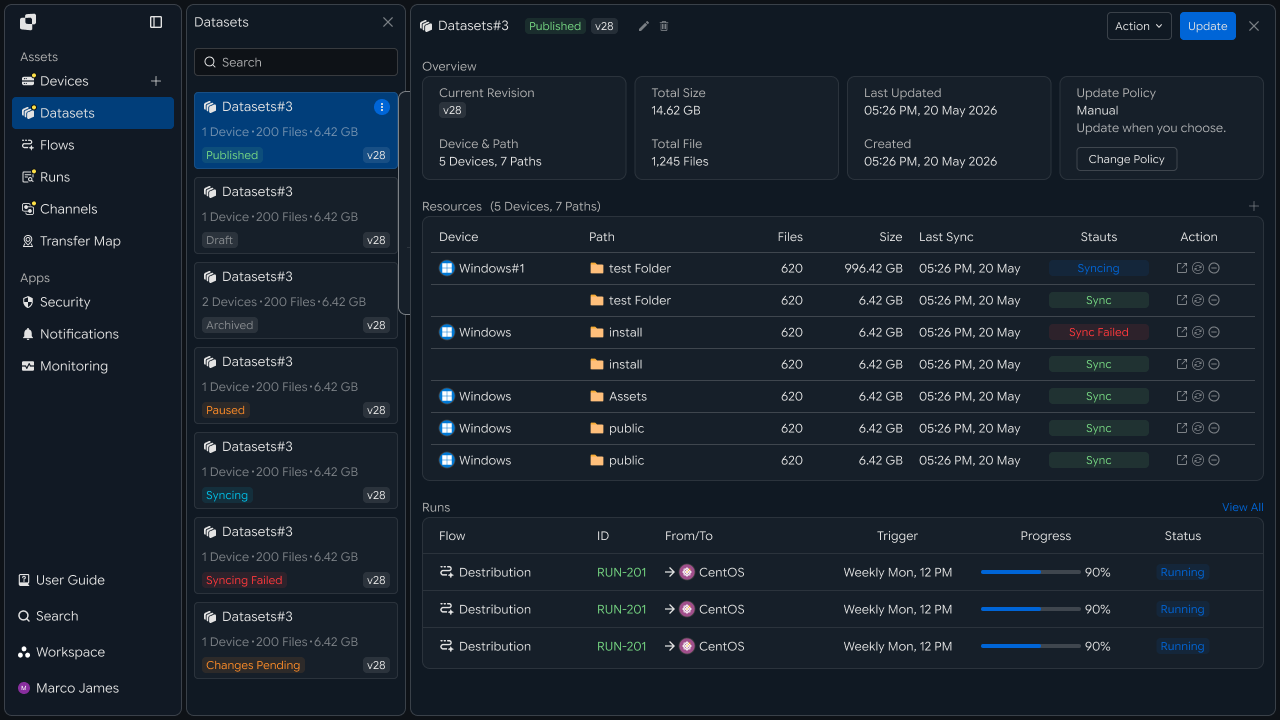
This flow connects everything from finding files to transferring them to the required work location and confirming the result.
Business Impact
Connect file exploration and transfer into a single workflow
When work requires files across multiple systems, users first identify where the required files are, find them on that system, and prepare them for the next work environment.
With unified file exploration, users can find required files on connected systems and transfer selected files directly to a designated system or workspace.
| Category | System-by-System File Management | Unified File Explorer |
|---|---|---|
| Work Start | Identify the system containing the required files | Select directly from the connected system list |
| File Exploration | Review files and folders in each system's environment | Explore systems and files from a single view |
| File Preparation | Prepare files for the next work location after reviewing them | Transfer selected files directly to the destination system |
| Workflow Connection | Continue to the next task after preparing files | Use files immediately for the next task after transfer |
By configuring file exploration and transfer as a single flow, files across multiple work environments can be used immediately where they are needed.
IT Engineers
Build and manage a file exploration environment across multiple systems
System Connection
Connect the systems to explore and extend the environment as needed
To configure unified file exploration, first connect the systems used in the work environment, such as PCs, servers, and storage systems, whose files need to be reviewed.
By configuring connection information for each system, its files and folders can be viewed from the unified exploration screen.
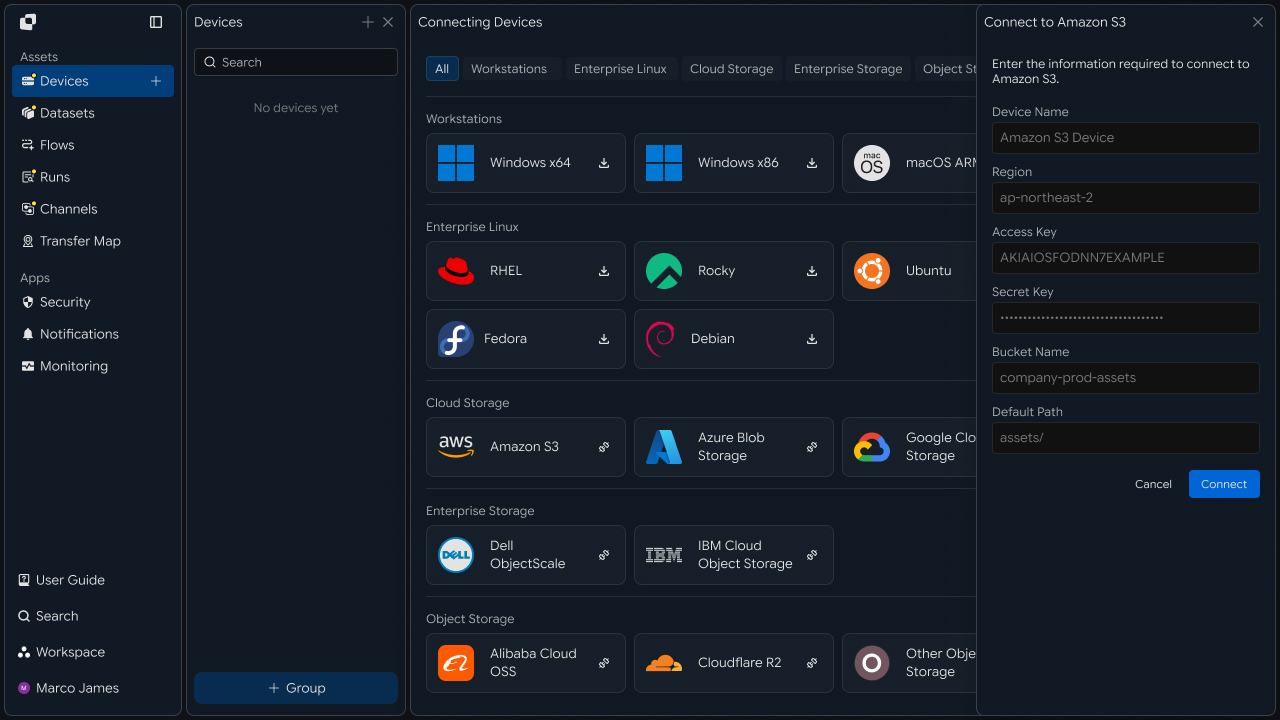
As the work environment expands, new servers or storage systems can be added in the same way. After configuring their connection information, include them in the existing exploration environment.
| System Type | Files Used |
|---|---|
| Work PC | Personal and team work files |
| Windows Server | Business documents and operational files |
| Linux Server | Data and processing files |
| Storage | Shared files and result files |
Adding systems extends the exploration scope to the systems required for work while preserving the existing file exploration environment.
Access Scope
Set the file and folder scope each user and system can access
After connecting the systems, configure the systems and file paths each user can view according to their role and responsibilities.
Specify the systems each user or user group can explore and configure the folder scope available on each system.
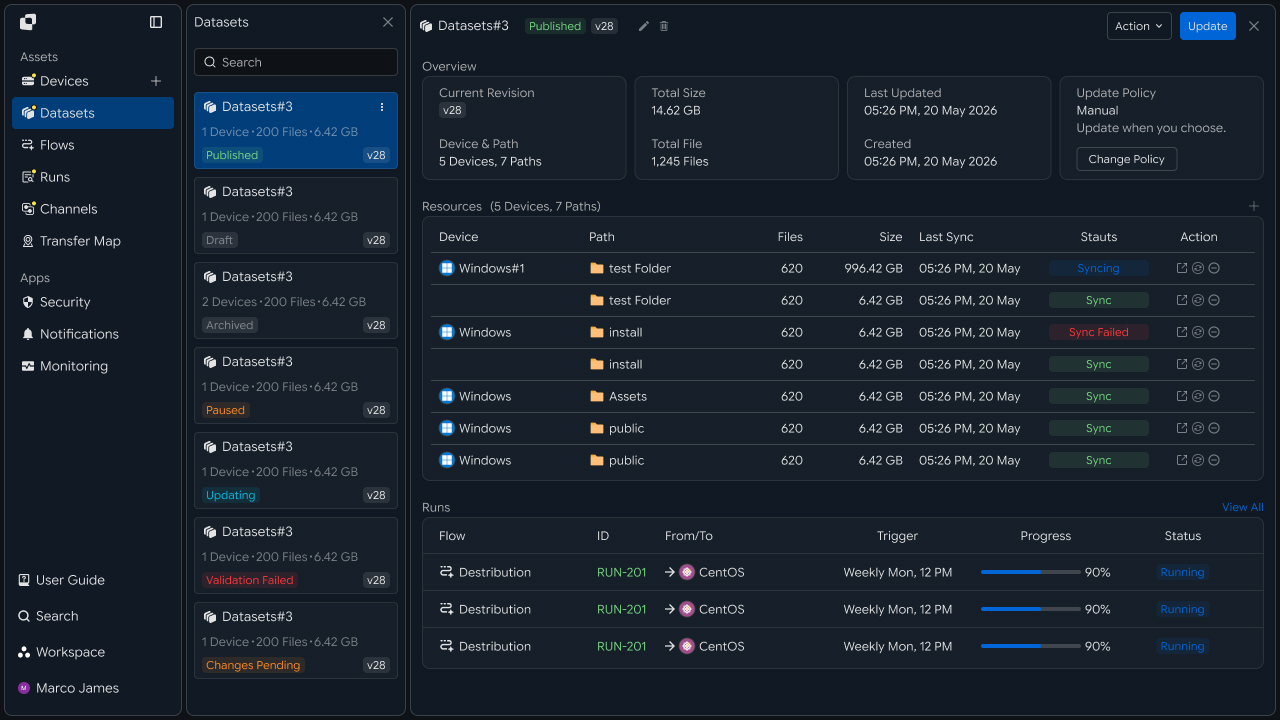
For example, configure the operations team to view designated folders on operational servers, while the data team can view work paths on analysis servers and data storage.
| User Group | Systems to Explore | File Scope |
|---|---|---|
| Operations Team | Operations Server | Operational file paths |
| Data Team | Analysis Server | Data folders |
| Business Team | Shared Storage | Business document folders |
Configuring exploration scope by user lets you operate the unified file exploration environment around the systems and files each role requires.
File Exploration
Find required files across connected systems
Once systems and access scopes are configured, users can select a system in the unified exploration screen and browse its folders and files.
Selecting a system from the system list displays its folder structure and file list, allowing users to find required files by name and path.
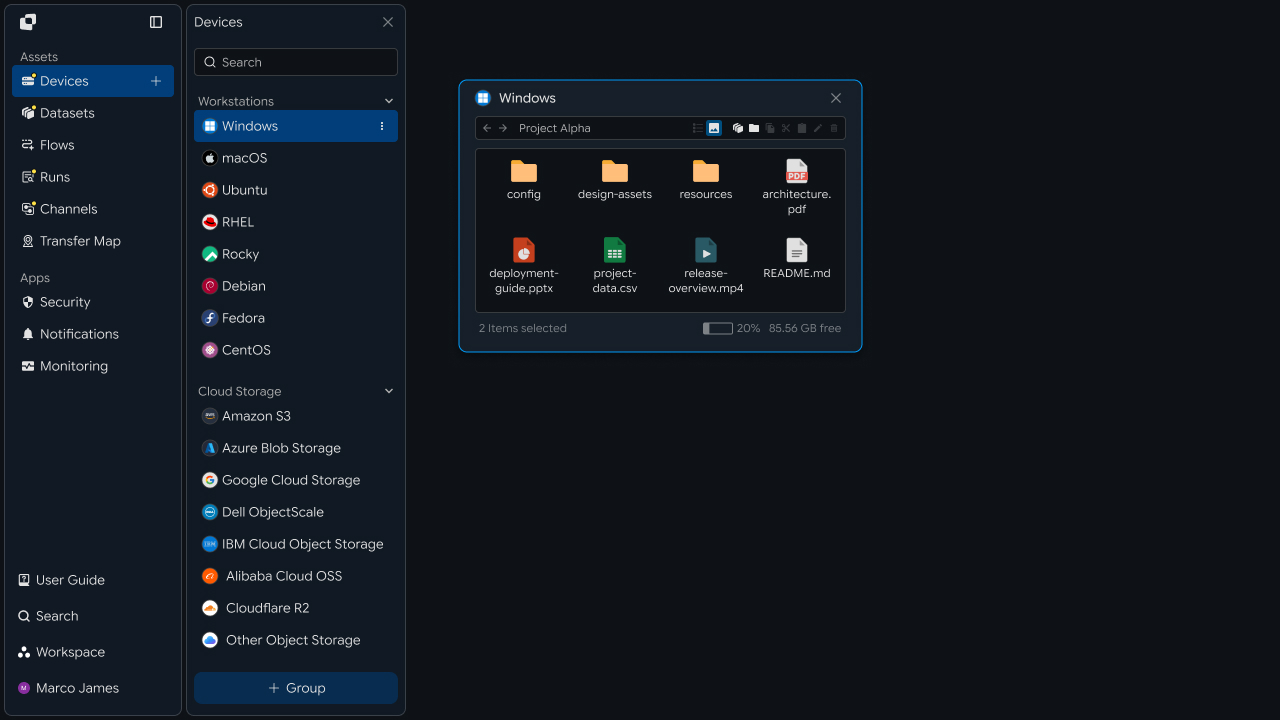
The file exploration screen provides the following information.
| Review Item | Details |
|---|---|
| Device | System containing the file |
| Path | Current file path |
| File Name | File name |
| Size | File size |
| Modified | Last modified time |
When the required file is found, select it to continue directly to the next transfer task.
File Transfer
Transfer selected files to the required systems and workspaces
After selecting the required files in the exploration screen, specify the destination system and path.
Selected files are transferred from their current location to the designated destination system or workspace, where they can be reviewed and used for the next task.
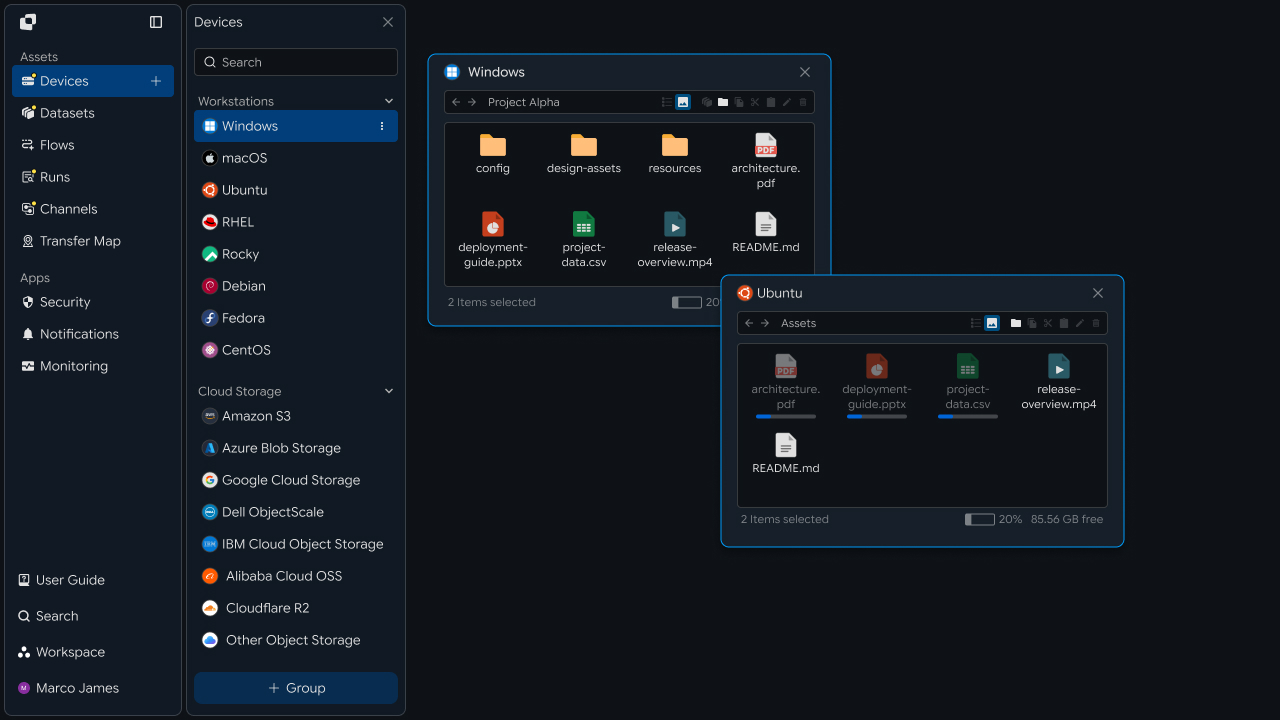
The transfer flow is configured as follows.
Device A
   │
   │ File Exploration
   ▼
Select Files
   │
   │ Select Destination
   ▼
Device B
   │
   ▼
Workspace
Finding files and specifying the destination in a single exploration screen connects file exploration and transfer into one workflow.
Verify Results
Check transfer status and file processing results
When a file transfer runs, review task progress and processing results in Runs.
Each task shows the Source and Target of the transferred files, file count and transfer volume, progress, execution time, and current status.
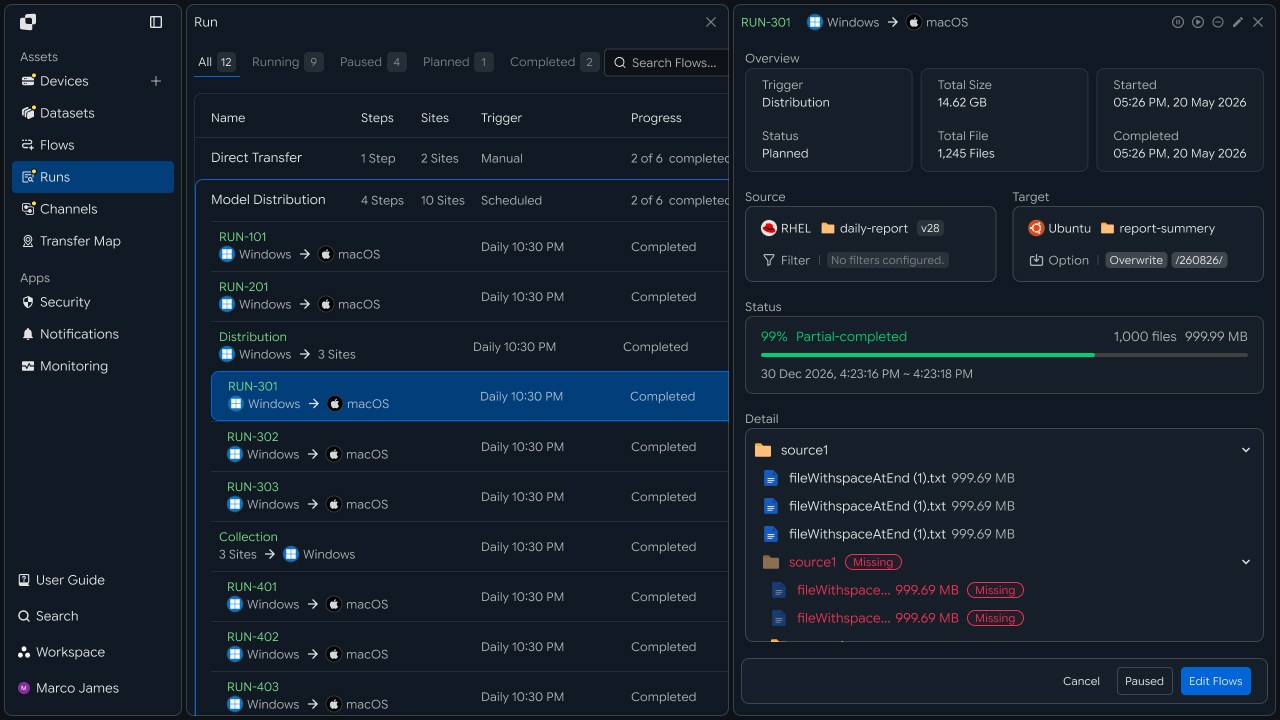
| Review Item | Details |
|---|---|
| Source | System and path from which the files were selected |
| Target | System or workspace receiving the files |
| Files | Number of files processed |
| Size | Total transfer volume |
| Progress | Transfer progress |
| Status | Current task status |
| Time | Execution and completion time |
Operators can use execution results to review file transfer flows between systems and manage how files were applied to each work environment.
Developers
Execute transfers between systems by retrieving remote file lists and search results through APIs
Integration Preparation
Prepare shared request code and status values
import os
import requests

BASE_URL = os.getenv("INNORIX_BASE_URL", "https://app.innorix.com").rstrip("/")
TOKEN = os.environ["INNORIX_ACCESS_TOKEN"]
WORKSPACE_ID = os.getenv("INNORIX_WORKSPACE_ID")   # optional; falls back to the current workspace

STATUS_COMPLETE = 2
TERMINAL = {2, 4, 5, 9, 99}          # complete / error / cancelled / partial / failed
NOT_SUCCEEDED = {4, 5, 9, 99}


def api(method, path, body=None, params=None):
    headers = {
        "Content-Type": "application/json",
        "Authorization": f"Bearer {TOKEN}",
    }

    if WORKSPACE_ID:
        headers["x-workspace-id"] = WORKSPACE_ID

    response = requests.request(
        method, BASE_URL + path,
        headers=headers, json=body, params=params, timeout=30,
    )

    payload = response.json() if response.content else {}

    if not response.ok:
        raise RuntimeError(payload.get("message") or f"HTTP {response.status_code}")

    return payload.get("data")


def is_terminal(detail):
    return detail.get("isTerminal", detail.get("status") in TERMINAL)
Determine the transfer status using the values below. There are five terminal states, and the successful state is Complete (2).
| Status Value | Meaning | Terminal |
|---|---|---|
| 2 | Complete | Yes |
| 4 | Error | Yes |
| 5 | Cancelled | Yes |
| 9 | Partially Complete | Yes |
| 99 | Failed | Yes |
| 1 · 6 · 12 · 13 | Started · Transferring · Synchronizing · Receiving | No |
List Folders
Retrieve the file list for each system and display it on screen
Specify the system identifier and path to retrieve files and subfolders. The value passed to --device becomes a path parameter, so it must be the device ID.
result = api("GET", f"/api/devices/{device_id}/files", params={
    "path": "/data/reports",
    "page": 1,
    "size": 50,
    "sort": "name:asc",
    "type": "all",
})

for item in result["items"]:
    kind = "DIR " if item["isDir"] else "FILE"
print(kind, item["name"], item["size"], item.get("modifiedAt"))| Response Item | Details |
|---|---|
items | List of files and folders |
total · lastPage | Total count and last page |
truncated | Whether some items were omitted because the item count exceeded the limit |
isDir | Whether the item is a folder |
Retrieve the device ID through the device list endpoint.
result = api("GET", "/api/devices", params={"page": 1, "size": 200})

for device in result["devices"]:
    print(device["deviceId"], device["name"], device.get("os"),
          device.get("ipAddress"))
The device list is returned in the data.devices array.
File Search
Recursively search subfolders to find files
Folder listing shows only the specified folder. To search through subfolders, start a search and continue retrieving results with the cursor.
RESTART_CODES = {"INVALID_CURSOR", "CURSOR_OUT_OF_SEQUENCE", "SEARCH_EXPIRED"}


def start_search(device_id, path, page_size=500):
    return api("POST", f"/api/devices/{device_id}/files/search",
               {"path": path, "pageSize": page_size})


def iter_search(device_id, path, max_pages=200):
    page = start_search(device_id, path)
    search_id = page.get("searchId")

    for _ in range(max_pages):
        for item in page.get("items") or []:
            yield search_id, item

        if not page.get("hasMore"):
            return

        try:
            page = api("GET", f"/api/devices/{device_id}/files/search",
                       params={"cursor": page["nextCursor"]})
        except RuntimeError:
            # restart the scan when the cursor expires or falls out of sequence
            page = start_search(device_id, path)
            search_id = page.get("searchId")
The search request accepts only the base path and page size. Name and extension conditions are evaluated against the returned results, so narrowing the base path reduces the search scope.
| Response Item | Details |
|---|---|
searchId | Search identifier passed to a stop request |
items[].type | file or directory |
hasMore · nextCursor | Whether another page exists and the cursor to use for the next request |
Stop Search
Stop an in-progress search
Search requires the system to actually scan its disk. Stop the search when the user leaves the screen so system load does not continue to accumulate.
def cancel_search(device_id, search_id):
    api("POST", f"/api/devices/{device_id}/files/search/cancel",
        {"uuid": search_id})       # pass the searchId returned when the search started


search_id = None

try:
    for search_id, item in iter_search(device_id, "/data"):
        if item["type"] == "file" and item["name"].endswith(".csv"):
            print(item["path"], item["size"])
finally:
    if search_id:
        cancel_search(device_id, search_id)
Use the same cleanup code both when starting a new search and when closing the screen.
File Transfer
Transfer selected files to another system
Immediate transfers can identify the system by name, IP address, or identifier, and the path is passed as a plain-text string. This differs from the exploration API, which accepts only a device ID.
When sending a file list, explicitly set isDir: false in sourceItem rather than using sourcePaths. sourcePaths treats every path as a folder, so supplying files can cause the server to scan each file as a folder, resulting in slowdowns or timeouts.
def send_files(source, target, target_path, paths, action="numbering"):
    transfer = api("POST", "/api/transfers/manual", {
        "sourceDevice": source,
        "targetDevice": target,
        "targetPath": target_path,
        "sourceItem": [{"path": p, "isDir": False} for p in paths],
        "sendAllFolder": False,
        "transferOptions": {"target-action": action},
    })

    return transfer["monitorId"]


monitor_id = send_files("device-a", "device-b", "/data/collected",
                        ["/data/reports/2026-08.csv"])
When sending folders, use sourcePaths with sendAllFolder: True.
api("POST", "/api/transfers/manual", {
    "sourceDevice": "device-a",
    "targetDevice": "device-b",
    "targetPath": "/data/collected",
    "sourcePaths": ["/data/reports"],
    "sendAllFolder": True,
    "transferOptions": {"target-action": "numbering"},
})
If the file size is already known, provide fileSize as well so the server can skip retrieving each item's size.
"sourceItem": [
  { "path": "/data/a.csv", "isDir": false, "fileSize": 1200 }
]
Verify Results
Check transfer status and file-level processing results
import time


def wait(monitor_id, timeout=1800, interval=3):
    deadline = time.time() + timeout

    while time.time() < deadline:
        detail = api("GET", f"/api/transfers/{monitor_id}")

        if is_terminal(detail):
            return detail

        time.sleep(interval)

    raise TimeoutError(monitor_id)


detail = wait(monitor_id)
succeeded = detail["status"] == STATUS_COMPLETE
Total failure and partial failure should be displayed differently on the screen. Retrieve file-level status and retransmit only the failed files.
def failed_files(monitor_id):
    result = api("GET", f"/api/transfers/{monitor_id}/files", params={
        "state": "any", "size": 500,
    }) or {}

    return [r for r in (result.get("children") or [])
            if r.get("status") in NOT_SUCCEEDED]


def retry_failed(monitor_id):
    rows = failed_files(monitor_id)

    if not rows:
        return 0

    api("POST", f"/api/transfers/{monitor_id}/retry", {
        "filesRetry": [
            {"filePath": r["sourceFilePath"], "isDir": bool(r.get("isFolder"))}
            for r in rows
        ]
    })

    return len(rows)
Retransmission can be called only after the transfer has ended. It is rejected while the transfer is in progress, so check the status first.
| Review Item | Details |
|---|---|
status | Transfer status value |
statusLabel | Status text displayed on screen |
percent | Progress |
fileCount · totalSize | Processed file count and total size |
children[].errorCode | Failure reason for each file |