Getting Started
Core Concepts
Integrate into a centrally managed environment while keeping existing transfer methods
File transfer environments can be distributed across multiple devices and servers depending on the business and system.
Each environment already has file transfer paths, execution methods, automation conditions, and file processing rules configured. When moving to a new management environment, you can define the migration scope based on these existing workflows.
Transfer environment migration is the process of reviewing the devices and transfer tasks currently in use, connecting them to the central management environment, and configuring existing file flows to be managed in the new operating environment.
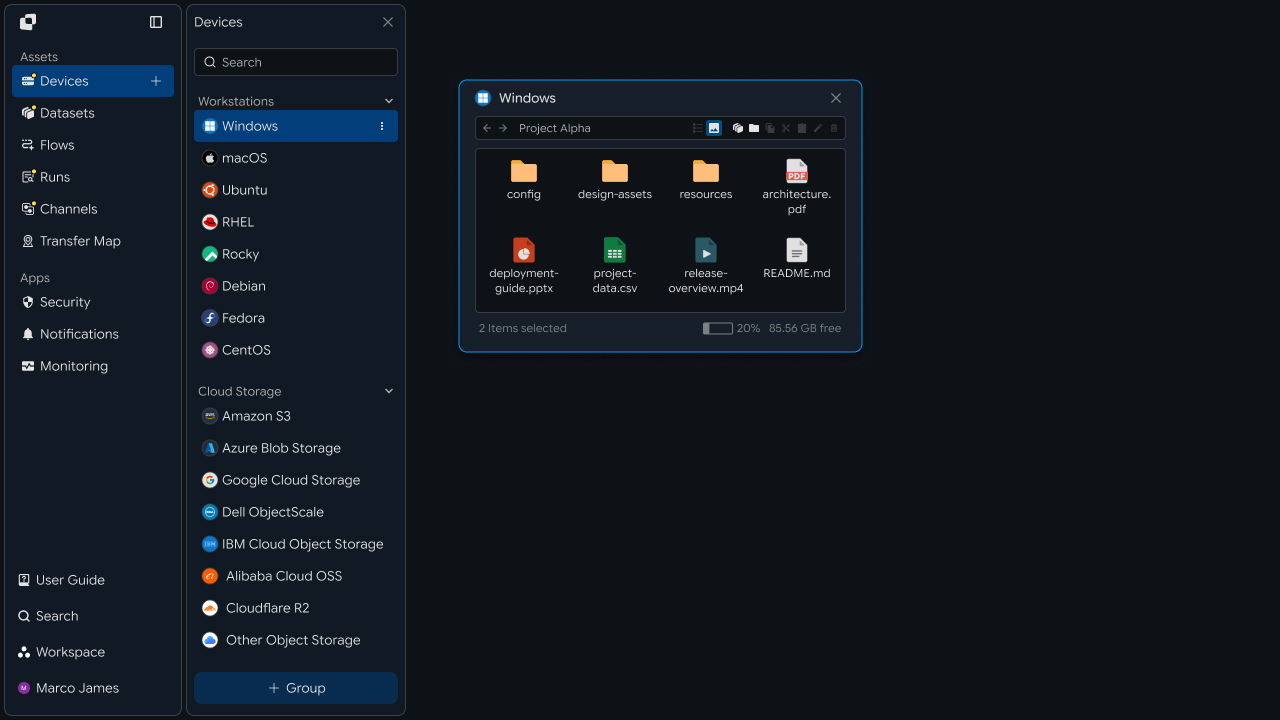
By building the connection structure from the devices and file paths used in the existing transfer environment, file tasks that previously ran in separate environments can be integrated into a centrally managed workflow.
Cutover Flow
Proceed step by step from connecting existing devices to central management
Transfer environment migration starts by reviewing the devices and tasks currently in operation. Next, connect the existing devices to the central management environment and build the new management flow based on the transfer tasks currently in use.
① Review Existing Environment
↓
② Select Migration Targets
↓
③ Connect Devices
↓
④ Apply Existing Tasks
↓
⑤ Validate Execution Results
↓
⑥ Start Central Management
Existing Devices
      ↓

Environment Review
      ↓

Central Connection
      ↓

Transfer Flow
      ↓

Validation
      ↓

Central Management
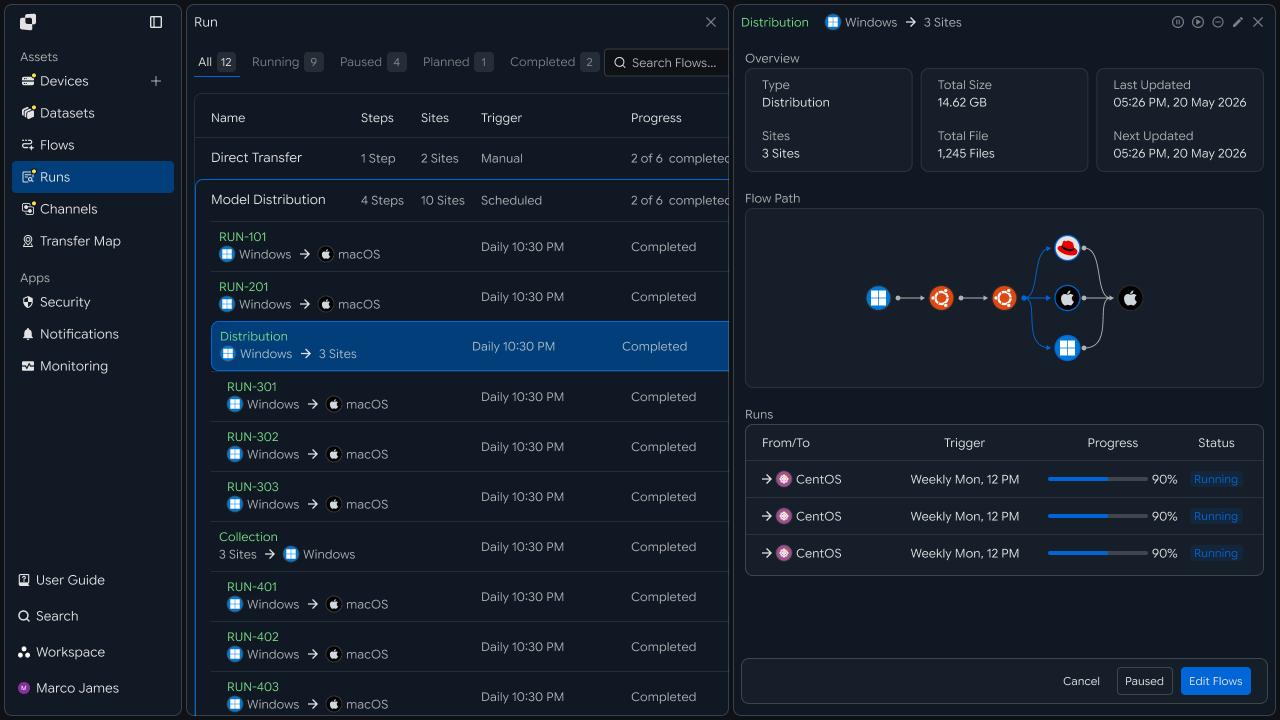
This process lets you build the operating structure of the central management environment based on existing devices and file transfer tasks.
Migration Benefits
Manage distributed transfer tasks in a single operating environment
When file transfer tasks run independently across multiple devices, work for checking execution status and processing results is distributed by device.
After moving to a central management environment, connected devices, file flows, and execution results can be reviewed in a single management environment.
| Category | Individual Environment | Central Management Environment |
|---|---|---|
| Device Management | Manage separately in each device environment | Manage connected devices centrally |
| Task Review | Check task status by device | Review the overall task status in one place |
| Execution History | Review results by environment | Manage execution history in one place |
| Transfer Flow | Manage file paths by device | Connect and manage flows across multiple devices |
| Operational Expansion | Add configurations by environment | Add devices and tasks to the central environment |
By connecting the existing transfer environment to a central management structure, you can expand the management scope based on current operations and review transfer status across multiple devices in one place.
IT Engineers
Move to a central management environment while keeping existing transfer tasks
Environment Assessment
Review the file transfer devices and task structure currently in use
Before starting the migration, review the file transfer environment currently in operation.
List the servers, PCs, storage systems, and other devices used for file transfers, and review the file paths, transfer targets, execution methods, and automation tasks used by each device.
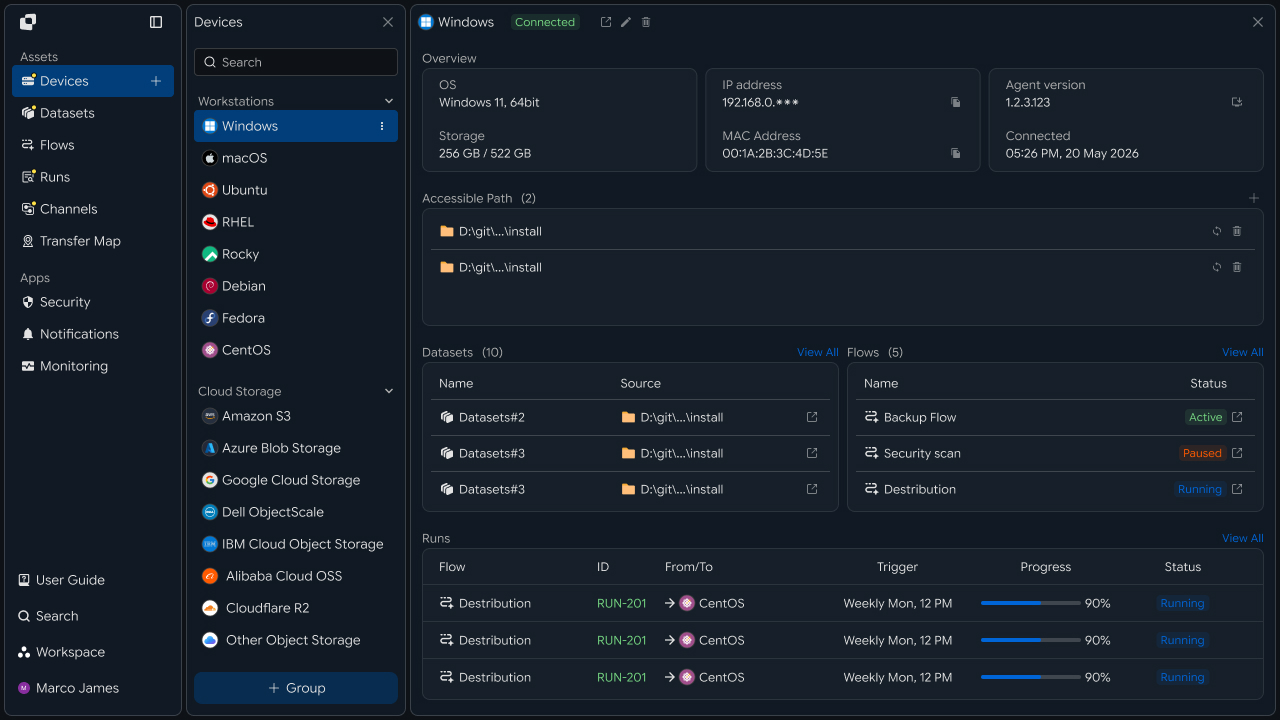
Organize the migration targets based on the following items.
| Review Item | Details |
|---|---|
| Device | Servers and PCs currently used for file tasks |
| File Path | Locations where transfer files are prepared and target paths |
| Transfer Target | Systems that process or use the files |
| Execution Method | Manual execution, scheduled execution, event-based execution |
| Automation Tasks | Existing follow-up tasks and execution conditions |
By organizing the current operating structure first, you can define which devices and tasks should be connected to the central management environment.
Device Registration
Connect existing transfer devices to the central management environment
Once the migration targets are organized, register the devices already in use in the central management environment.
Configure the connection information and access scope for each device so that file paths and transfer tasks can be reviewed from the central management environment.
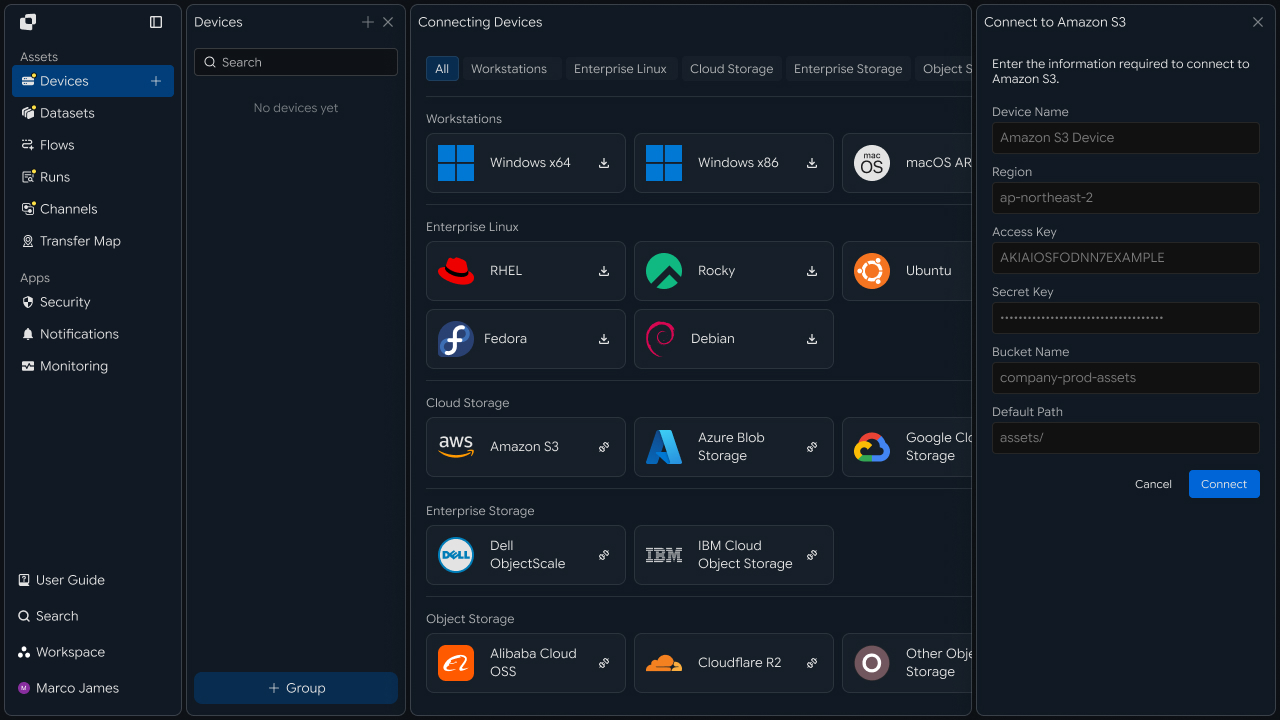
After connecting the devices, review the paths and access scope used for file tasks.
| Configuration Item | Setting |
|---|---|
| Device | Existing device to connect to central management |
| Connection | Device connection information |
| Path | Path to use for file tasks |
| Access | Access scope used to review and transfer files |
| Status | Current device connection status |
After registering the devices, you can review the existing file task environment in the central management structure and proceed with the next migration task.
Task Migration
Connect existing file flows to tasks in the central management environment
After connecting the devices, configure the file flows of existing transfer tasks in the central management environment.
Review the relationships between the existing Source and Target, then connect them to a Flow in the central management environment based on the file paths and transfer direction currently in use.
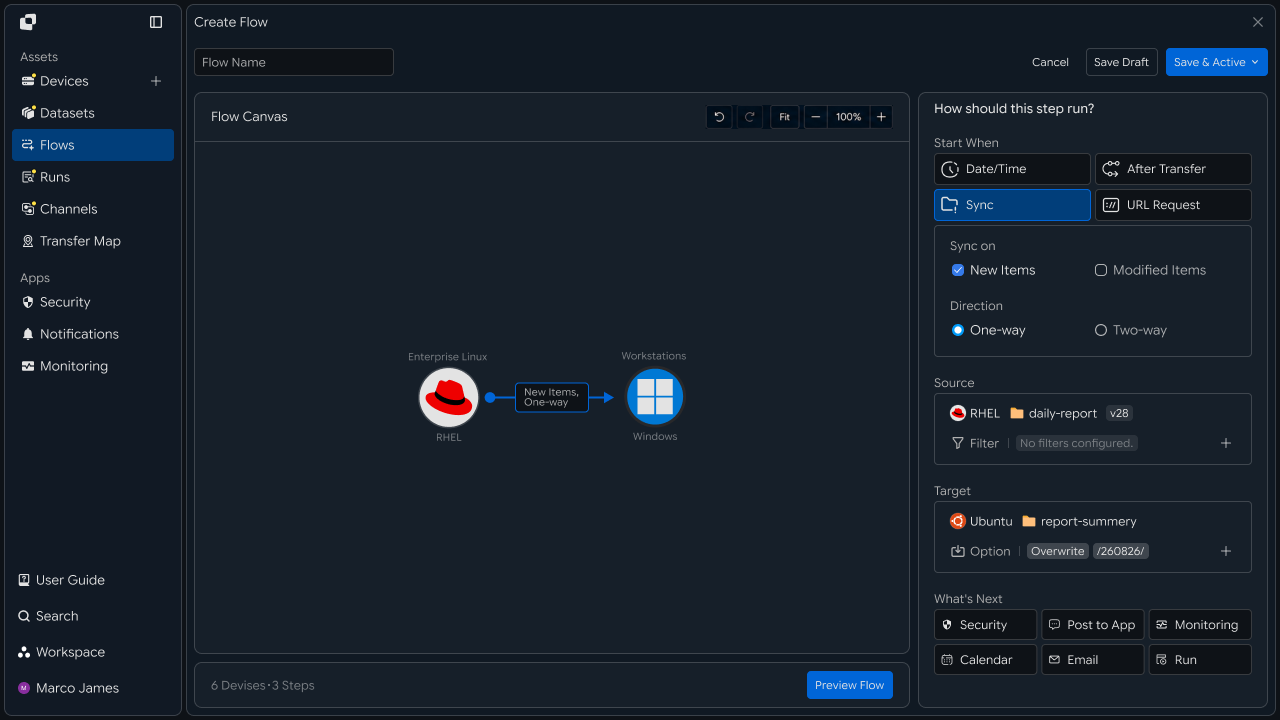
Existing Source
       ↓

Central Flow
       ↓

Existing Target
If existing tasks include automatic execution conditions or follow-up processing, you can connect those conditions and task order as well.
For example, connect a file transfer task that previously ran on a schedule on an existing device to the execution conditions in the central management environment, and configure the follow-up task that runs after transfer completion as part of a single Flow.
Migration Validation
Review execution results and file processing status of existing tasks
After task configuration is complete, run an actual file transfer to confirm that the workflow used in the existing environment is processed in the central management environment according to the configured criteria.
Using test files, review the Source and Target file paths, processing targets, execution time, and transfer results.
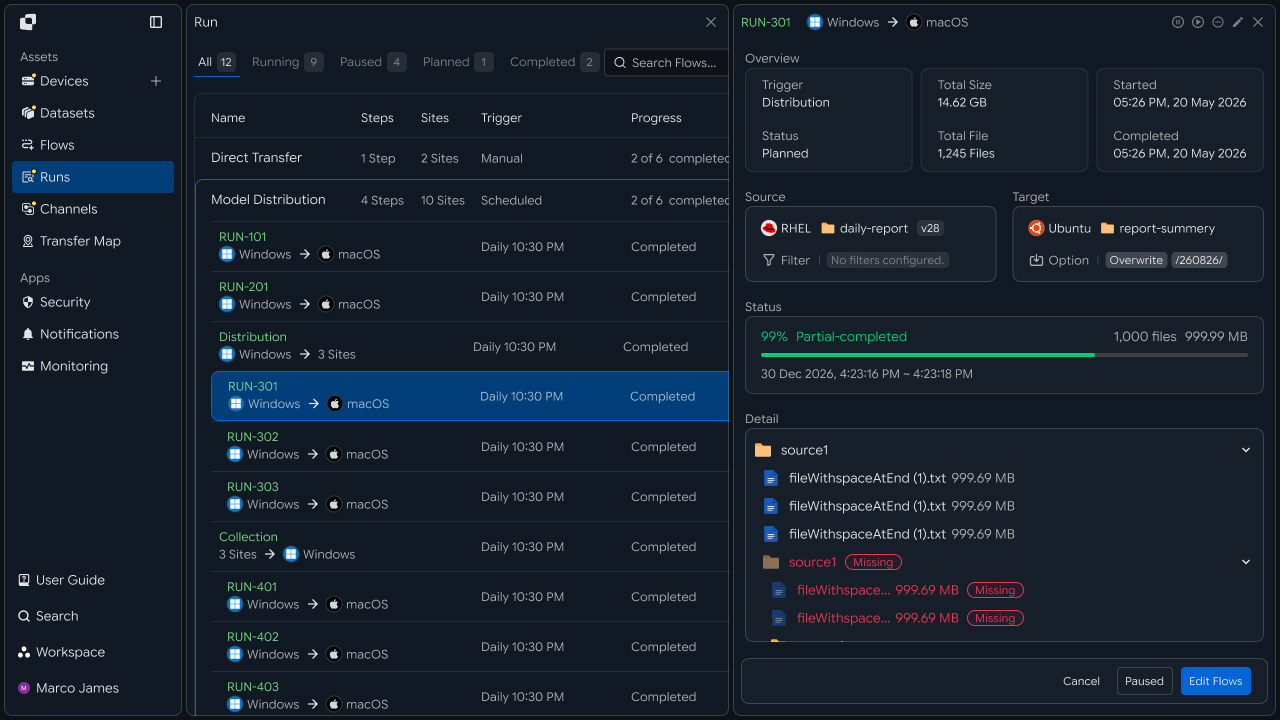
The main items to review are as follows.
| Review Item | Details |
|---|---|
| Source | Location where existing files are prepared |
| Target | Destination location where files are reflected |
| Files | Number of processed files |
| Size | Total transfer size |
| Time | Execution time |
| Status | Task processing result |
Migration validation lets you review file processing results from existing tasks alongside execution results from the central management environment and establish operating criteria.
Unified Operations
Manage transfer tasks and execution status for distributed devices centrally
Devices and tasks that have completed migration can be managed together from the central management screen.
Review connected Devices and configured Flows, and use Runs to centrally review execution history and current status for each task.
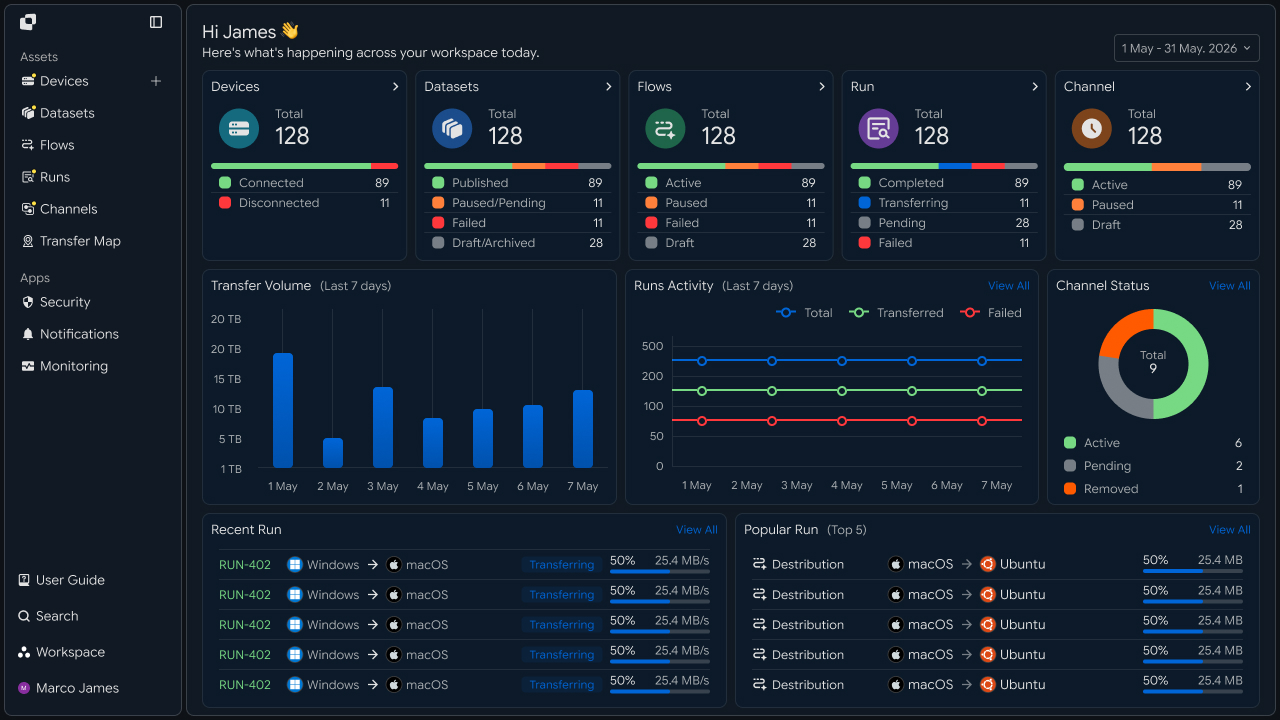
Operators can review the following information in a single management environment.
List and status of connected devices
File transfer tasks by device
Configured Flows and execution conditions
Tasks currently running
Recently completed task results
Activity Log by device and task
New devices or file tasks can also be connected to the same central management environment to expand the management scope.
Troubleshooting
Review and adjust connection and execution status during migration
When a task requires additional review during migration, check the device connection status, file paths, access scope, and transfer task settings in order.
Use Runs and Audit Log to identify which device and task stage require review based on the execution history.
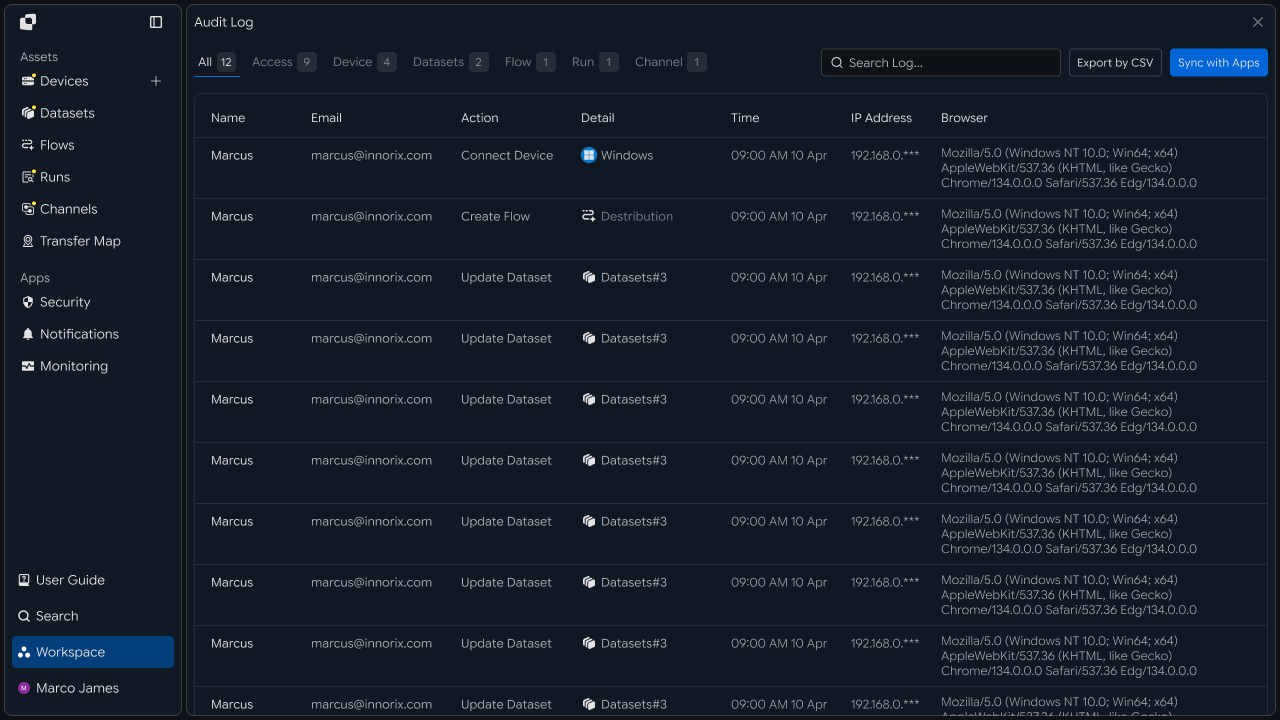
Review Run
   ↓

Check Device Connection Status
   ↓

Check File Path
   ↓

Check Access Scope
   ↓

Check Flow Settings
   ↓

Adjust Environment
   ↓

Rerun
   ↓

Review Result
| Check Item | Details |
|---|---|
| Device Connection | Existing device's connection status to the central environment |
| File Path | Source and Target paths |
| Access Scope | Permissions to review and transfer files |
| Task Settings | Transfer direction and execution conditions |
| Execution History | Run and Audit Log |
Through this process, you can review the status of migration target devices and tasks, adjust the required settings, and rerun them to operate file transfer tasks in the central management environment.
Developers
Replace existing transfer commands with INNORIX CLI
The examples in this document use a shell, not Python. The migration target is a command-line tool rather than an API.
Identify Migration Targets
Inventory the transfer commands currently running
First, make a list of what is currently running. This process often reveals a significant number of scripts that are no longer used.
# transfer jobs registered in cron
crontab -l | grep -E 'scp|rsync|sftp|ftp'

# transfer commands called inside scripts
grep -rnE '\b(scp|rsync|sftp|ftp|lftp)\b' /opt/scripts --include='*.sh'
| Script | Command | Source | Target | Schedule |
|---|---|---|---|---|
nightly-backup.sh | rsync -avz --delete | /data/db | backup01:/backup/db | Daily 02:00 |
send-report.sh | scp | /data/report.pdf | hq01:/incoming | Daily 08:00 |
This table becomes the checklist for later validation.
Login and Profiles
Replace keys and passwords with account login sessions
innorix login
When an account and password are entered interactively, the session is stored locally and reused by subsequent commands.
cron and CI cannot accept interactive input, so pass credentials through environment variables.
export INNORIX_EMAIL="ops@example.com"
export INNORIX_PASSWORD="..."

innorix login --non-interactive
Do not put passwords directly in scripts; inject them from a secret store. This follows the same principle as keeping existing SSH keys in files.
Separate environments into profiles when moving between multiple environments.
innorix profile add prod  --workspace <workspaceId>
innorix profile add stage --workspace <workspaceId>

innorix --profile prod cp /data/report.pdf name:hq01:/incoming/
After migration, server-specific private key files and deployment procedures, known_hosts management, and visiting each server to renew credentials when accounts expire are no longer needed.
Host Reference Migration
Replace host addresses with device identifier notation
innorix devices # list the registered devices
| Notation | Example | Use Case |
|---|---|---|
| Name | name:backup01 | Scripts intended for people to read |
| Device ID | id:dev-8a3f... | Environments where names may change |
| IP | ip:10.0.2.31 | When moving directly from existing scripts |
| MAC | mac:00:1A:... | Environments with dynamic IPs |
# before
scp /data/report.pdf ops@10.0.2.31:/incoming/

# after
innorix cp /data/report.pdf ip:10.0.2.31:/incoming/
The account portion (ops@) disappears. The login session determines who is sending, so do not include an account in the path. Because of this difference, blindly replacing existing commands with a regular expression can produce incorrect results.
Command Replacement
Replace existing commands with the corresponding CLI commands
| Existing | Migration |
|---|---|
scp SRC user@host:DST | innorix cp SRC name:host:DST |
scp -r DIR user@host:DST | innorix cp -r DIR name:host:DST |
rsync -av SRC user@host:DST | innorix sync SRC name:host:DST |
sftp batch script | innorix cp multiple lines or innorix sftp |
ftp batch script | innorix ftp compatibility mode |
To minimize script changes, use compatibility subcommands. They accept the argument structure of the existing commands.
- rsync -av --exclude='*.tmp' /data/out/ backup01:/backup/
+ innorix rsync -av --exclude='*.tmp' /data/out/ name:backup01:/backup/
You can transfer directly between remote devices without an intermediate server. If this path exists, it is one of the biggest benefits of the migration.
# before: download locally, then send again
scp remote1:/data/a.tar /tmp/ && scp /tmp/a.tar remote2:/incoming/

# after: a single hop
innorix cp name:remote1:/data/a.tar name:remote2:/incoming/
Option Mapping
Distinguish options that remain from those that are removed
| Category | Option | Action |
|---|---|---|
| Keep | -r · -a | Recursive |
| Keep | --exclude | Exclude patterns |
| Keep | --bwlimit | Bandwidth limit |
| Keep | --partial → --resume | Resume from the interruption point |
| Keep | -n · --dry-run | Dry run |
| Remove | -z | Handled by the transfer layer itself |
| Remove | -p · -o · -g | Follow the target device policy |
| Remove | -e ssh ... | Different transfer channel |
| Add | --encrypt | Encrypt the transfer path |
| Add | --verify sha256 | Compare checksums after transfer |
--delete is not supported. Because it deletes files from the target that are absent from the source, it must not be handled as a regular-expression replacement.
# before
rsync -av --delete /data/out/ backup01:/backup/
When this behavior is required, set the target policy to overwrite and separate stale-file cleanup into a task on the target device, or move it to sync automation so the server keeps both sides consistent. Review scripts containing --delete one by one.
Scripts and Scheduled Tasks
Keep exit-code branching and scheduled registration unchanged; change only the call site
The CLI also returns 0 on success and a nonzero value on failure. Existing branches continue to work as they are.
#!/bin/bash
set -euo pipefail

SRC=/data/report.pdf
DST=name:hq01:/incoming/

innorix login --non-interactive || exit 1

if innorix cp "$SRC" "$DST"; then
    logger -t send-report "Transfer complete"
else
    logger -t send-report "Transfer failed (code $?)"
    exit 1
fi
There is no need to change the if branches, set -e, or trap. Keep cron entries and systemd unit files unchanged and modify only one line inside the script.
The output format differs from the existing rsync -v output. If there is downstream processing that parses the logs, review it as well.
Validation and Rollback
Compare results with the existing method and prepare a rollback procedure
Before actually sending, confirm what will be the target.
innorix sync -n /data/out/ name:backup01:/backup/
Compare the output from existing rsync -n with the target list. If the counts differ, the exclude-pattern interpretation is different, so review the options again.
# send to both paths during the verification period
rsync -av /data/out/ backup01:/backup-old/
innorix sync /data/out/ name:backup01:/backup-new/

diff <(ssh backup01 'find /backup-old -type f -printf "%P %s\n" | sort') \
     <(ssh backup01 'find /backup-new -type f -printf "%P %s\n" | sort')
Do not delete the existing command from the migrated script; leave it as a comment.
# rsync -av --exclude='*.tmp' /data/out/ backup01:/backup/
innorix rsync -av --exclude='*.tmp' /data/out/ name:backup01:/backup/
For rollback, restore the commented line. Revoke keys last. If you revoke the keys first, rollback will not be possible.