Getting Started
Core Concepts
Transfer files directly to a designated workspace without a shared drive
Business files are created and used in a variety of locations, including personal PCs, servers, and project environments.
When files are needed by another person or for the next task, they may first be stored in a shared location and then prepared in the required work environment.
Workspace file transfer is a capability that directly connects the environment where files are located with the workspace where the actual business work is performed, so required files can be transferred immediately.
By specifying the files to transfer and the destination workspace, you can transfer files directly from where they were created to the workspace where they will be used.
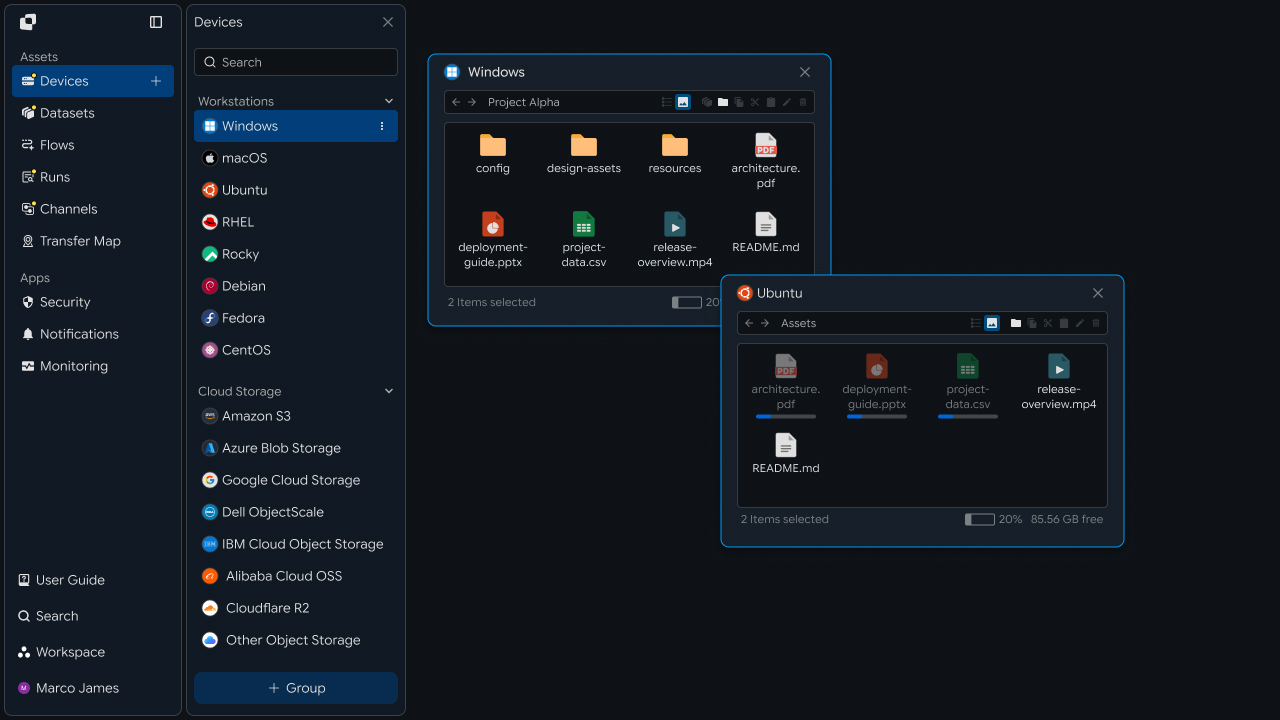
This lets you build a file flow that continues from file creation through reflection in the destination workspace and into the next task.
Transfer Flow
Continue from file selection through reflection in the destination workspace
Workspace file transfer checks the files to transfer, selects the destination workspace where they will be used, and transfers the files to the specified location.
Once the transfer is complete, review the file reflection status in the destination workspace and continue the required work.
① Select Files to Transfer
↓
② Select Destination Workspace
↓
③ Review Transfer Conditions
↓
④ Transfer Files
↓
⑤ Reflect Files in Workspace
↓
⑥ Review Results
This flow directly connects the environment where files are located with the workspace where they are needed.
You can select files in their current location and transfer them to the workspace where the actual work is performed, connecting file preparation through business use in a single flow.
Business Impact
Reduce repetitive work of downloading and uploading files again
When a file created in one work environment is used in another environment, using a shared location can add steps for storing and preparing the file.
For example, a person may create a result file on a PC, save it to a shared location, and have the next person repeatedly prepare the file in their own workspace.
With workspace file transfer, files can be transferred directly from their current location to the workspace where they will actually be used, reducing this file management process.
Before and After Transfer
| Category | Existing File Sharing | Workspace File Transfer |
|---|---|---|
| File Preparation | Save files to a shared location | Select files to transfer directly |
| Destination Selection | Review files in the shared location | Select the destination workspace directly |
| File Movement | Store and prepare files | Transfer directly to the destination location |
| Start Work | Start work after preparing files | Work with the reflected files |
In this way, workspace file transfer connects the workspace where files will actually be used as the transfer destination.
You can quickly select required files and transfer them to the designated workspace, naturally continuing from file preparation to the next task.
Business Teams
Select Workspace
Select the workspace where files will be used and transfer them
When transferring files, first select the workspace where the files will actually be used.
For example, you can send a completed report to the review team's workspace or immediately reflect processing results in a project-specific workspace.
After reviewing the files to transfer, select the required workspace and the location where the files will be stored.
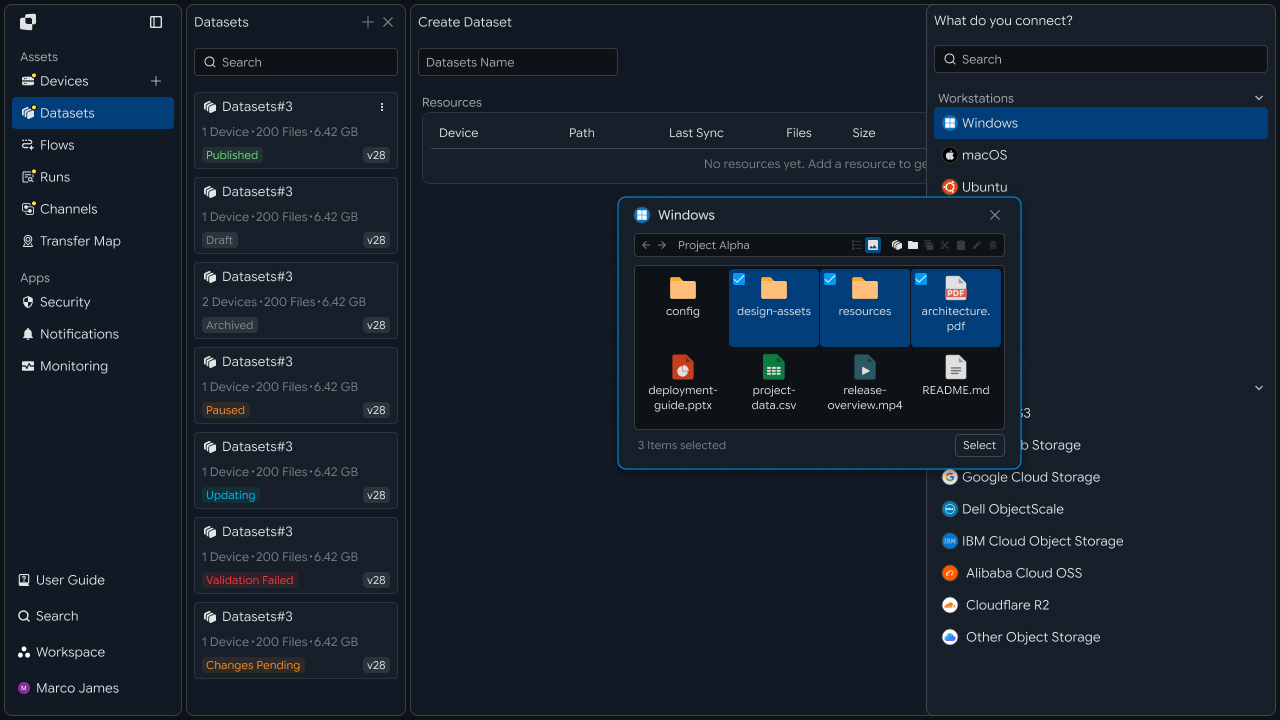
The destination is the workspace where files will be reviewed and used for the next task.
You can review the following items before transferring.
| Check Item | Details |
|---|---|
| Business Purpose | Confirm the work for which the files will be used |
| Workspace | Select the destination where files will be used |
| File Location | Review the location where files will be used within the workspace |
| Transfer Files | Select files needed for the current task |
After selecting the destination workspace and files and starting the transfer, you can send the required files directly to that work environment.
Transfer Check
Confirm that files have been properly reflected in the destination workspace
After starting a file transfer, review the current task progress and the file reflection result in the destination workspace.
For tasks in progress, check the transfer status; once the transfer is complete, the files can be used in the destination workspace.
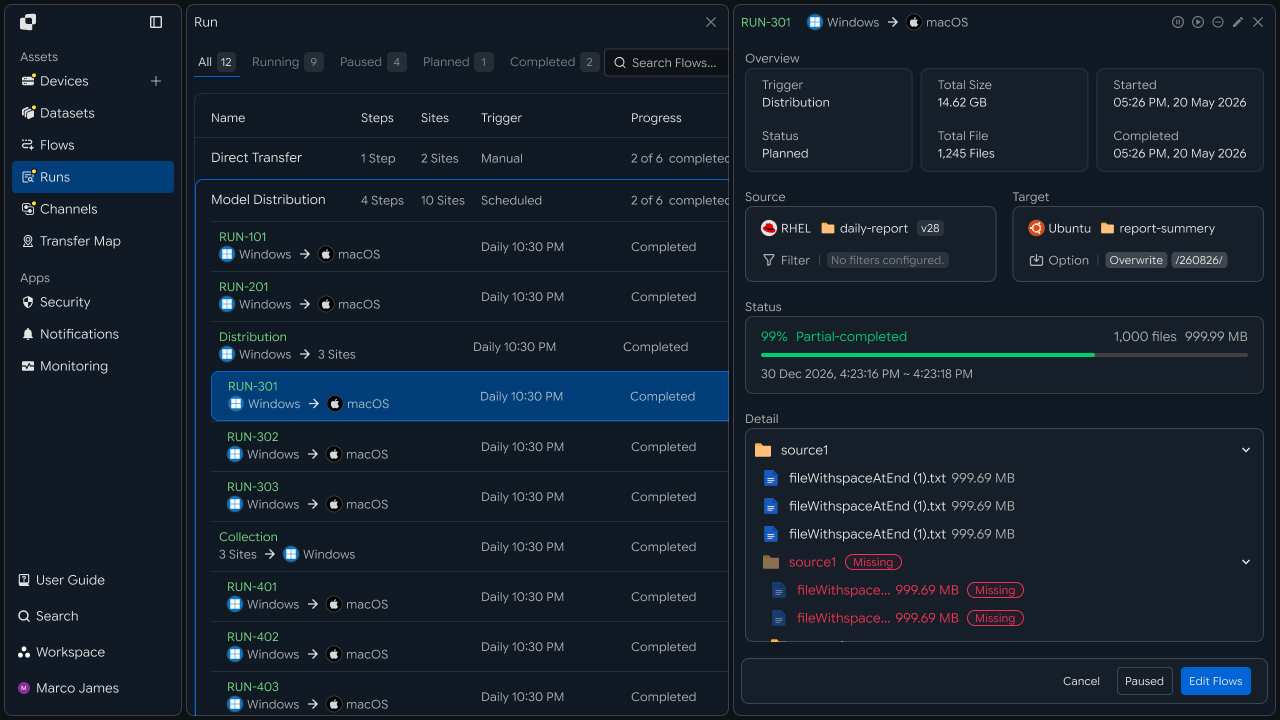
The flow from transfer through the next task is as follows.
Start File Transfer
↓
Check Transfer Progress
↓
Reflect in Destination Workspace
↓
Review Files
↓
Proceed to Next Task
The transfer result provides the following information.
Task status
Transfer progress
Number of transferred files
Total file size
Transfer start and completion time
Destination workspace
After the transfer is complete, review the file reflection status in the destination workspace and continue review, revision, or follow-up work based on those files.
IT Engineers
Environment Setup
Connect the transfer device and workspace and set the access scope
To configure workspace file transfer, first connect the device where the files are located to the destination workspace.
On the Source device, you can review and read the files to transfer; in the destination workspace, configure the access scope so transferred files can be reflected in the specified location.
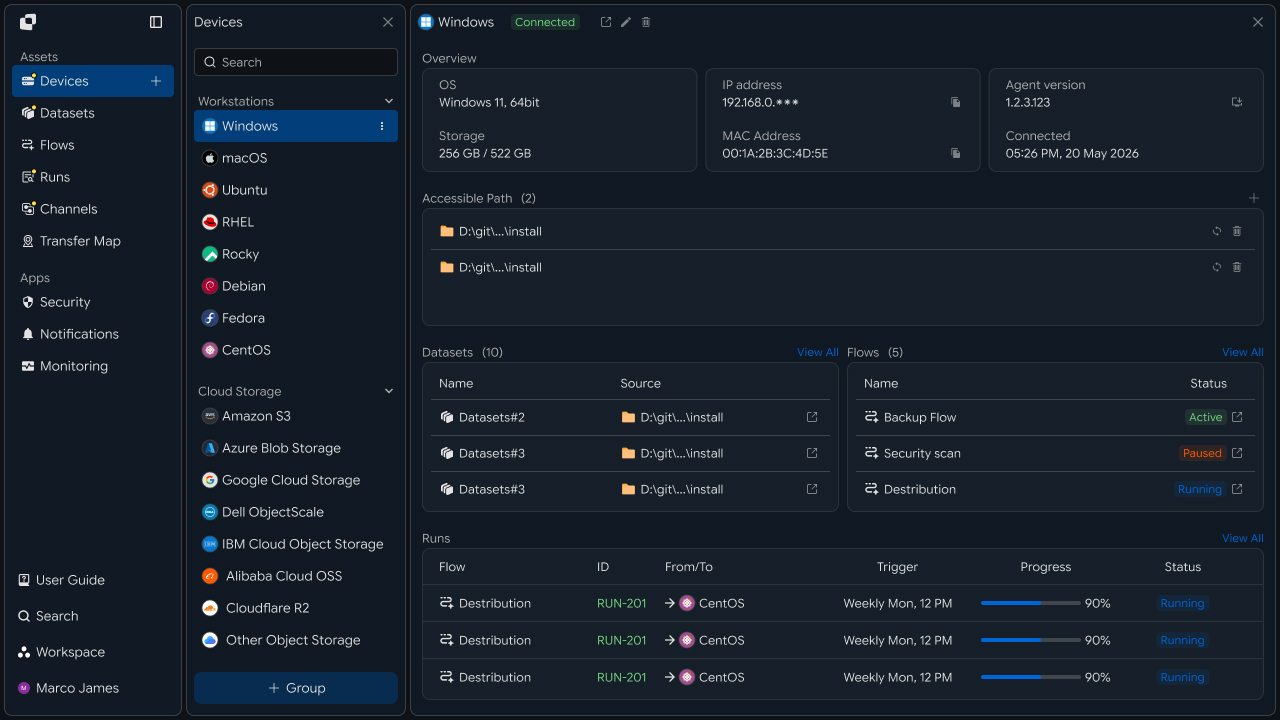
Prepare the following access scopes in the transfer environment.
| Category | Required Access Scope |
|---|---|
| Source Device | Review and read files to transfer |
| Destination Workspace | Store and reflect files |
| User | Review and run transfer tasks |
| Operator | Manage the connection environment and transfer settings |
After connecting the device and destination workspace, configure the file path and destination location used for the actual transfer.
This makes it clear which files from which location will be transferred to which workspace.
Transfer Configuration
Define the files to send, destination location, and execution conditions
Once the environment is configured, set the files to transfer, the destination location, and the conditions that start the task.
In the transfer settings, specify the Source and Target and configure file paths, filters, and execution conditions according to the business flow.
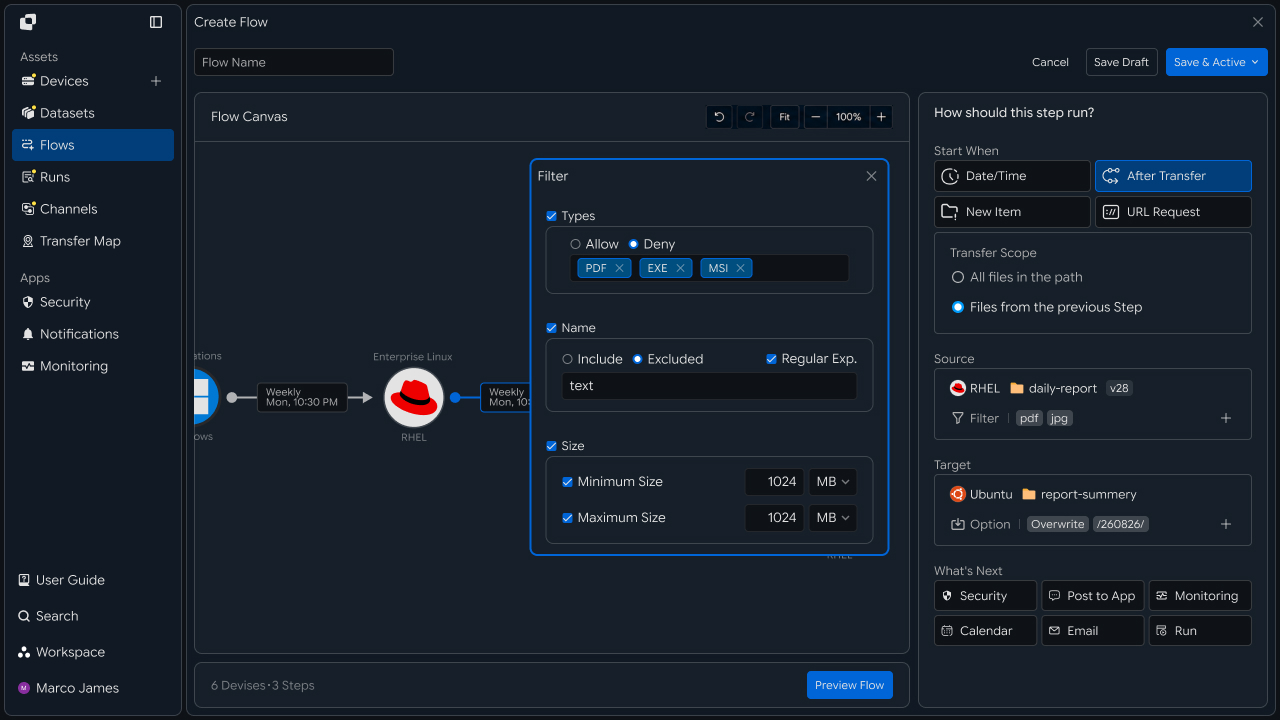
First, specify the path where the files to transfer are located in Source.
For example, you can configure files created in /data/report/daily as transfer targets.
When needed, select files to transfer based on file name, extension, or path conditions.
In Target, specify the workspace to which the files will be transferred and the actual location where they will be reflected.
File transfer tasks can start under various conditions depending on the business process.
Date/Time: Transfer at the specified date and time
After Transfer: Transfer after the previous task completes
Sync: Transfer based on file changes
URL Request: Transfer through an external request
By setting the files, destination location, and execution conditions, you can configure the entire process from when the files are ready through reflection in the destination workspace as a single transfer task.
Flow Configuration
Connect the device containing the files directly to the destination workspace
After configuring the transfer, connect Source and Target in the Flow to build the complete file transfer path.
Source provides the files to transfer, Flow processes them according to the configured conditions, and Target reflects the files in the specified location of the destination workspace.
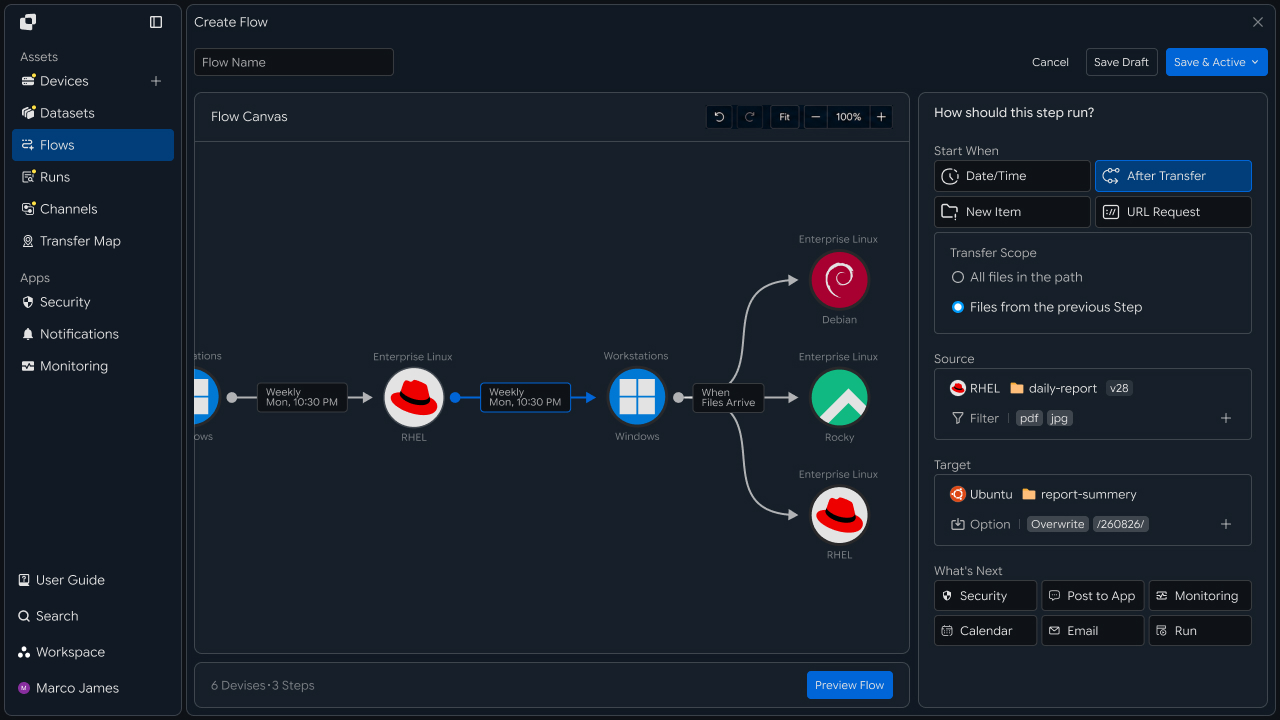
The basic transfer structure is as follows.
Source Device
     │
     │ Files
     ▼
Transfer Flow
     │
     ▼
Workspace
     │
     ▼
Target Path
After reviewing the required files in Source, transfer them to the destination workspace through the configured Flow and reflect them in the specified location.
Depending on the business environment, you can also transfer files from multiple devices to one workspace or branch files from one Source to multiple workspaces.
Automation Connection
Connect the next task and external services after transfer completion
After a file transfer is complete, connect the required tasks so the workflow can continue automatically after the files are reflected in the destination workspace.
For example, when a result file is reflected in the workspace, you can start the next processing task or send a completion notification to the responsible person.
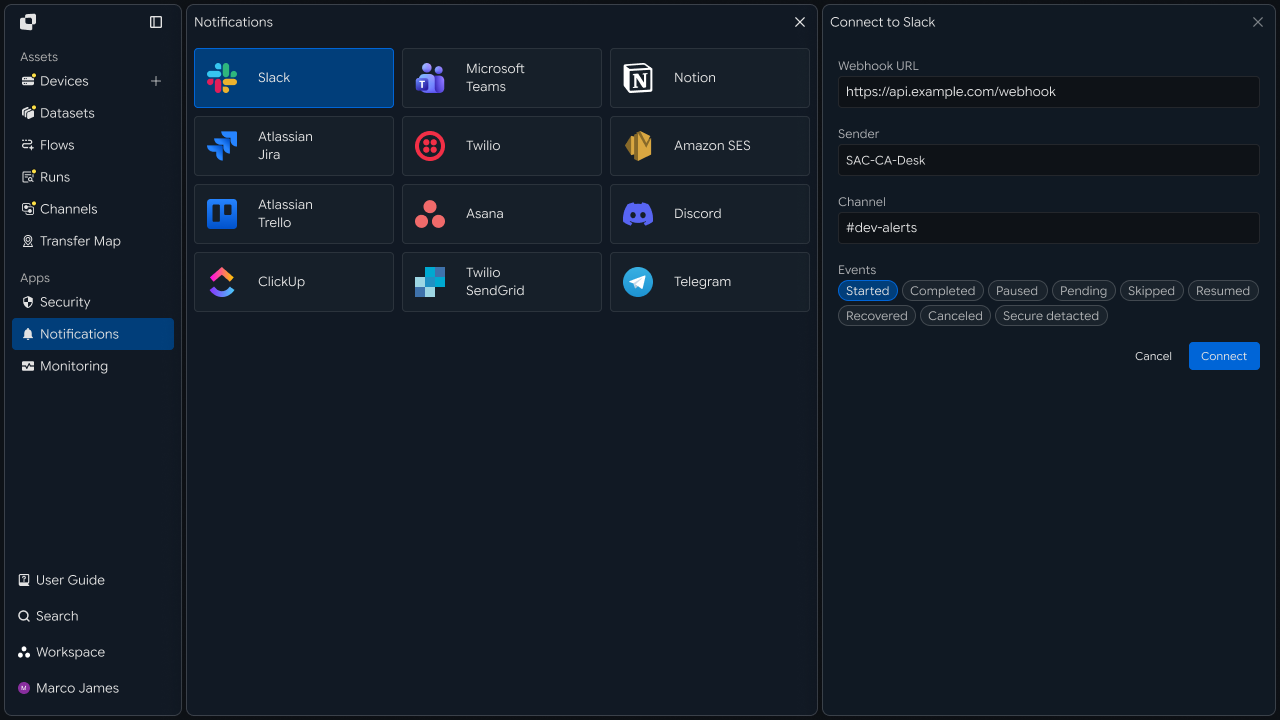
The basic automation flow is as follows.
File Transfer
↓
Workspace Reflection
↓
Confirm Transfer Completion
↓
Run Follow-up Task
↓
Review Results
You can also connect file transfer results to external services when needed.
| Integration Area | Use |
|---|---|
| Business · Collaboration | Transfer completion notifications and follow-up task connection |
| Monitoring | Review transfer status and execution results |
| Security | Review the file transfer environment and related events |
For example, you can notify users of transfer completion through a collaboration tool and start the next task in a business management system.
You can also connect to a monitoring environment to review transfer status and, when needed, integrate with a security system to manage the file usage environment together.
This creates an automation flow centered on file transfer that connects file preparation → workspace reflection → notification → follow-up task → operational review.
Review Results
Review transfer status and per-file processing results
When a transfer task runs, review the current progress and overall processing result in Runs.
In the execution list, you can compare the status of multiple transfer tasks, and when you select a specific task, review the Source and Target, transfer volume, progress, and per-file processing results.
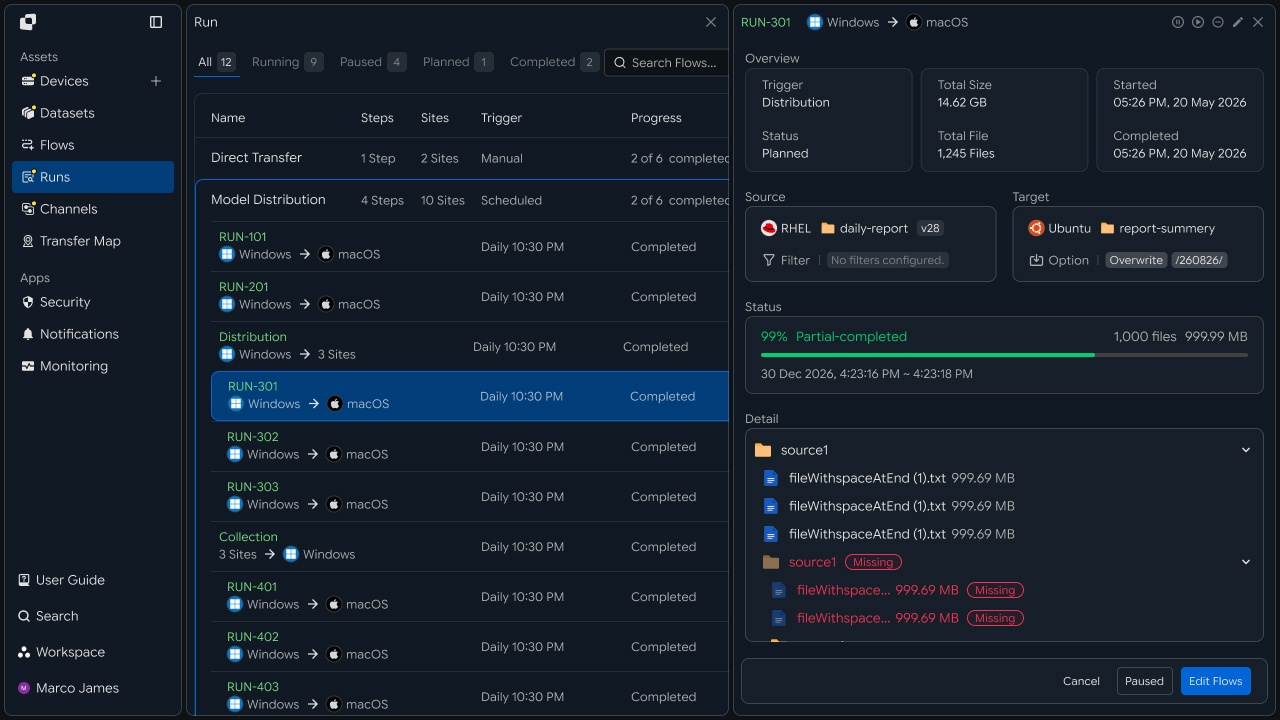
Each Run provides the following information.
| Check Item | Details |
|---|---|
| Source | Device and path from which files were transferred |
| Target | Workspace and location where files are reflected |
| Total Size | Total transfer size |
| Total Files | Number of target files |
| Progress | Current transfer progress |
| Status | Task completion and progress status |
| Started | Task start time |
| Completed | Task completion time |
The transfer result lets you confirm the file reflection status in the destination workspace.
For tasks in progress, review the current processing status; when files require additional review, use the detailed result to inspect the relevant items.
Incident Response
Review the transfer environment and rerun required tasks
When a file transfer requires additional review, use the Run details to identify the task's processing status and where the issue occurred.
Then review the connection status between Source and Target, file paths, access permissions, and take the required action before rerunning the task.
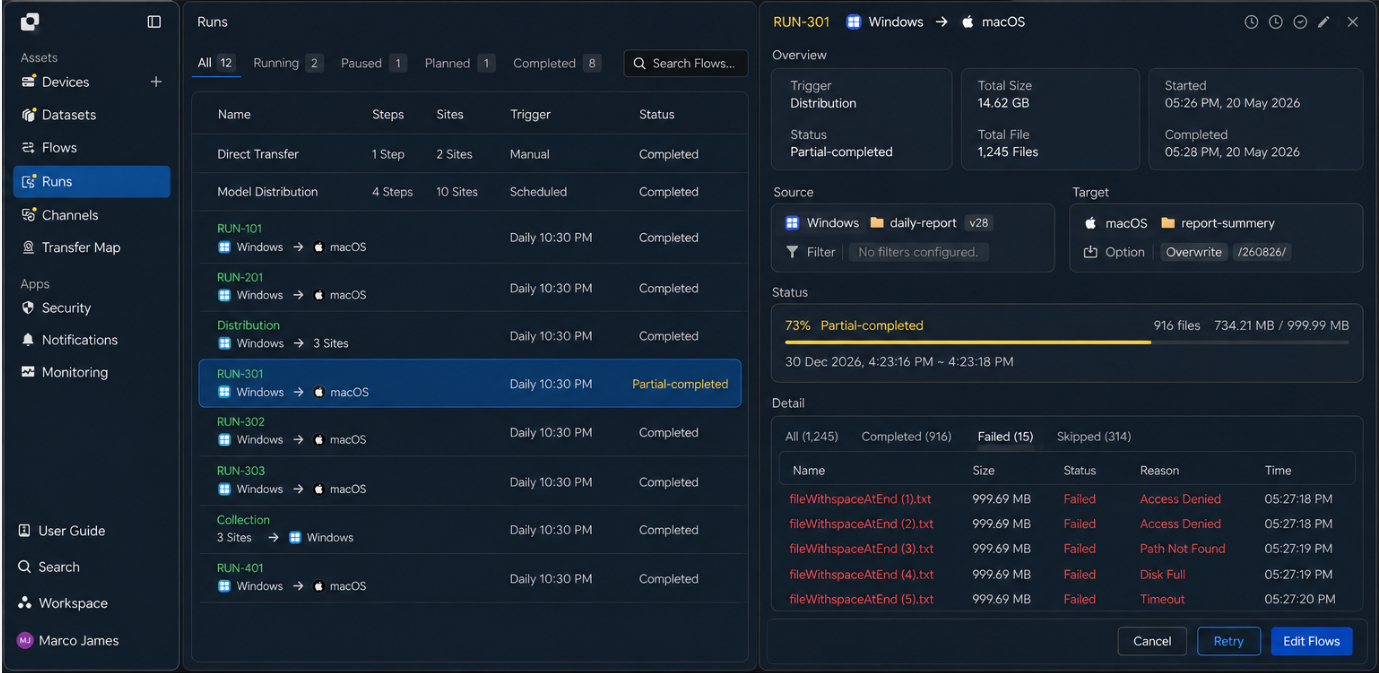
Incident response can follow the flow below.
Review Run
    ↓

View Details
    ↓

Review Source
    ↓

Review Target
    ↓

Review Path and Permissions
    ↓

Adjust Environment
    ↓

Retry
    ↓

Create New Run
    ↓

Confirm Reflection in Destination Workspace
    ↓

Completed
Review the following items together when checking the transfer environment.
| Check Item | Details | Follow-up Task |
|---|---|---|
| Device Connection | Source system connection status | Check connection status |
| Destination Connection | Workspace access status | Review destination environment |
| File Path | Source and Target paths | Run after adjusting paths |
| Access Permissions | File read and save permissions | Review permission settings |
| File Status | Information about target files | Review file status |
| Execution History | Run details and activity records | Adjust the execution environment |
For example, you can review the Source file information or adjust the Target storage location, then rerun the task.
After rerunning, use the new Run to confirm that the files have been properly reflected in the destination workspace.
Through this process, you can manage the transfer environment and file processing status step by step and operate the file transfer flow from Source to the destination workspace reliably.